Send an Approval Email in Table Format with an Attachment Using the Approval Action

Businesses can use an approval process to assess, approve, and review specific actions, choices, or requests. The purpose of an approval process is to guarantee that decisions or activities meet required standards, adhere to guidelines, and obtain the necessary authorization before moving forward or being accepted.
In this article, I will show you how to send an approval email in a table format, send an approval email with attachments, prevent an infinite loop from the trigger, update the SharePoint list with the approval outcome, and send the result of the approval email to the individual who initiated the request. These types of attachment file formats in the email can be an image, Excel document, Word document, presentation slides, or PDF file.
What Is an Inventory Restock Approval Process?
The inventory restock approval process is designed to ensure that a series of steps are carried out and completed before placing a new order or restocking existing products that are currently out of stock.
This process is taken to ensure that the inventory process is tracked closely, and well recorded without errors and mistakes, and to avoid excess goods. The figure below shows what the approval email at the end of the process looks like.

Use Case: Inventory Restock Approval Process
Let me explain the sample scenario I’ll use to help you better understand the approval process.
The scenario includes a SharePoint list named Product Request to help keep track of all the activities concerning restocking in ABC company (which is a furniture and electronics company). When a new product or an existing product restock request is made, an approval request is sent out to the sales manager to go through the invoice and the data who then determines the next step.
Disclaimer: This is not an actual company, but a scenario I created to show you how the approval process works with the Approval action in Power Automate.
I will walk you through each step in the flow:
- Create the automated cloud flow.
- Pick up the attachment in the SharePoint list as an email attachment for the approver email.
- Create a table format for the approval email using the approval action.
- Create the approval email using the approval action in Power Automate.
- Introduce the table format in the Start and wait for an approval action.
- Send an email with an attachment using the Start and wait for an approval action in Power Automate.
- Update the SharePoint list with the approver’s response.
- Stop the trigger from an infinite loop.
- Email the sales team with an update on the approval request.
- Common errors in the flow and how they were fixed.
Create the Automated Cloud Flow
In this step, I’ll show you how to create the Power Automate cloud flow and select the trigger for the flow using an automated cloud flow. An automated cloud flow is when an activity must happen for the flow to be triggered; here, in this scenario, an item must be added to the SharePoint list for the flow to start running. Follow these steps:
1. Go to the Power Automate Portal.

2. At the left-hand side of the screen, click on Create, as shown in figure 2. Next, select Automated cloud flow.

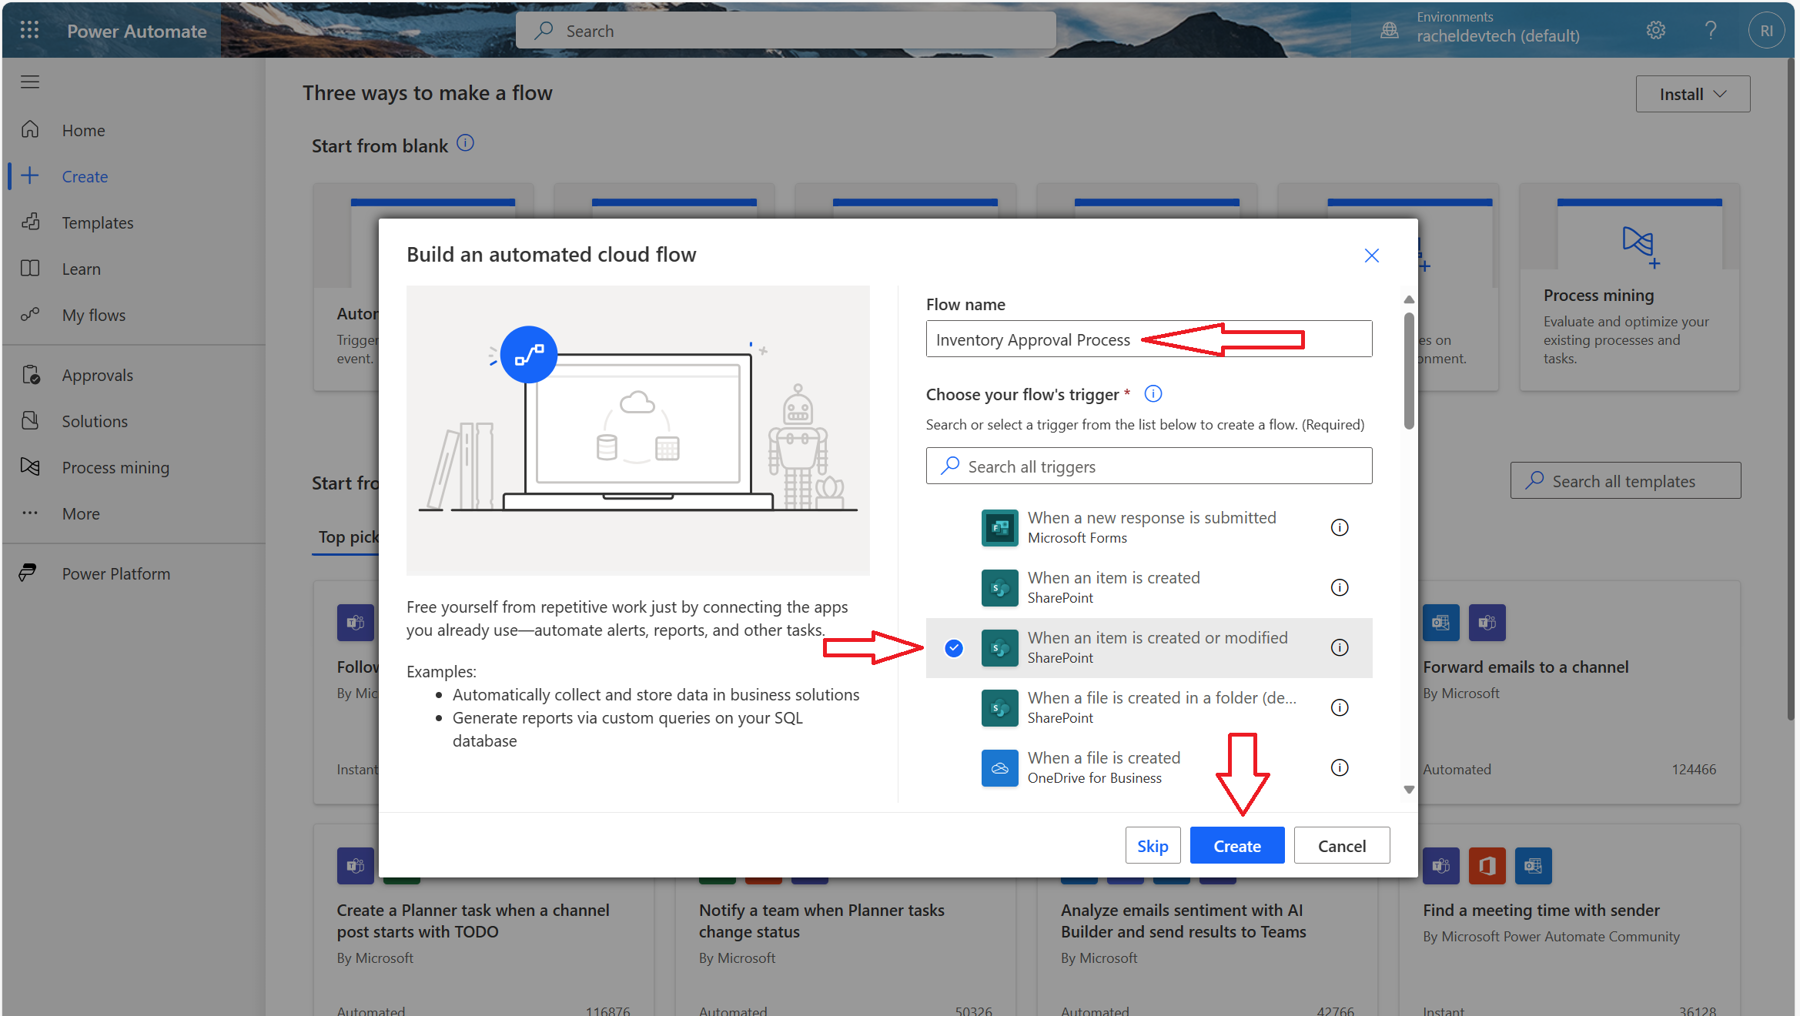
3. On the Flow name, give the flow a name (a name you can use to identify what the flow is about), as shown in figure 3. From the list of triggers, select the trigger named When an item is created or modified. Click on Create.

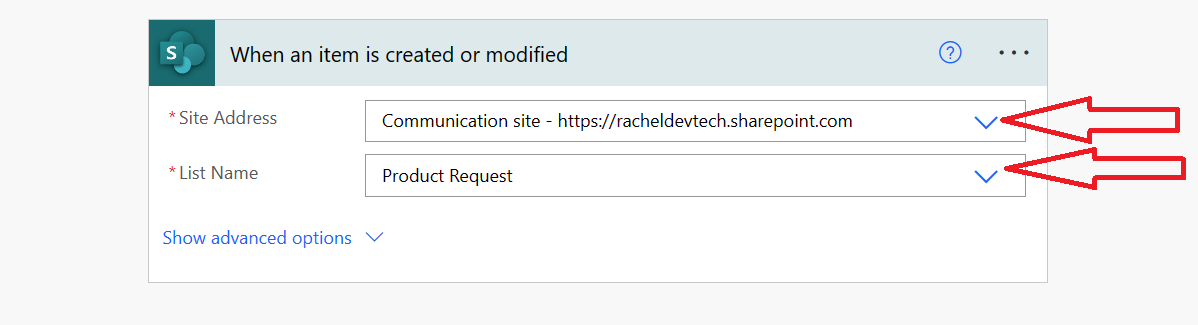
4. Figure 4 shows two required properties that you must set for the trigger named When an item is created or modified. Select your SharePoint Site and SharePoint list by where you see the Site Address, then for List Name, select your SharePoint list.

Pick the Attachment in the SharePoint List as an Email Attachment for Approval Email
The information and invoice of a restock request are saved in the SharePoint list called Product Request. In this step, I will show you how to enable the flow to pick up the invoice attachment in the SharePoint list to be attached to the approval email.
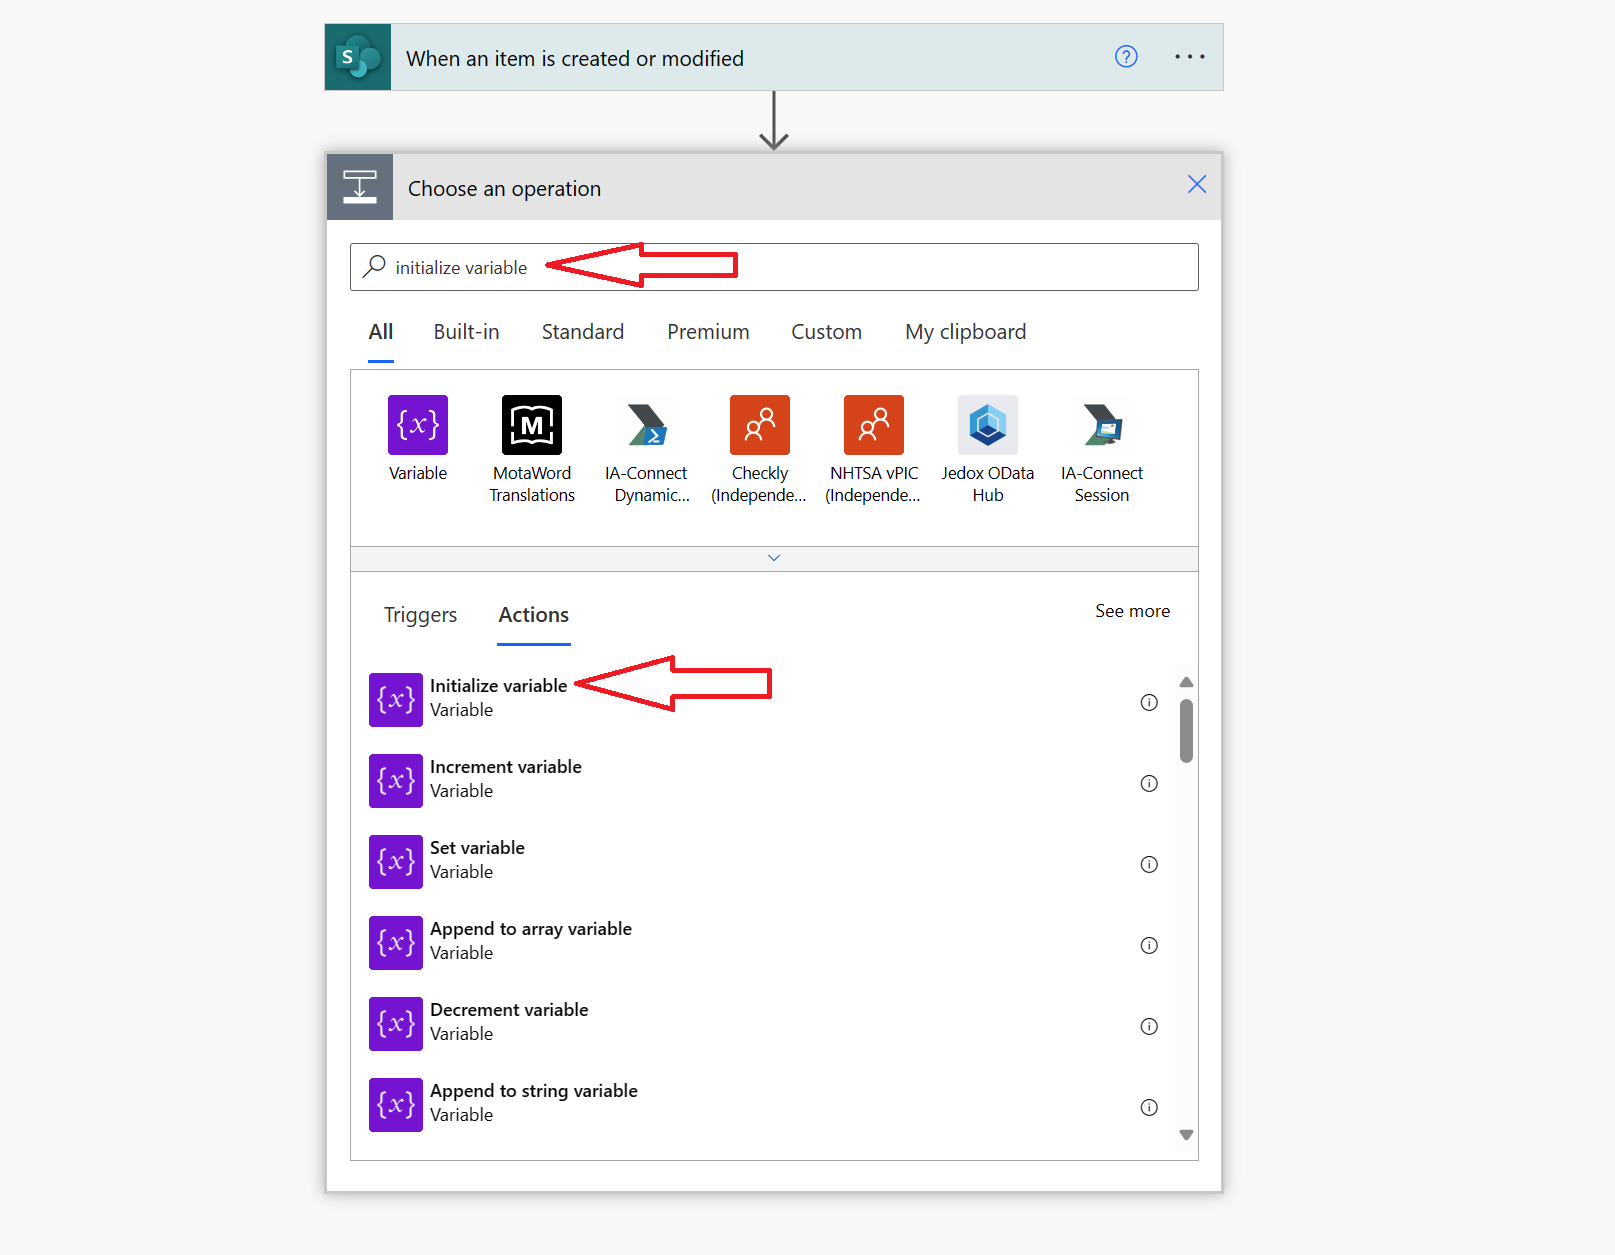
1. Click on the + New step. Search and add the action, Initialize variable as shown in figure 5. On Name, (figure 6) give your variable a name. I will name the variable Add Attachment (figure 6). On Type, select Array as the variable type.


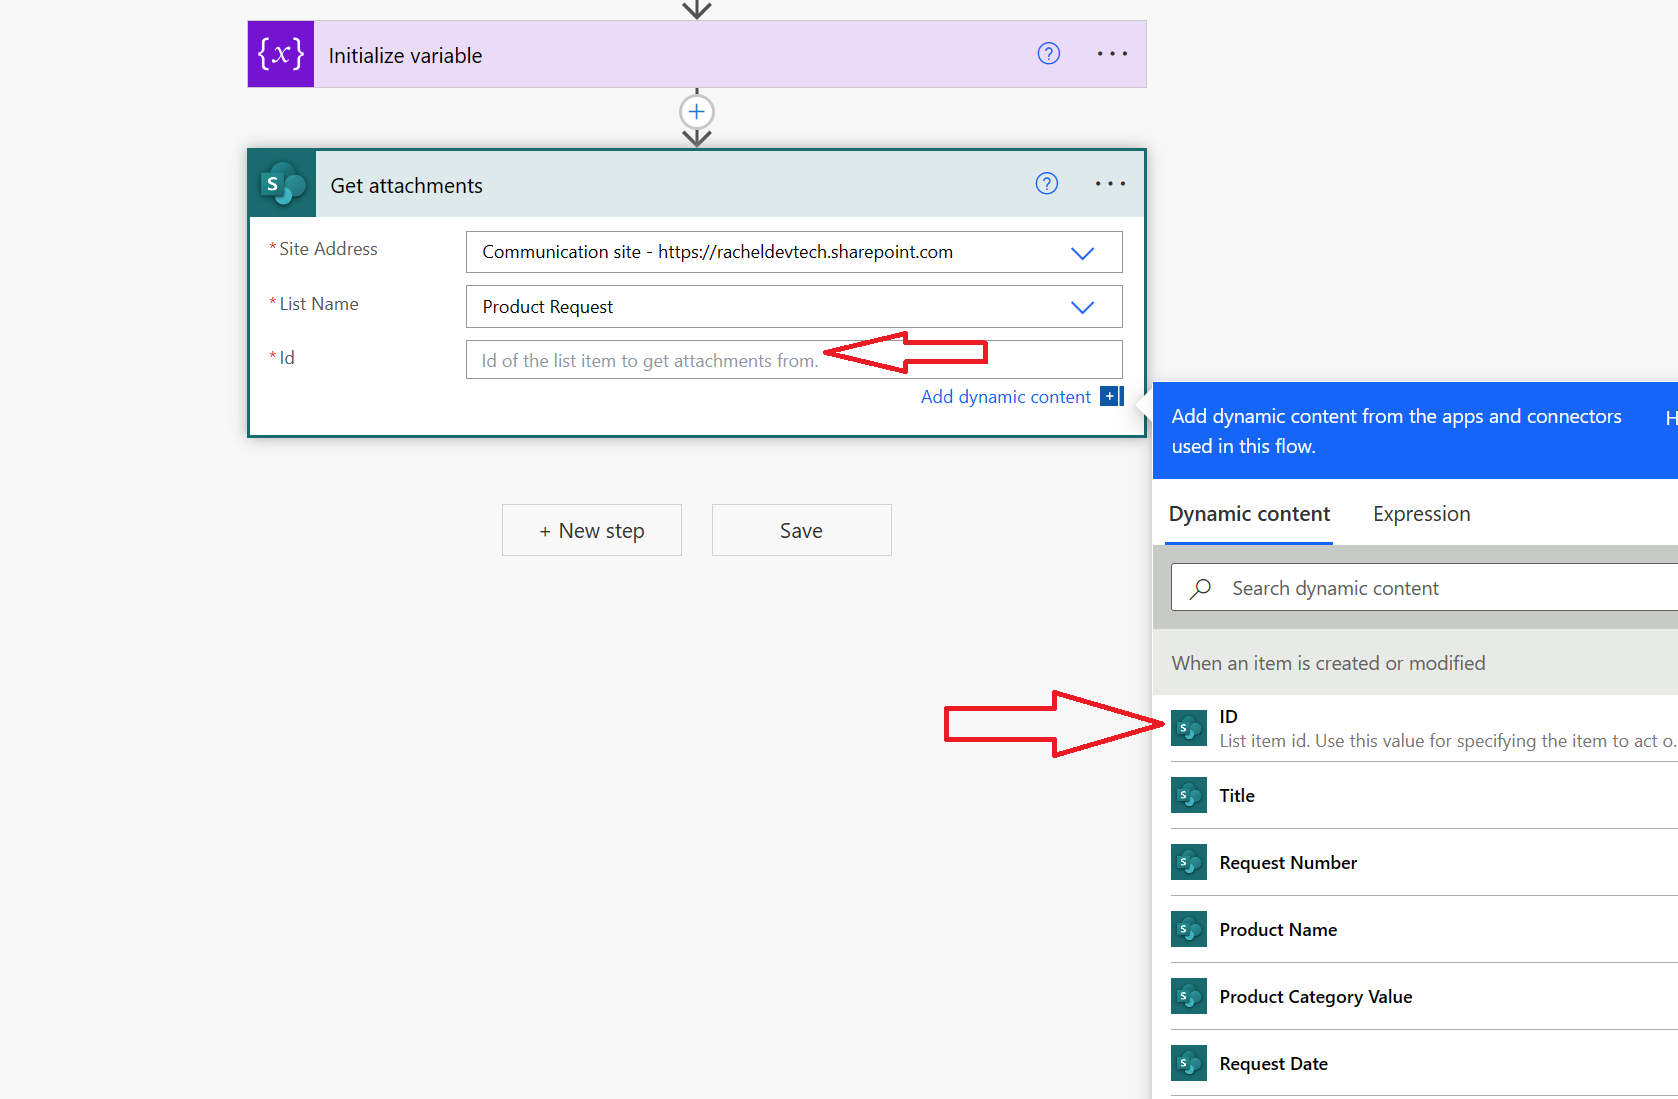
2. Add an action to the flow by clicking the + New step. Search and add the action named Get attachments as shown in figure 7. On the Site Address of the action (figure 8), select your SharePoint site. On List Name, select your SharePoint list. Next, on id, choose the ID from the dynamic content, as shown in figure 9.


If figure 10 you can see that the ID from the dynamic content is connected as the Id of the Get attachments action.

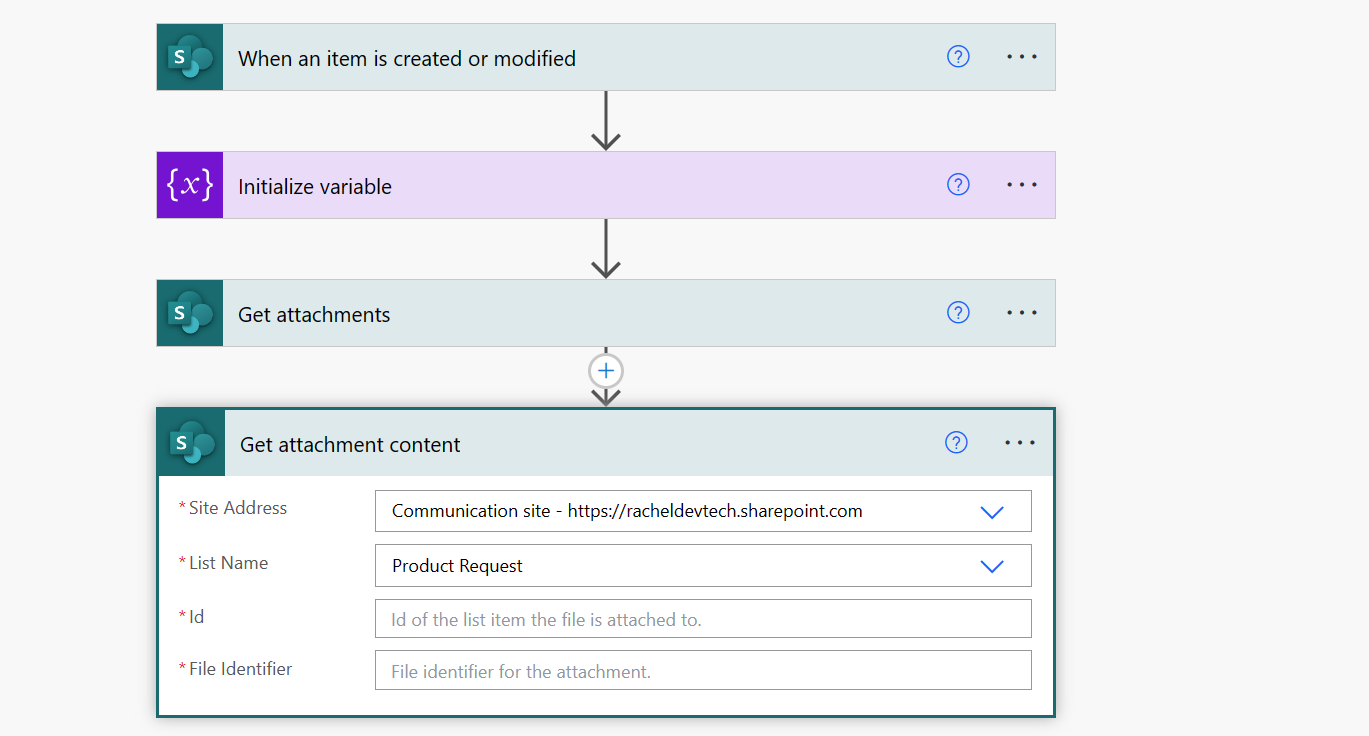
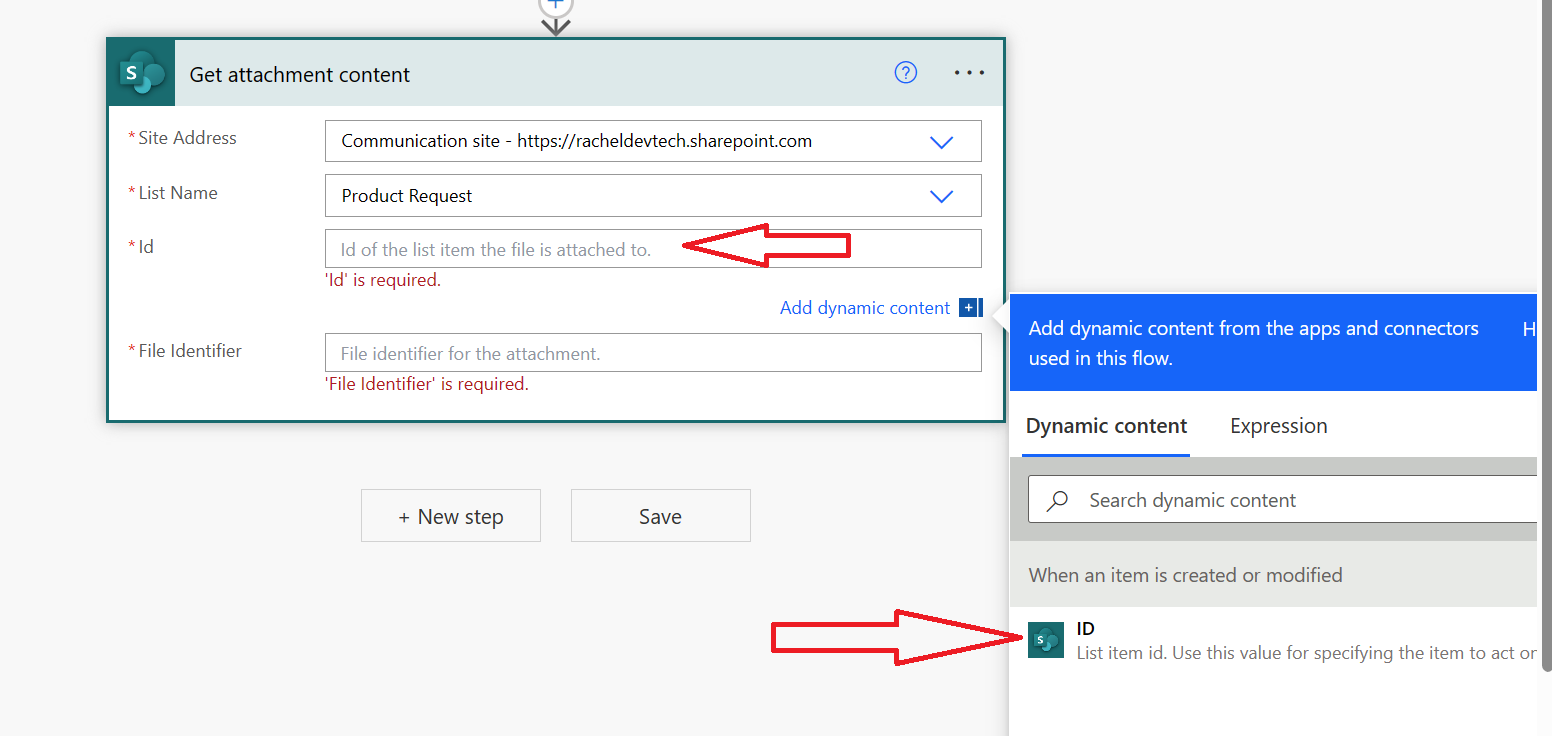
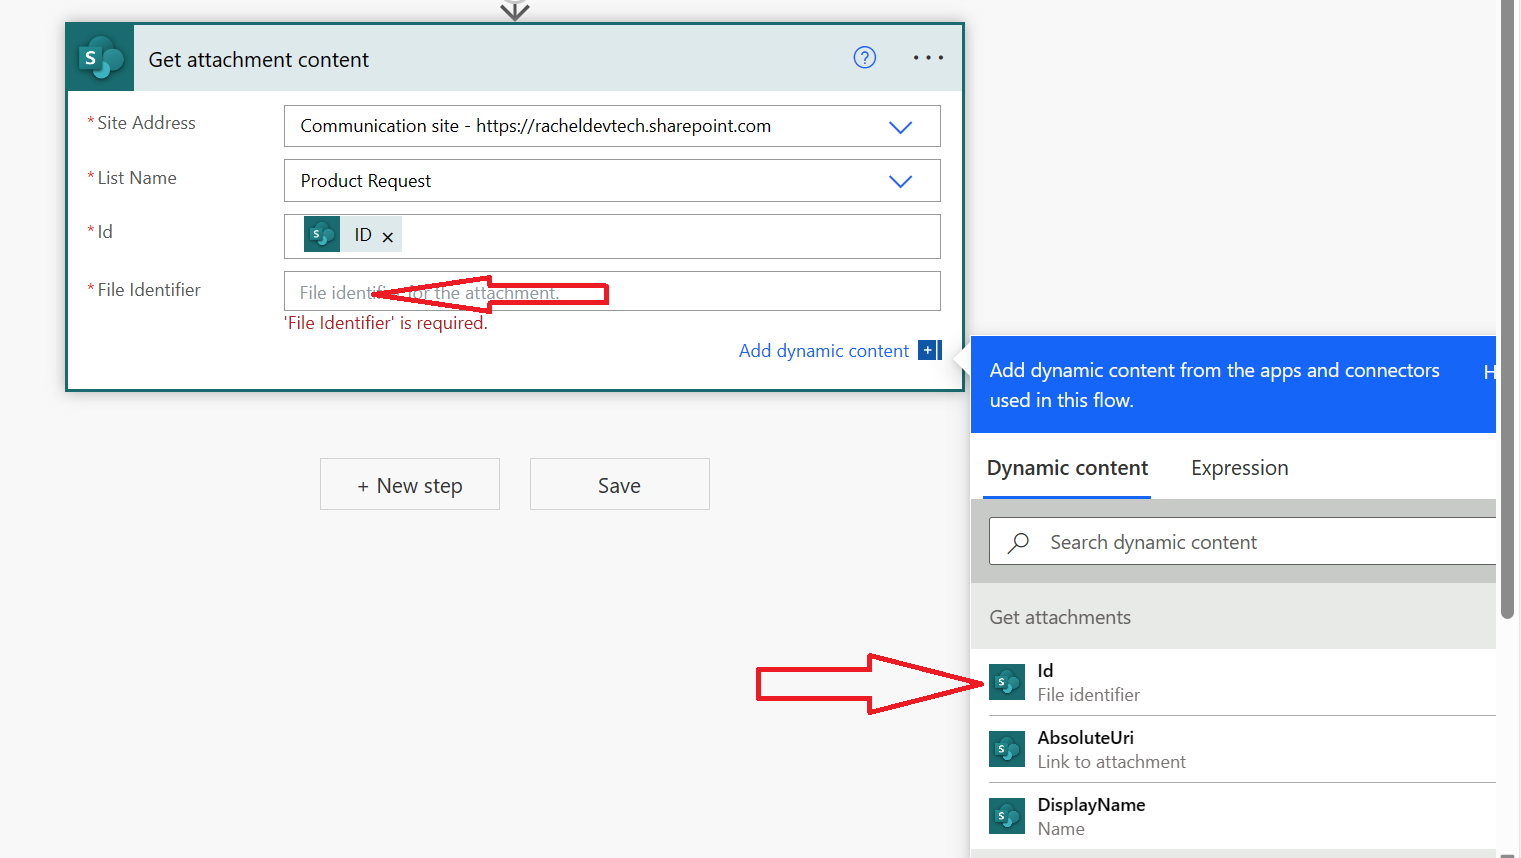
3. Next, click on + New step. Search and add the Get attachment content action (figure 11). On the Site Address, select your SharePoint site (figure 12). On List Name, select the SharePoint list. On id, in dynamic content, choose the id coming from the trigger (figure 13), when an item is created or modified. On the File identifier, choose the id of the Get attachment action in the Dynamic content (figure 14).
Note: When the File identifier column is selected in the dynamic content for the Id field in the action Get attachment content as shown in figure 13 and figure 15, the Apply to each action is automatically added to the flow.


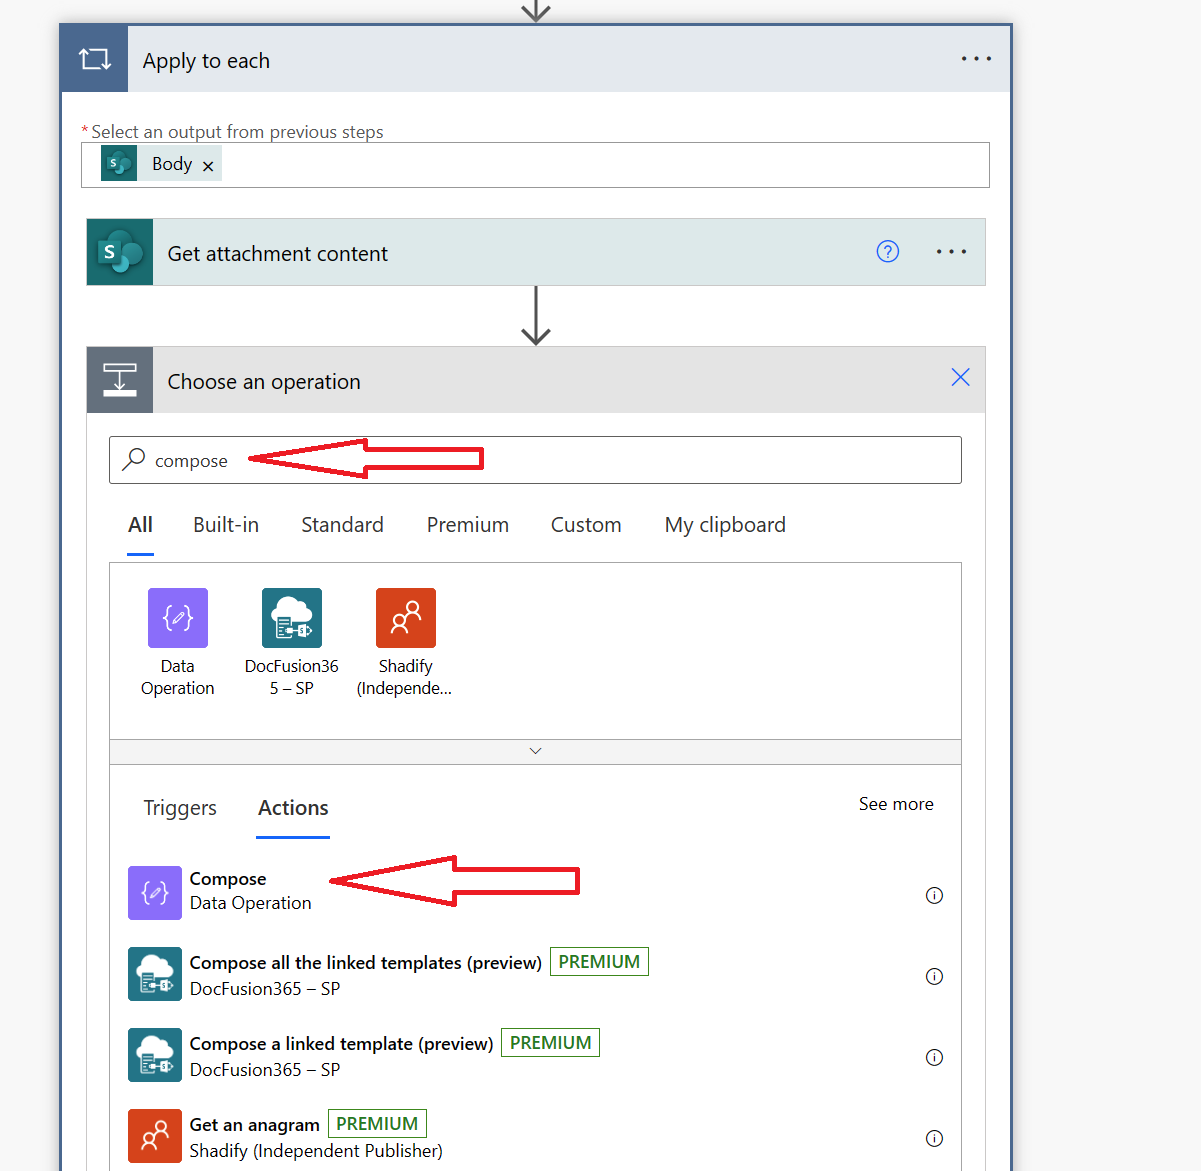
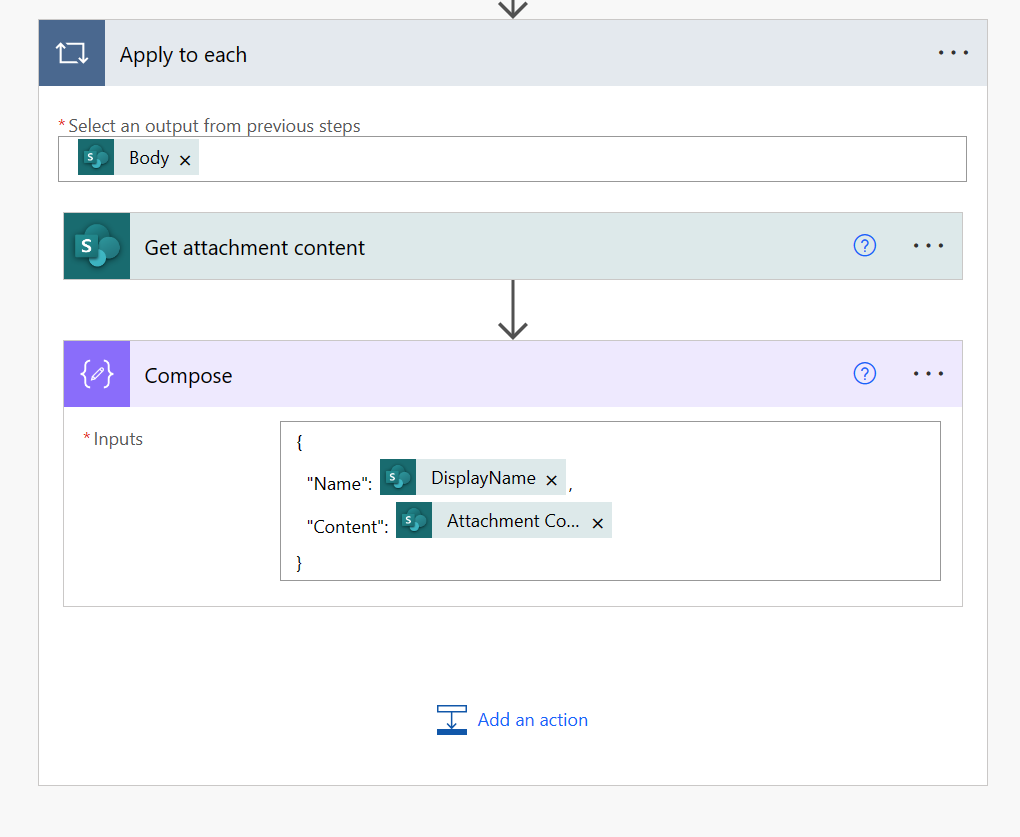
4. In the Apply to each action, click on Add an action (figure 16). Search and add the Compose action (figure 17).


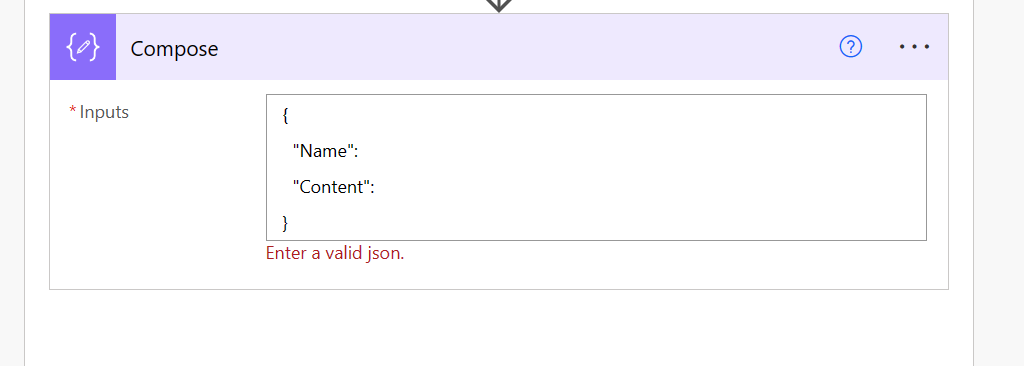
5. In the Compose action, copy, and paste the text below, shown in figure 18.
{
"Name":
"Content":
}
6. Now, I’ll make a few changes to the text in the Compose action.
For the Name object, select DisplayName from the Dynamic content (this is coming from the Get attachments action) as shown in figure 19. At the end of dynamic content, Display name, add a comma.
For the Content object, select the Dynamic content Attachment content (this comes from the Get attachment content action).

7. In the apply to each action, click on Add an action. Search and add the action named Append to array variable (figure 21).

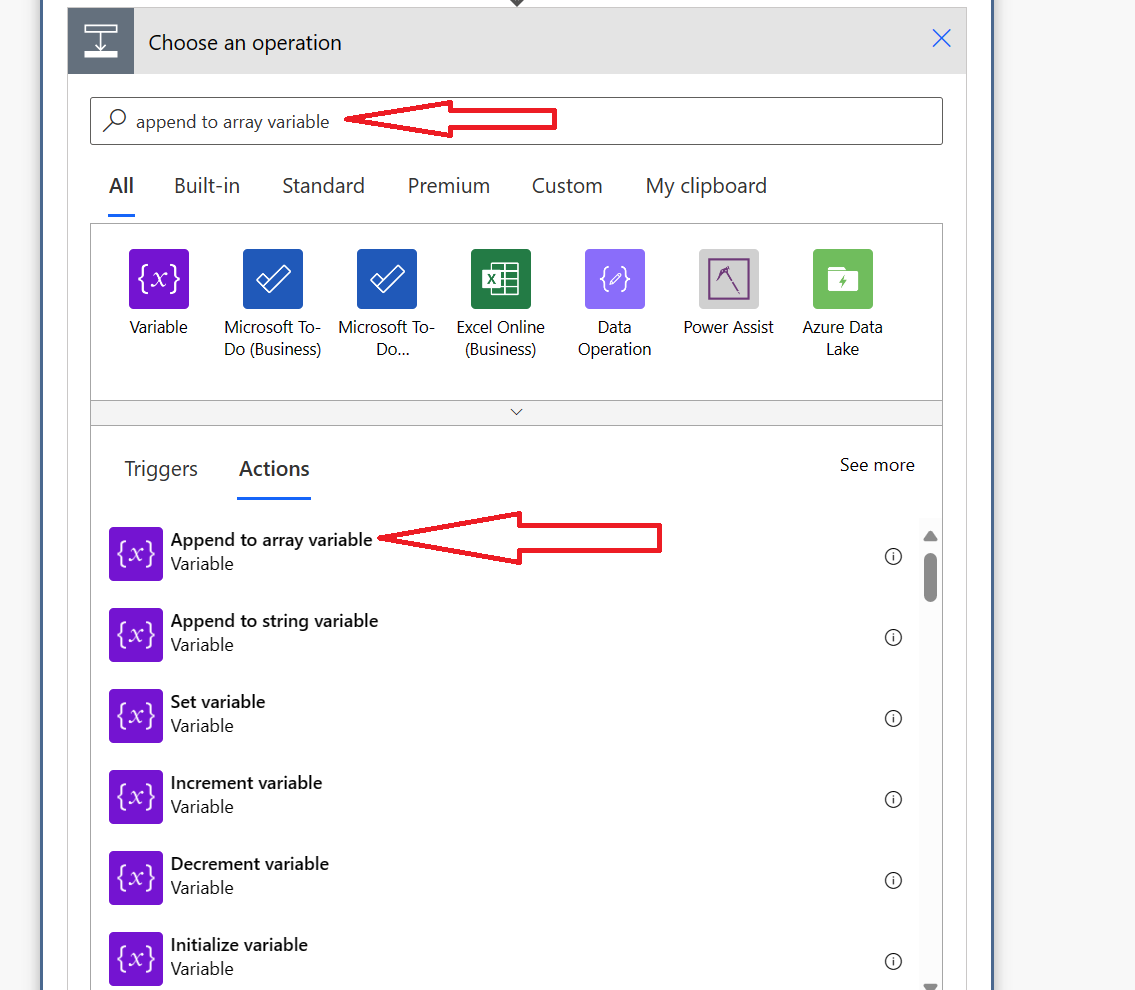
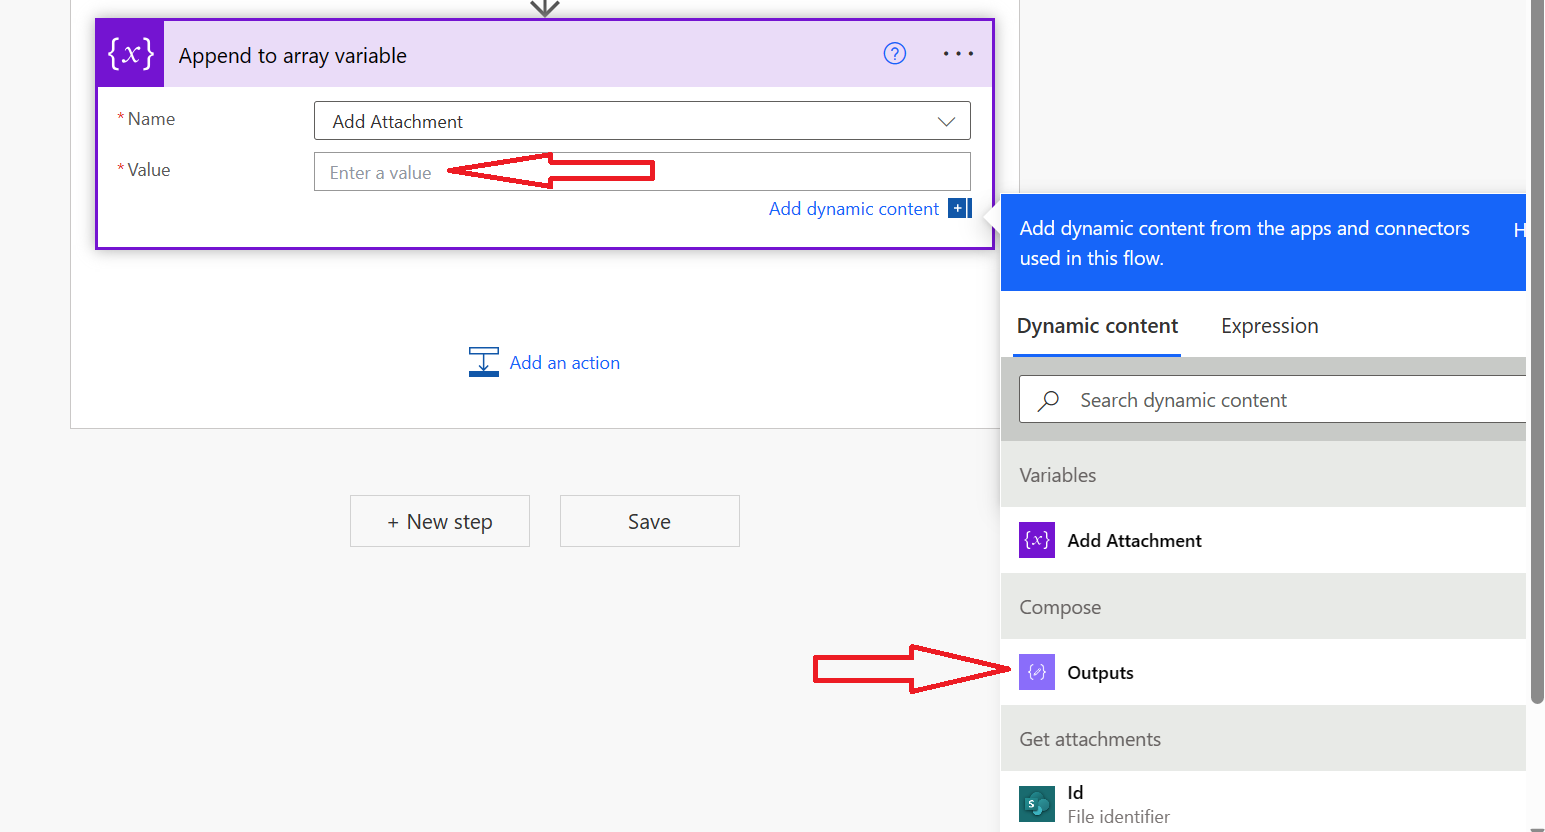
8. In the Append to array variable (figure 22) on Name, click on the drop-down and select the Add Attachment coming from the Initialize variable. On Value, go to the dynamic contents and choose the output of the Compose action (figures 23-24).


Create a Table Format for the Approval Email Using the Approval Action
In the approval email, some of the information from the approval request will be presented in a tabular format to help make it more structured and easier for the approver to read. One thing to understand here is that using the tabular format in the approval email is not required; the approval email can include text and the use of dynamic content (dynamic content in Power Automate allows users to select columns and variables coming from actions and triggers in the Power Automate flow). Let’s go ahead and work on the table format:
1. Outside the Apply to each action, click on + New step. Search and add the data operation action named Select (figure 25). In the Select action (figure 26) you must enter From (source) and Map information (which will be dynamic values).

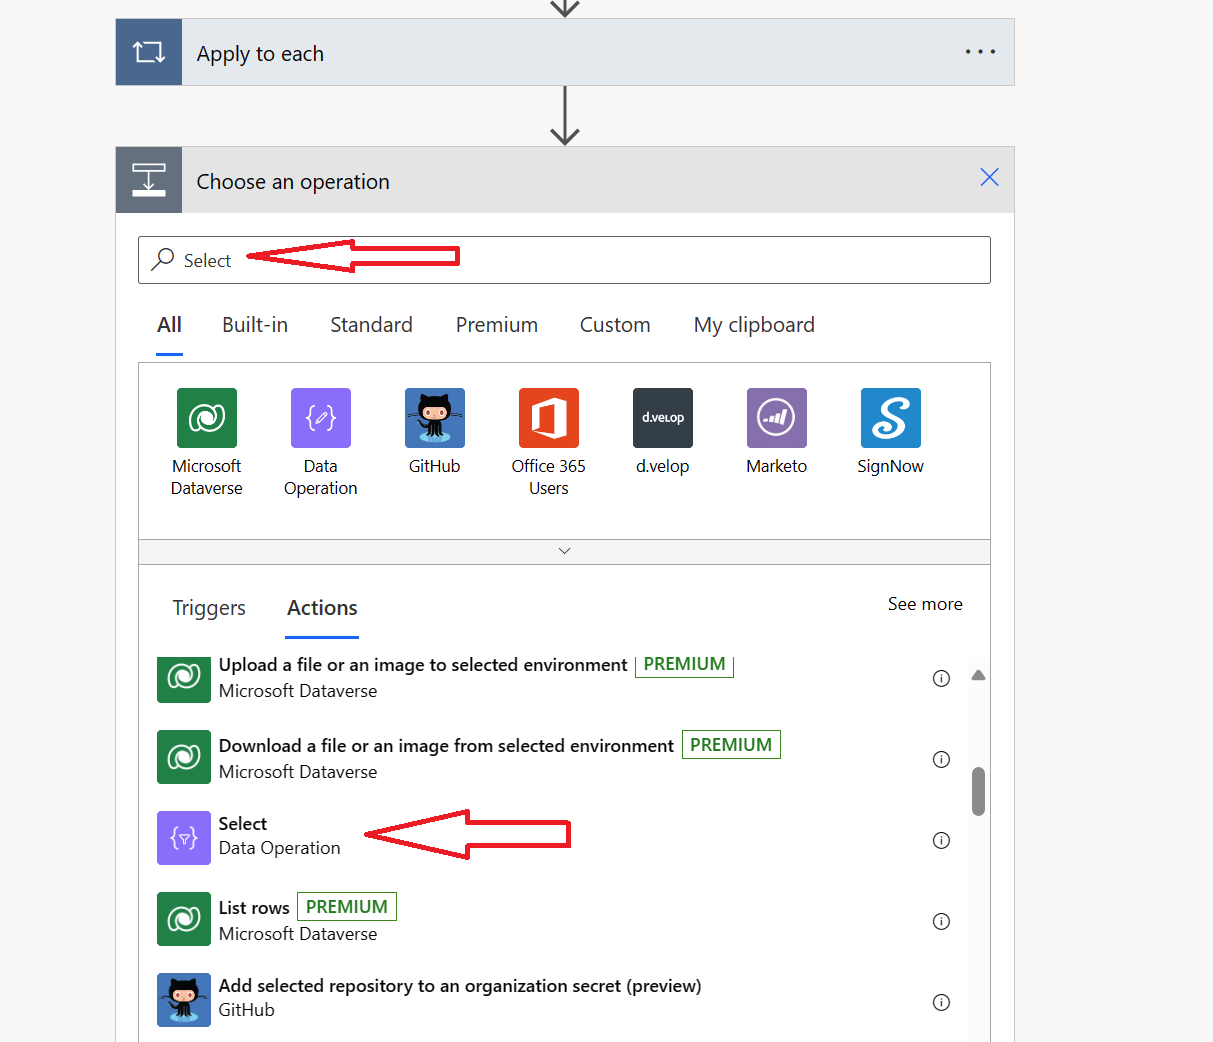

2. Add dynamic contents in the Select action, as shown in figure 27. For From, enter an opening and closing square bracket, in the middle of the square bracket, choose body from the dynamic content (body is coming from the flow's trigger which is when an item is created or modified) For Mapping, it has two sides. The left side is meant for the column names in the table, and the right side is for the rows in the table.
Here, the Select action is used to create a table, and tables contain columns and rows, as shown in figure 27. The Select action properties includes a Map object that lets you specify names (essentially labels) you want to show in your table; these names are from the columns in your SharePoint list.
The right side of the Map object shows where the values are coming from as dynamic content. The approval email includes dynamic values from the SharePoint list for Request Number, Product Name, Product Category, and Request Comment. You’ll see these in the approval email later in this article.

3. At the top right side of your screen click on Save (figure 28) or below the Select action click on Save. Now go ahead and run the flow by adding items (entries of data of a specific line of record) to your SharePoint list. Here I will be adding records/items to the Product Request SharePoint list. Remember the trigger of this flow is When an item is created or modified so you need to add data to the SharePoint list for the flow to run.

4. Check the flow we just ran by going to the run history and clicking on the last run flow. Scroll down and click on the Select action.


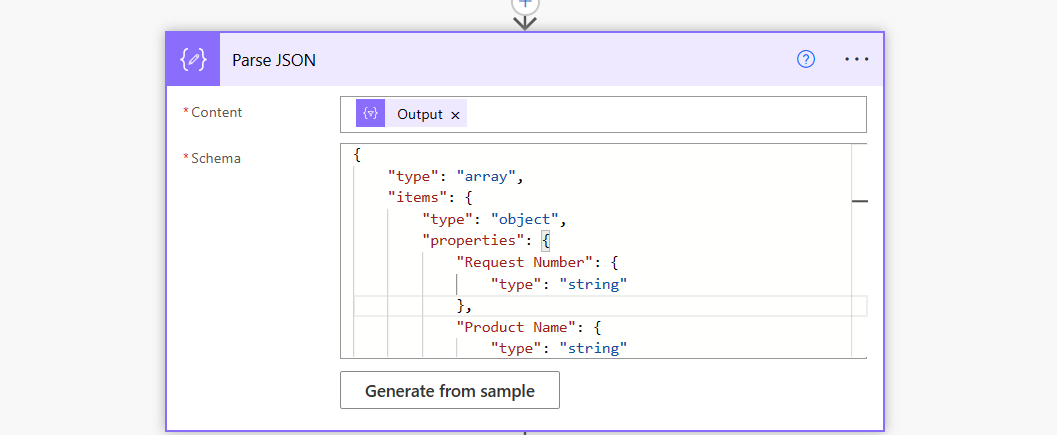
5. To use the Parse JSON action in Power Automate, JSON data must be retrieved from a source and then used to generate a JSON code in the Parse JSON action. In this flow, I need to retrieve data by copying the schema in the Body of the Select action from the run flow as shown in figure 31.
[
   {
      "Request Number": "bhu900078",
      "Product Name": "Waffle Maker",
      "Product Category": "Electronics",
      "Requestor Comment": "We are currently short on delivering a lot of orders for Waffle makers. Please treat this urgently"
   }
]
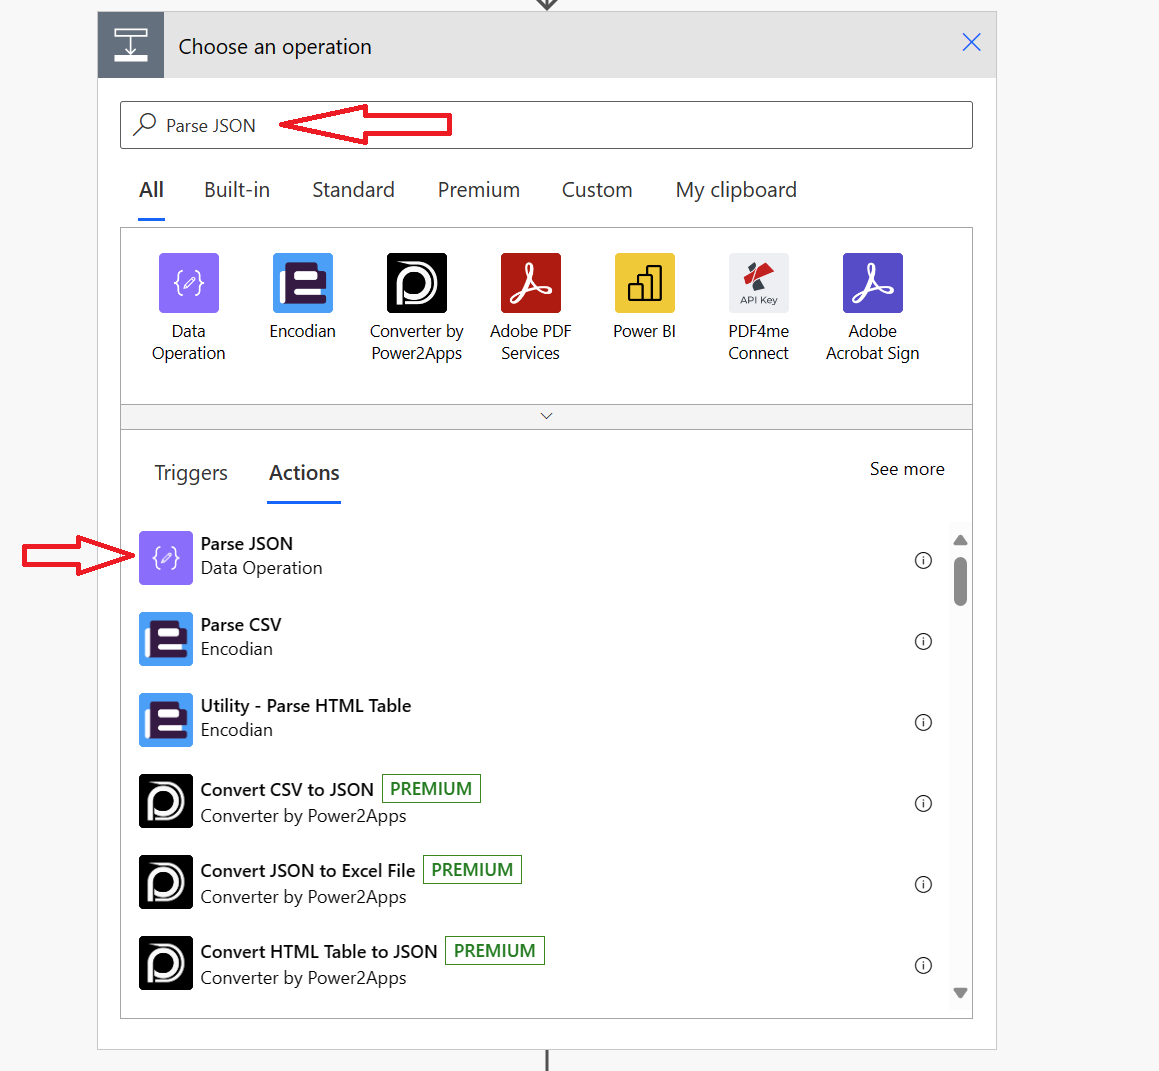
6. Let’s go back to working on the flow. Click on the Edit icon on the right side of the screen as shown in figure 30. Next, click on + New step. Search and add the action, Parse JSON as shown in figure 32.

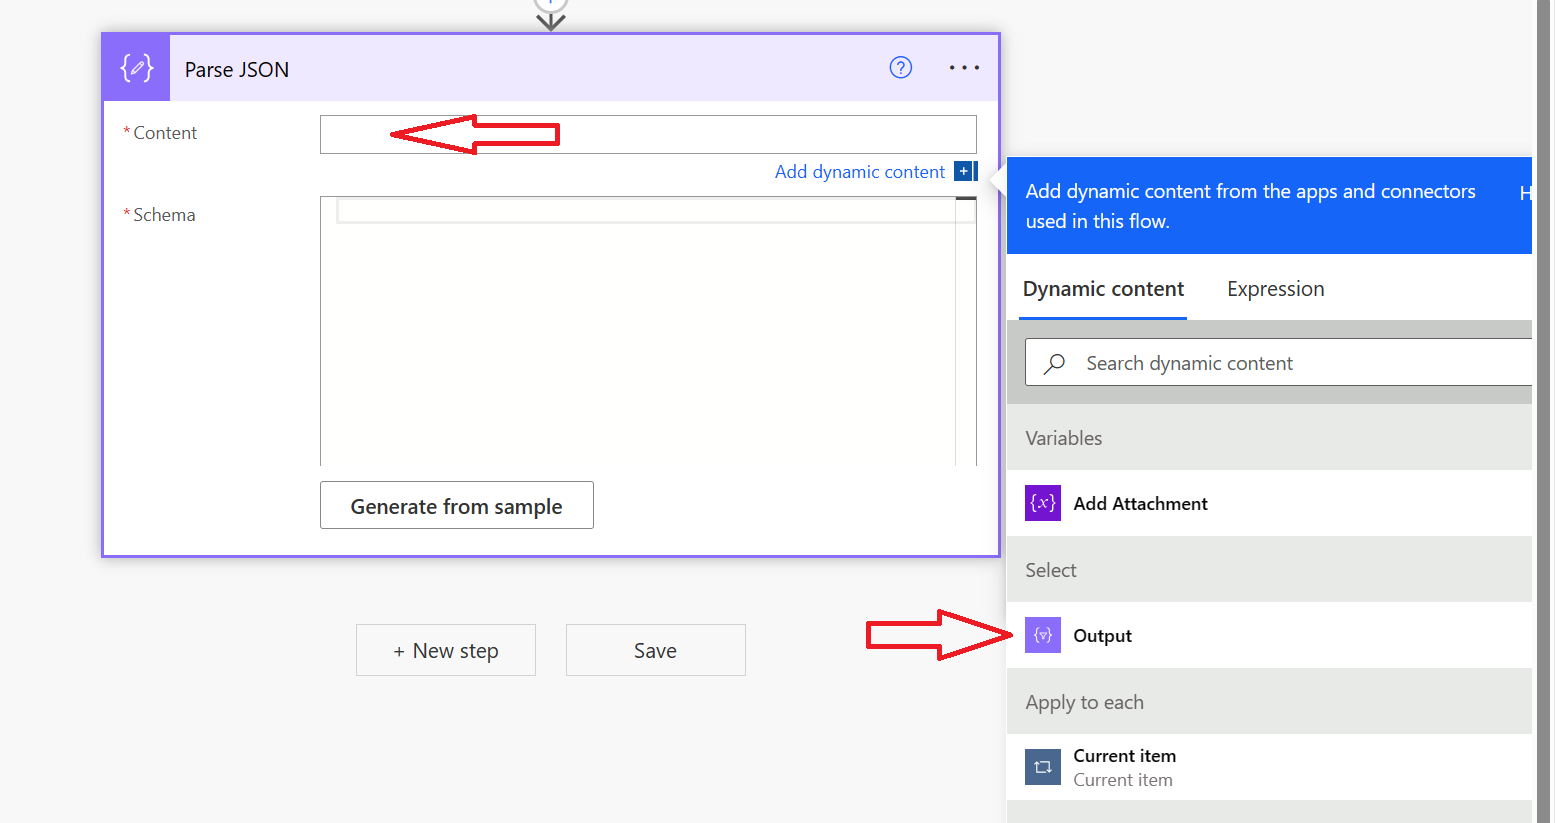
7. On the Parse JSON action, you want to add dynamic content to the Content field, so as shown in figure 33, add the Dynamic content Output which is coming from the Select action.

8. Here, I will use the schema data I copied from the Select action after running the flow as shown in figure 31, by clicking the Generate form sample button in the Parse JSON action as shown in figure 34, and next paste the schema obtained from the Select action. Click on Done (this is shown in figure 35).


9. The next step of this flow will help structure the format of the table. Let us go ahead and do just that: Add the initialize variable to the flow. Click on +New step. Search and add the action Initialize variable as shown in figure 7. (Because earlier in the flow we had an action named Initialize variable, this new variable is automatically renamed Initialize variable 2). On Name, give the variable a name; here, I will name it Product Request. On Type, click on the drop-down and select String. On Value, copy and paste the text below:
| Request Number | Product Name | Product Category | Requestor Comment |
|----------------|--------------|------------------|-------------------|
A few things to note in this step:
- The text above represents our Table column names so definitely your column names will be different from mine.
- The reason why the added action Initialize variable as shown in figure 37 is named Initialize variable 2; this is automatically created as Initialize variable 2 because we already have an Initialize variable action in the flow. So, for instance, if I add another Initialize variable action to this flow it will be named automatically as Initialize variable 3.

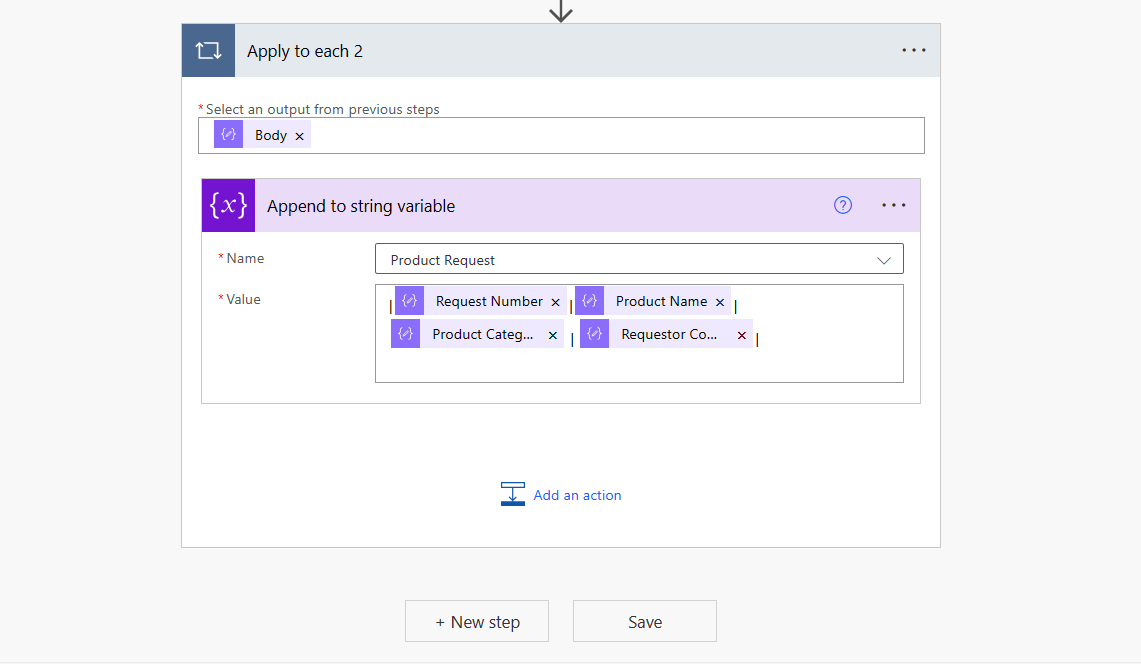
10. Click on + New step. Search and add the Append to string variable in the flow. On Name, select Product Request coming from the Initialize variable as shown in figure 38.

11. On the value of the append to string variable. Enter the dynamic content of the values in the Initialize variable by getting the dynamic content from the Parse JSON action. As shown in the animation of figure 39, you’re inserting multiple items of dynamic content, here I will add four in total ( four is not a required number if you notice from figure 37 I have just four column names).
This is the format below where the Dynamic content is coming from the Parse JSON.
|Dynamic content |Dynamic content |Dynamic content | Dynamic content |
When you’ve added the dynamic contents, your Append to string variable action should resemble figure 40.
Note: If you notice from figure 40, we have the Append to string variable action inside the Apply to each action. The Apply to each action is automatically added when I enter the Dynamic contents in the Initialize variable action, as shown in figure 39 and figure 40.

Limitation of the Table Format in the Approval Email
For the approval email, I created a tabular format to help make the approval request more structured and easier for the approver to understand, where the table has information like request number, product name, product category, and requestor’s comment. The tabular format has limits, and this depends on the number of columns you want to see in your table and how long the data is in the column, the tabular format can be seen in the approval email at the beginning of this article. See the heading, “Common Errors in the Flow and How They Were Fixed,” at the end of this article for more details.
Create the Approval Email Using the Approval Action
In this step, I will create the approval email for the approver using the Start and wait for an approval action.
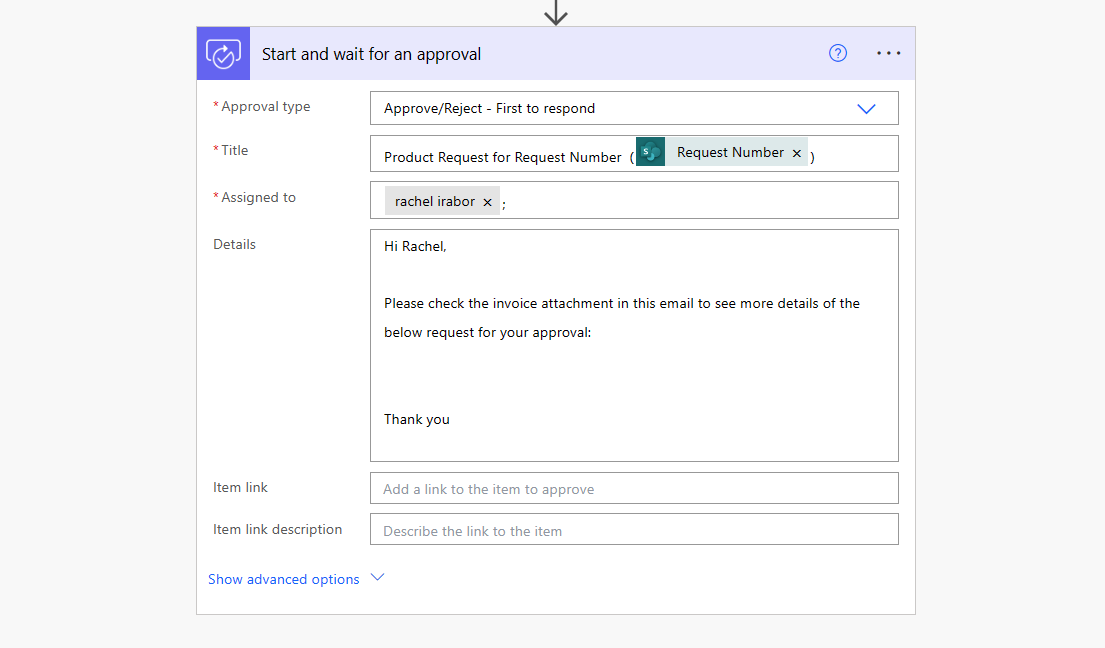
- Outside the Apply to each action (back in figure 40), click on + New Step. Search and add the Start and wait for approval action. As shown in figure 41, set the Approval type to Approve/Reject - First to respond. On Title, add the subject of the email. Here I am using Product Request for Request Number as the subject of the email. On Assigned to, write the approver’s email or search for their names if the person is in the organization. On Details, add your text. Here I wrote.
Hi Rachel,
Please check the invoice attachment in this email to see more details of the below request for your approval:
Thank you.
Introduce the Table Format in the Start and Wait for an Approval Action
The Start and wait for an approval action is where we will have our approval email. The Start and wait for an approval action is built just like us sending a new email from our email app, where you have to add who you are sending the email to, the subject of the email, an attachment if needed, and the body of the email. Before this step, under the section called "Create a table format for the approval action", we made an organized table layout for the approval email. So here in this step, we need to bring in the output of the table format we created for it to show in our approval email. Let’s go ahead with the steps.
- Click into the Details of the Start and wait for an approval action and put your cursor before the thank you text where you want to insert the Product Request variable to appear. Then go to the Dynamic contents (figure 42) and click on the Product Request variable coming from the Initialize variable.

Your Start and wait for an approval action should now look like figure 43.

Send an Email with an Attachment using the Start and wait for an approval action
In the earlier step, named “Pick up the attachment in the SharePoint list as an email attachment for the approver email” I created the action to help pick up the attachment from the SharePoint list of an item. Here I need to add the variable for the attachment into the Start and wait for an approval action.
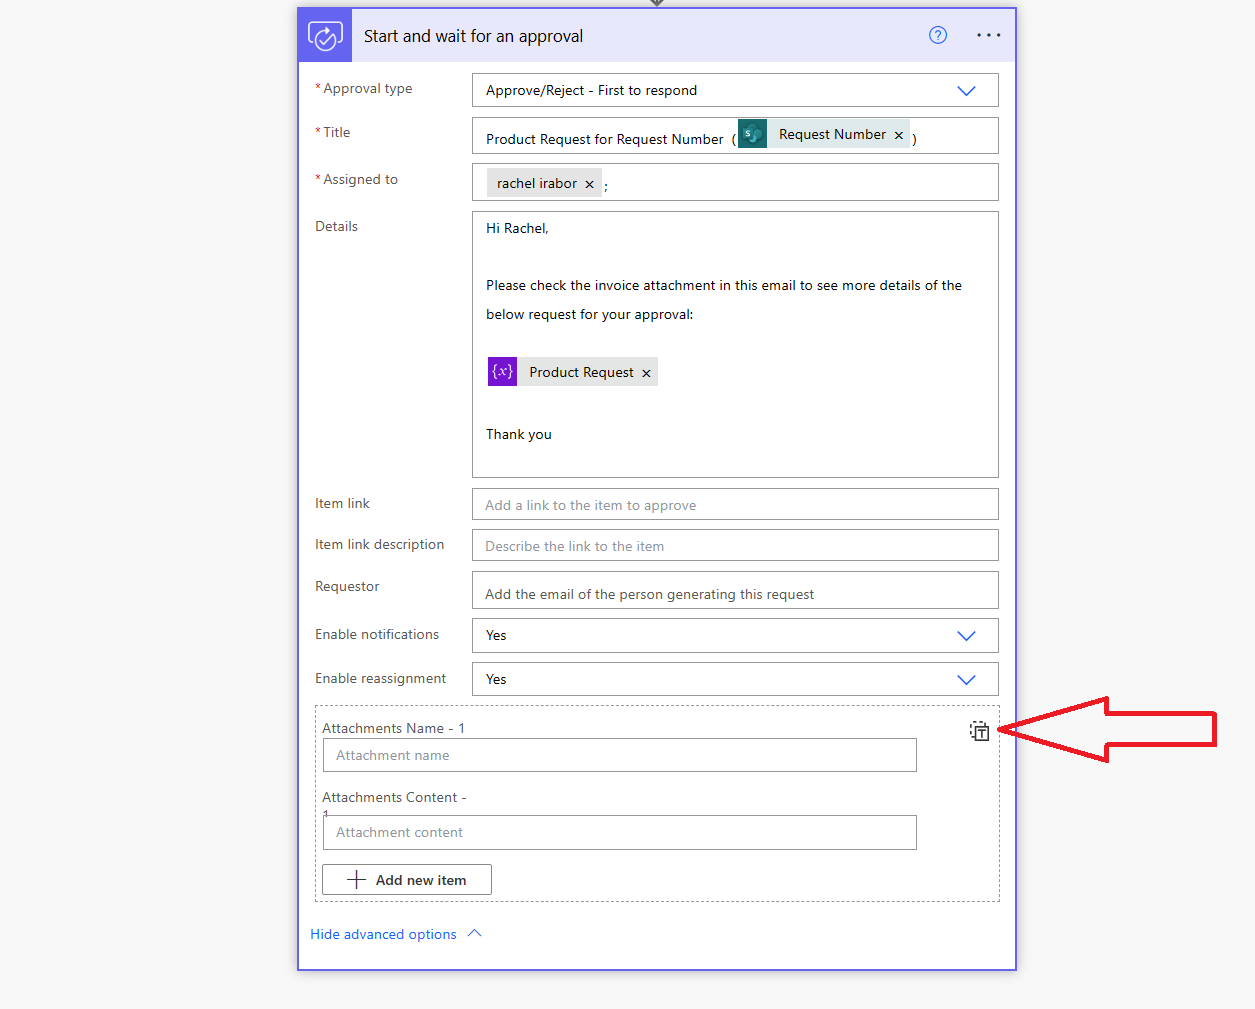
1. In the Start and wait for an approval action, click Show advanced options (figure 44). Next, go to the line for Attachment Name - 1. On the right-hand side, click on the T icon. (If you look at the left side of the T icon in figure 44 you will notice the Attachment Name -1 and Attachment content - field.) The T icon in the Start and wait for an approval action is used to change this field from the request of providing an attachment name and content value to an Attachment field, this is shown in figure 45). The reason we are clicking on the T icon here is that we do not need to enter dynamic contents separately for the attachments name and attachments content.

The field changes from having the document name and document attachment to Attachments.
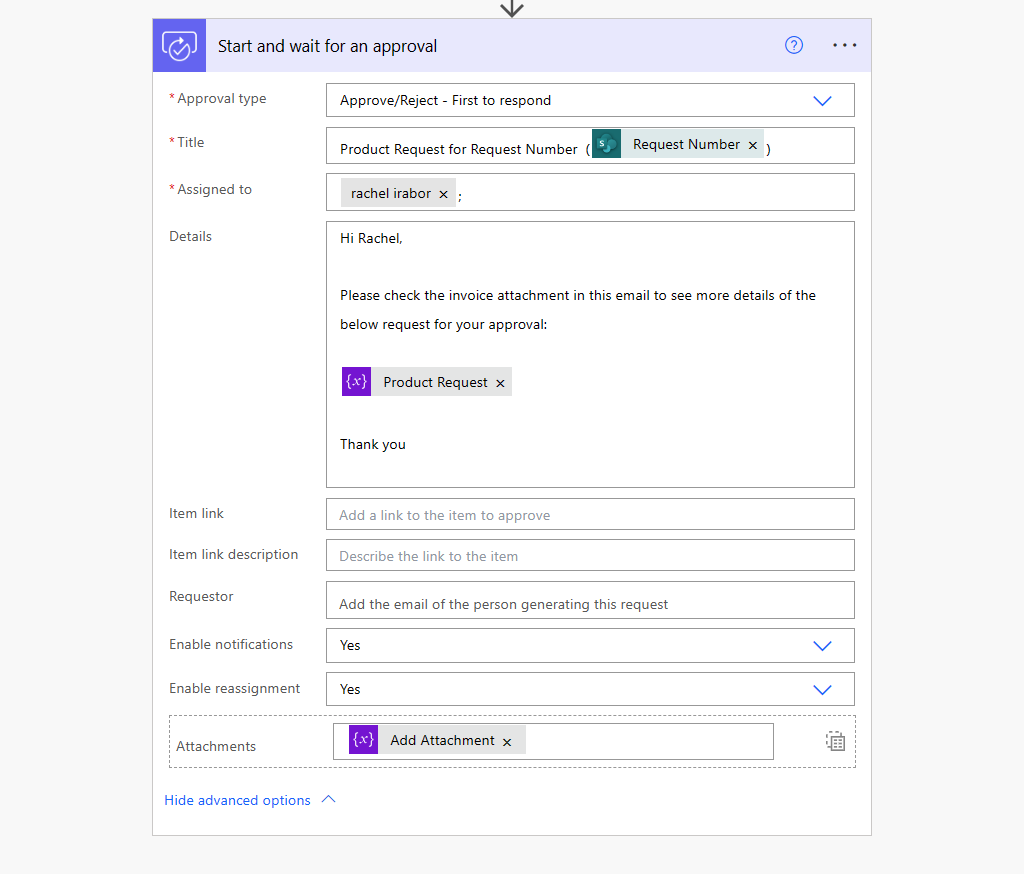
2. Click on the Attachments field in the Start and wait for an approval action. On the right, you’ll see the dynamic contents form open. Click on the Add Attachment variable (figure 46). You can see the result of these steps in figure 47.


Update the SharePoint List with the Approver’s Response
In this step, we will update the SharePoint list “Product Request” with the outcome (the rejection or approval of the restock request) and comments from the approver. This outcome is obtained from the approval email.
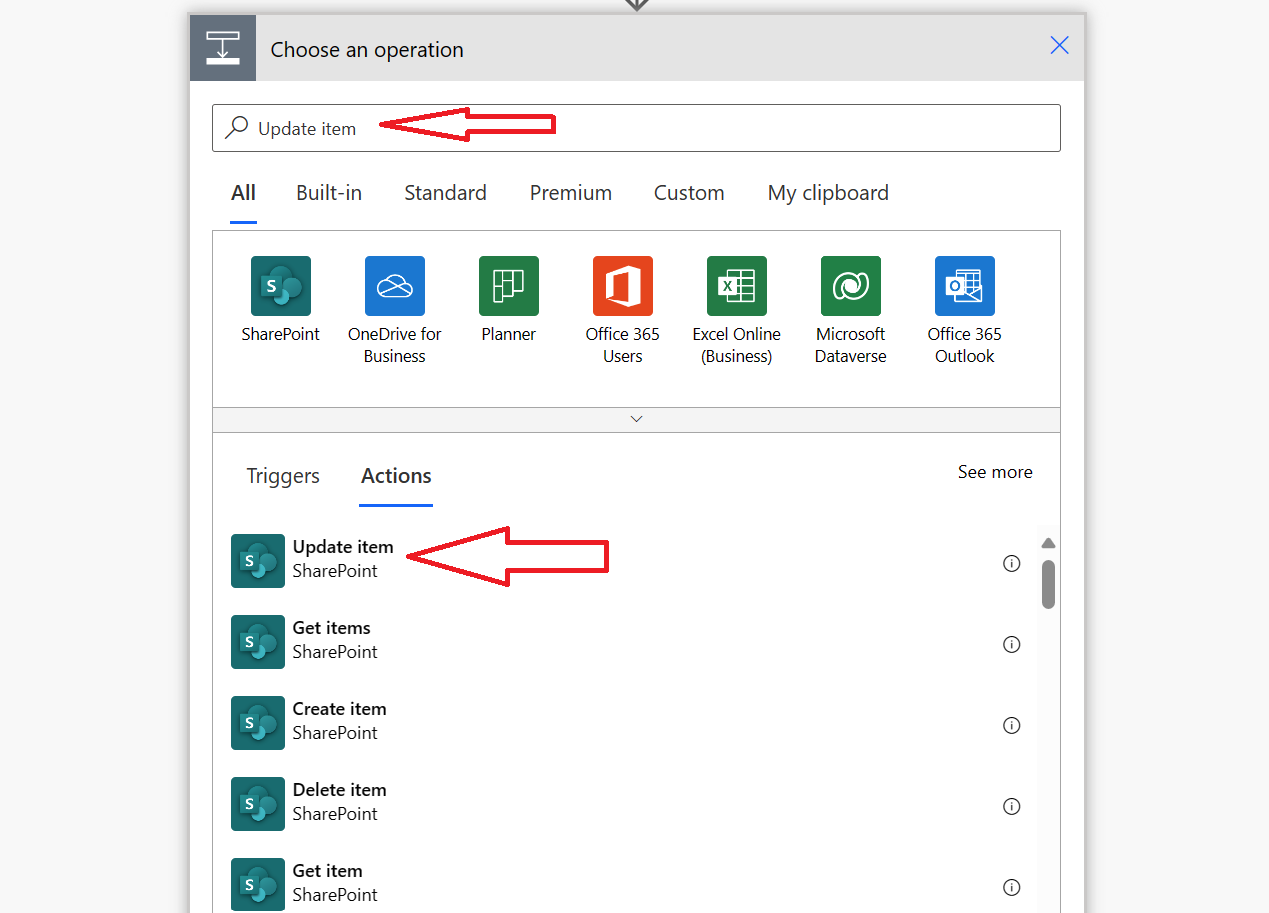
1. Click on Add an action. Search and add the action, Update item (an action from SharePoint) as shown in figure 48.

2. The Update item action has a required field named Id so let’s work on it. In the Update item action, on the id field, go to the dynamic content and click on the ID column coming from the trigger, when an item is created or modified as shown in figure 49.

As you can see in figure 50, the update item from the SharePoint list is dynamic content for the Id field of the Update item.

3. Now let’s add the columns we want to update in the SharePoint list. On the Status Value field in the action (figure 51), click on the drop-down and select Enter custom value. Next, on the dynamic content, search for Outcome and select it (figure 51).
Note: The Status Value field in the Update item action is used to update the SharePoint list of the outcome of the approval email if it was rejected or approved.

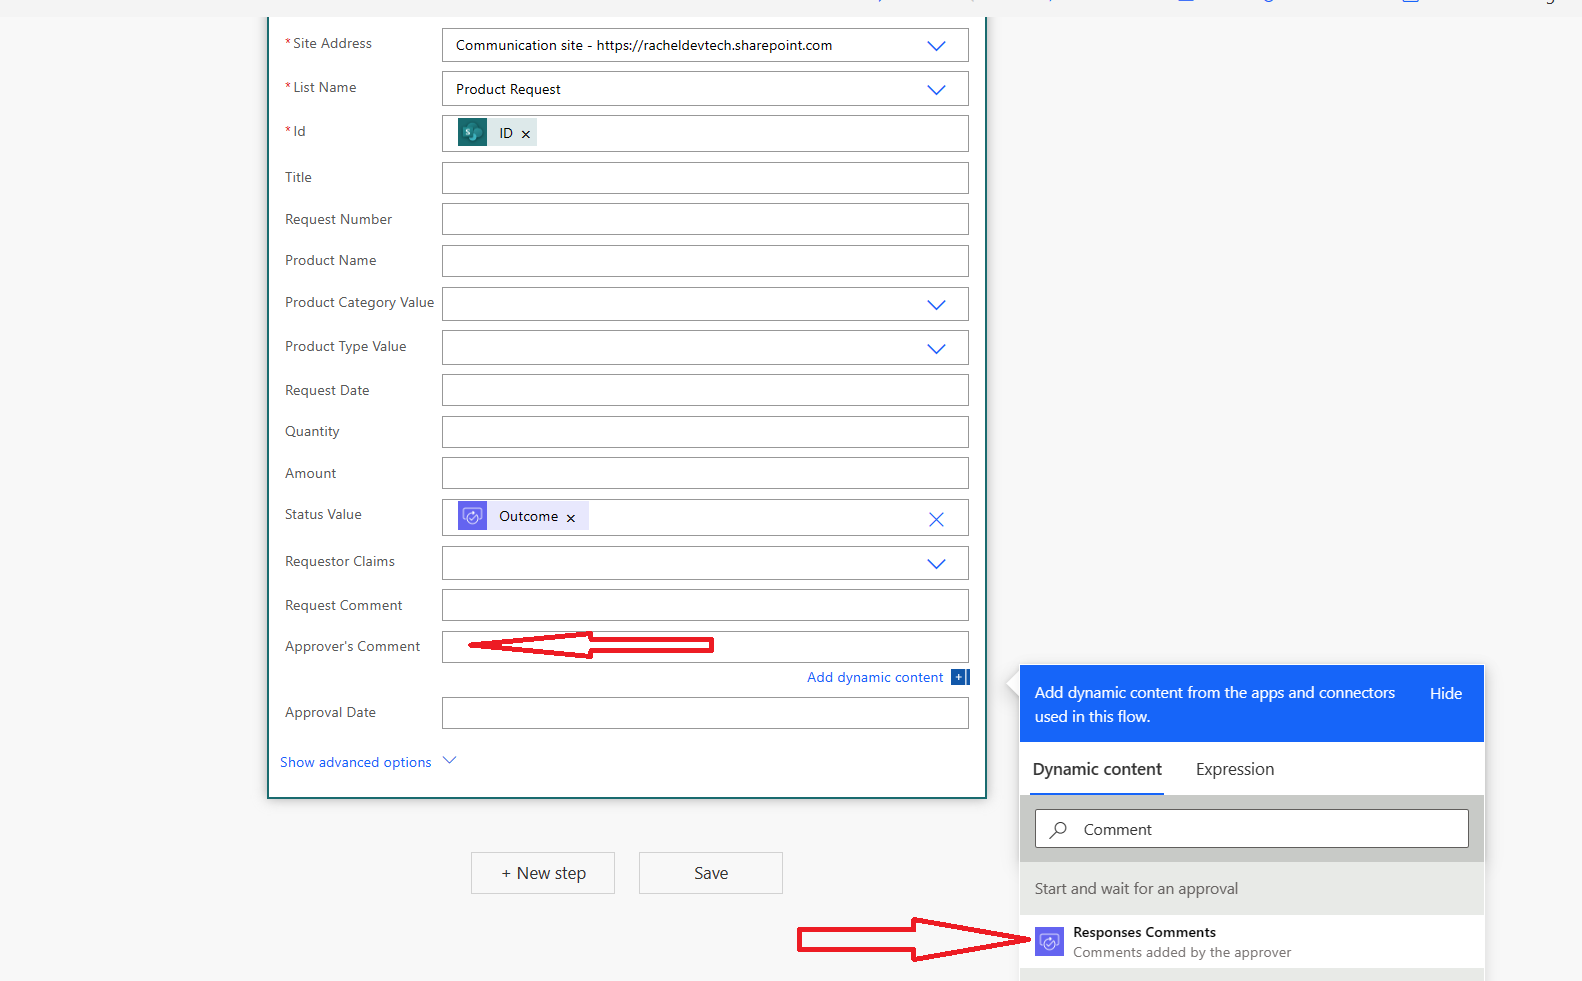
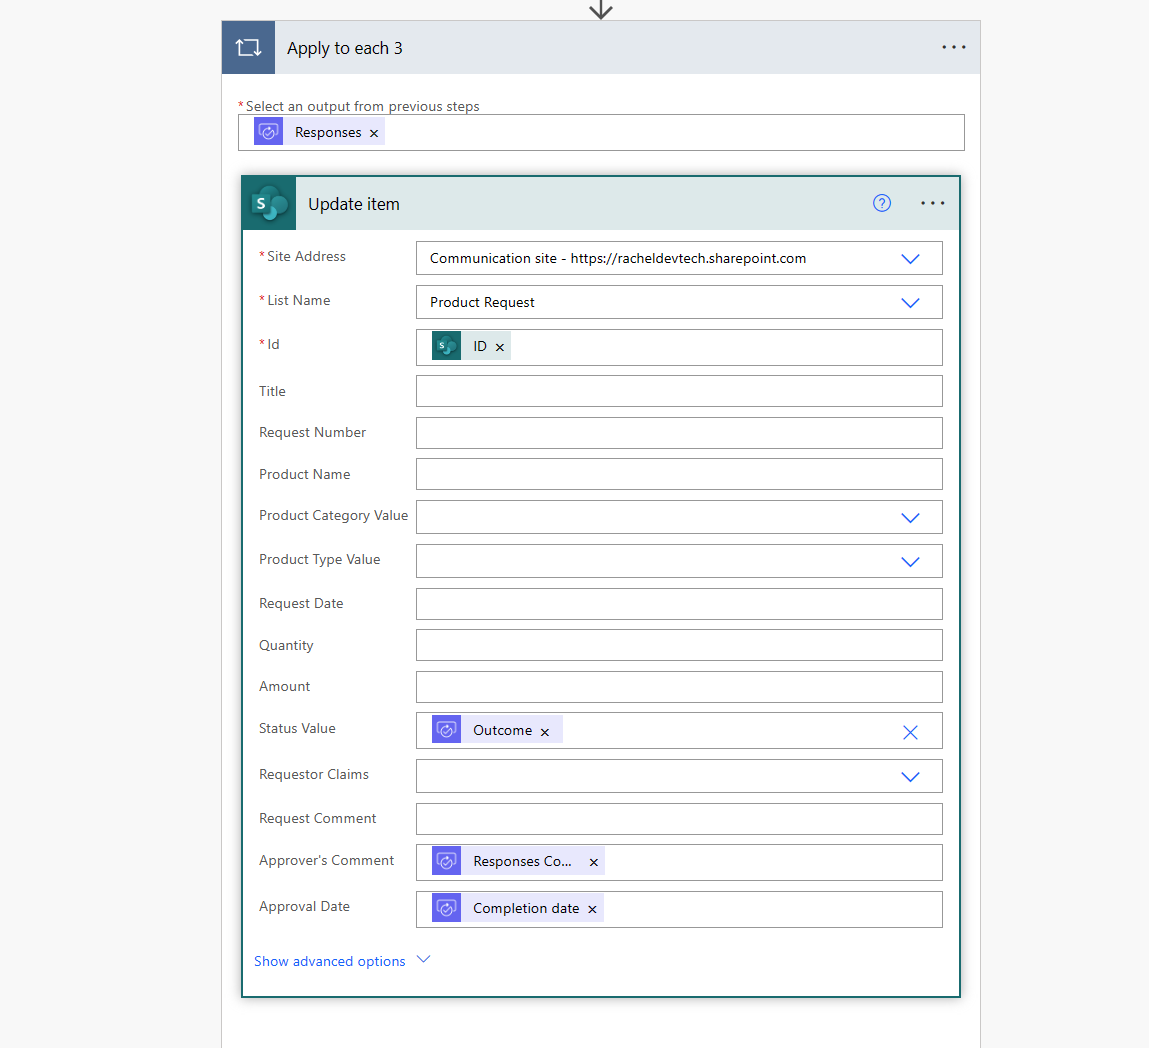
4. We need to get the approver’s comment and the completed date of the approval request from the approver's email and then save it into the columns in our SharePoint list. As shown in figure 52, go to the Approver’s comment field (this is showing here in the Update item action because it is a column in the SharePoint list) in the Update item action and add the dynamic content Responses Comment. Repeat the same step for the Approval Date column and add the Dynamic content Completion Date. The result is shown in figure 53.


Stop the Trigger from an Infinite Loop
After testing the complete flow, I noticed the flow running multiple times for one approval request. So, in this step, I want to prevent the flow from running or sending out an approval email multiple times when a request is initiated, or an item is added to the SharePoint list.
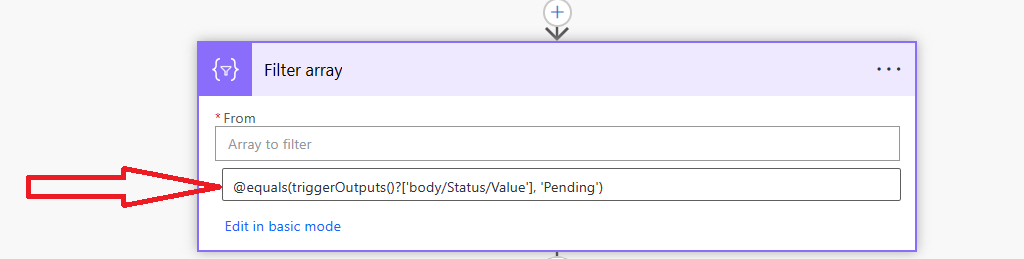
1. Go to the top of the flow after the trigger When an item is created or modified. Click on + New step and add the action Filter array as shown in figure 54. In the Filter array action, on Choose a Value at the left-hand side, enter the dynamic content “Status Value” (it has value because it’s a choice column; if your data type is a single line of text, it will be Status). On Choose a Value at the right-hand side, add the text Pending. Next, click the link to Edit in advanced mode.

Your Filter array should now look like figure 55. After clicking Edit in advanced mode, here I have the text below as seen in figure 55. Copy the text.
@equals(triggerOutputs()?['body/Status/Value'], 'Pending')

2. All we needed from the Filter array action was the text we just copied; this text will help us stop the continuous approval emails sent out for one request. Next, we’ll delete the filter array action from the flow by clicking on the three dots at the top right side of the action as shown in figure 55. 3. Go to the trigger When an item is created or modified. Click on the three dots on the right-hand side. Next, click on Settings. Scroll down and click on + Add (as shown in figure 56) and paste the text you copied from the filter array action here on the Trigger Condition text box, as shown in figure 57. Click on Done.
Note: With these steps taken here the flow would only run when the status of a new record/item in the SharePoint list is pending.


Email the Sales Team with an Update on the Approval Request
In this step, I’ll add to the workflow to email the person who initiated the request to let them know the outcome of the approval request.
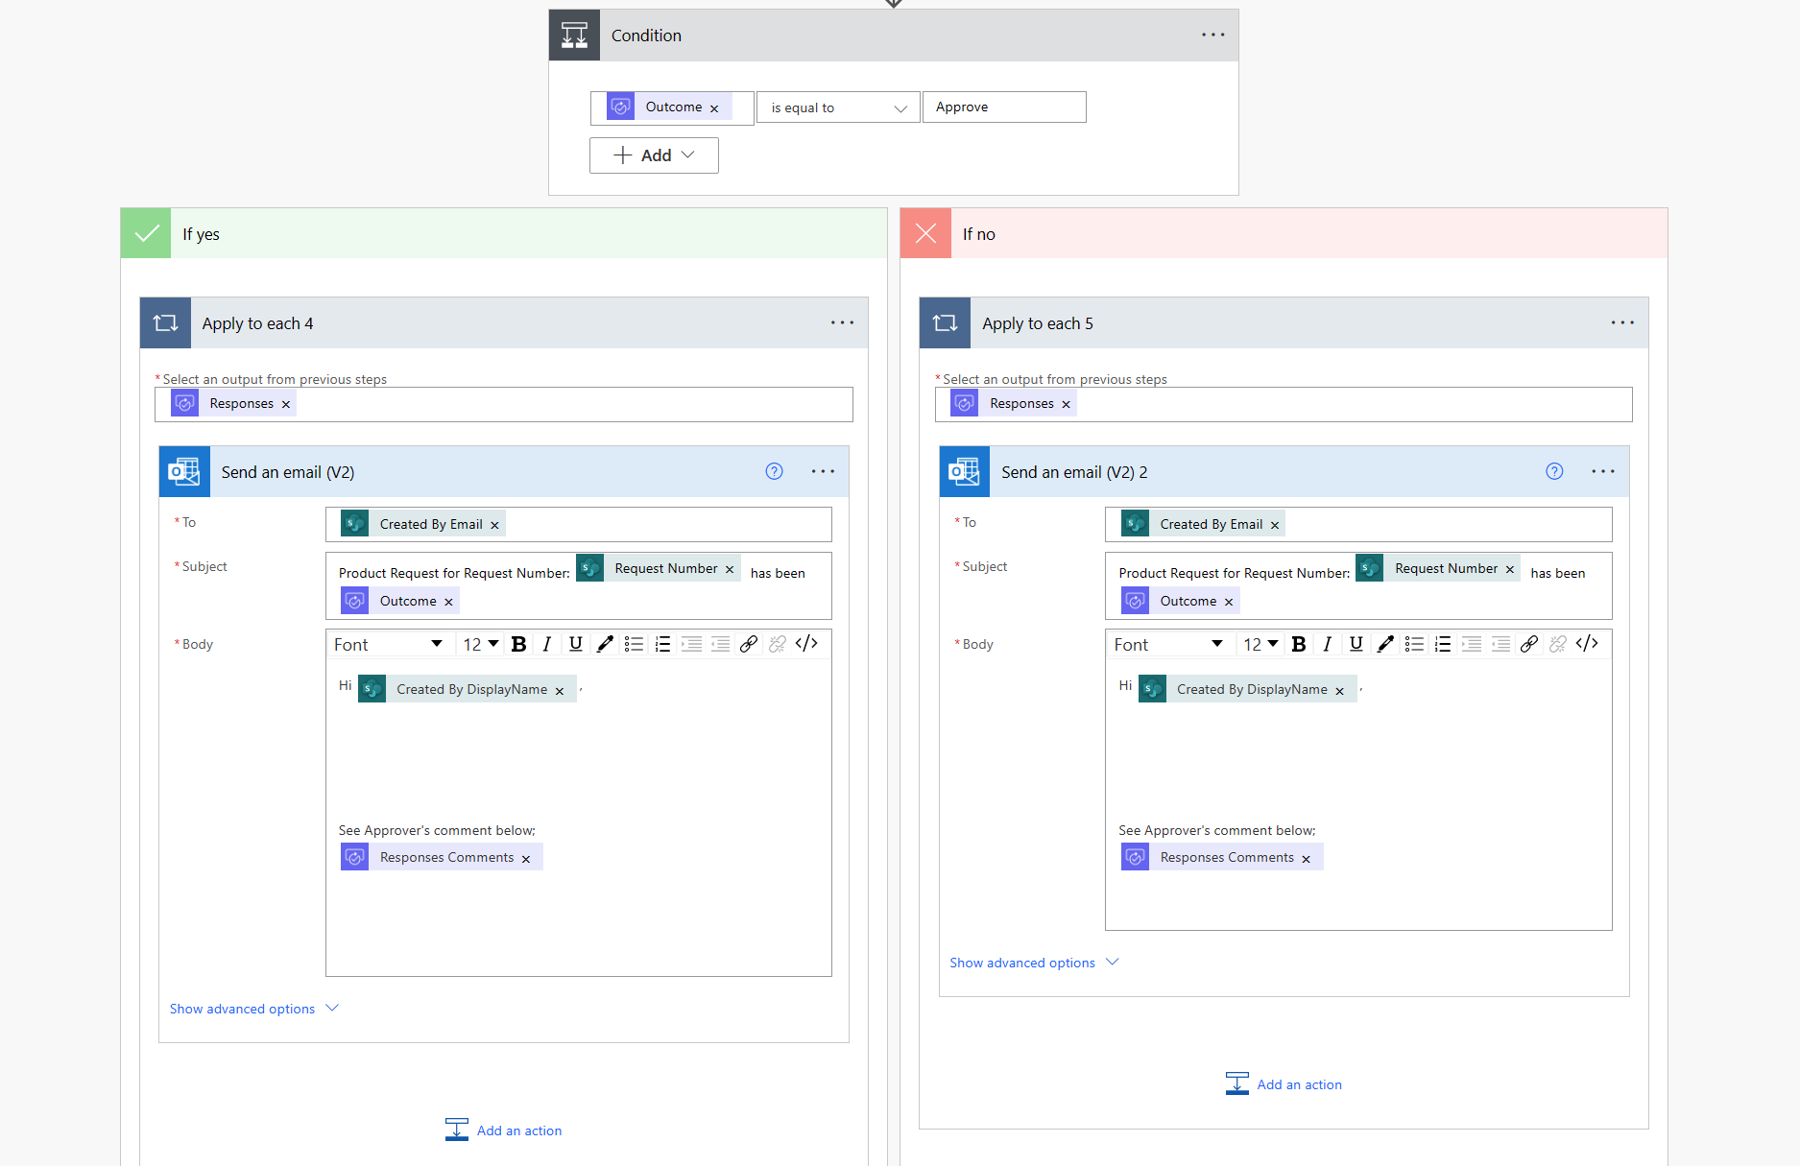
1. Scroll down to the end of the flow where we have the Update item action as seen back in figure 53. Outside the Apply to each action 3 for the Update item action, click on + New Step. Search and add the Condition action.
On the left-hand side of the condition, we have to choose a value. Here, add the dynamic content Outcome (this is coming from the action Start and wait for an approval) this is shown in figure 58.
On the right-hand side of the condition, we have to choose a value and write the Approve text.
Next, on the If yes and If no of the conditions, add the Send an email V2 action by clicking on Add an action, the final result is shown in figure 58.
Note: The use of the Condition action here means that when a condition is met, an action should be carried out. In this case, when an approval request is approved the If yes of the condition runs the Send an email v2 action inside it to send out an email to send the outcome of the request. If the approval request is rejected, the If no part of the condition runs the Send an email v2 action to send the outcome of the request.

2. Here, we will create the email that gets sent after the approval request condition is met and send the outcome of the approval request to the individual who initiated it. To is the email of the person you are sending the email to, Subject is the subject of the email, and Body is the body of the email, as shown in figure 59.

In the example here, there are two nearly identical emails generated based on the response of the approver. You wouldn’t have to have identical emails; it just works for this scenario. Details of each Send an email V2 action has.
- To has the dynamic content “Created by Email”.
- Subject has Product Request for Request Number: Request Number.
- In the body of the email, the Request Number dynamic content is coming from when an item is created or modified action in the dynamic content seen in figure 59. Later in the body of the email, the dynamic content for Outcome is coming from the Start and wait for an approval action in the dynamic content, which will show the outcome of the request if it was approved or rejected by the approver.
Note: When Outcome is added to the Send an email V2 action, Apply to each action is introduced to the flow and that is what we can see at the top of figure 59.
- On Body, this is the text we have.
- Hi (with the dynamic content) Created by Display Name.
- See the Approver’s comment below;
- Reponses Comments (this is coming from the Start and wait for an approval action in the dynamic content and this shows any comments from the approver).
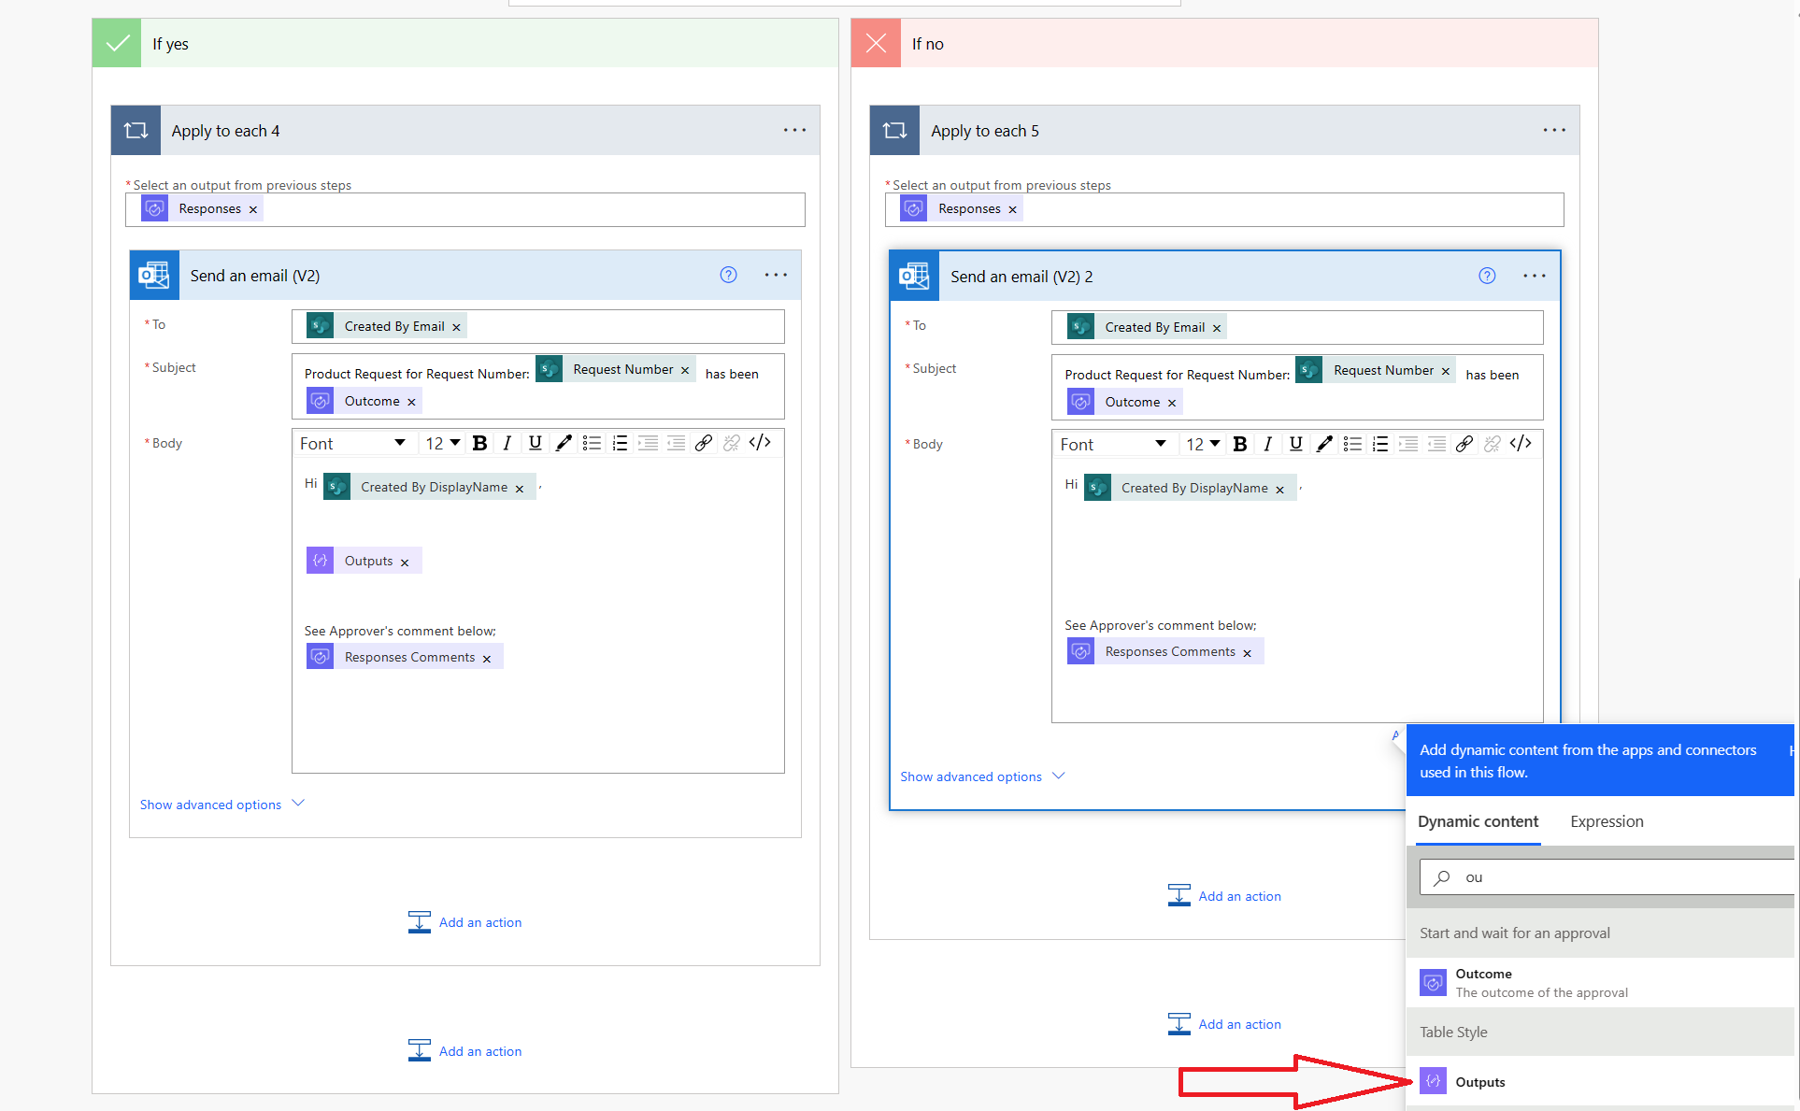
3. Next, I will add a Compose action to the flow to create a table format in the email sent to the initiator of the request using the Send an email V2 action. Rename the compose action to Table style. Do not create your Compose action inside of the Condition or Apply to each action for Send an email V2. Scroll up and add the Compose action before the Start and wait for an approval action.
NOTE: The step we took to create a table format action for the Start and wait for an approval action cannot be used in the Send an email V2 action and the reason is not based on preferences but because it does not work with the Send an email v2 action.
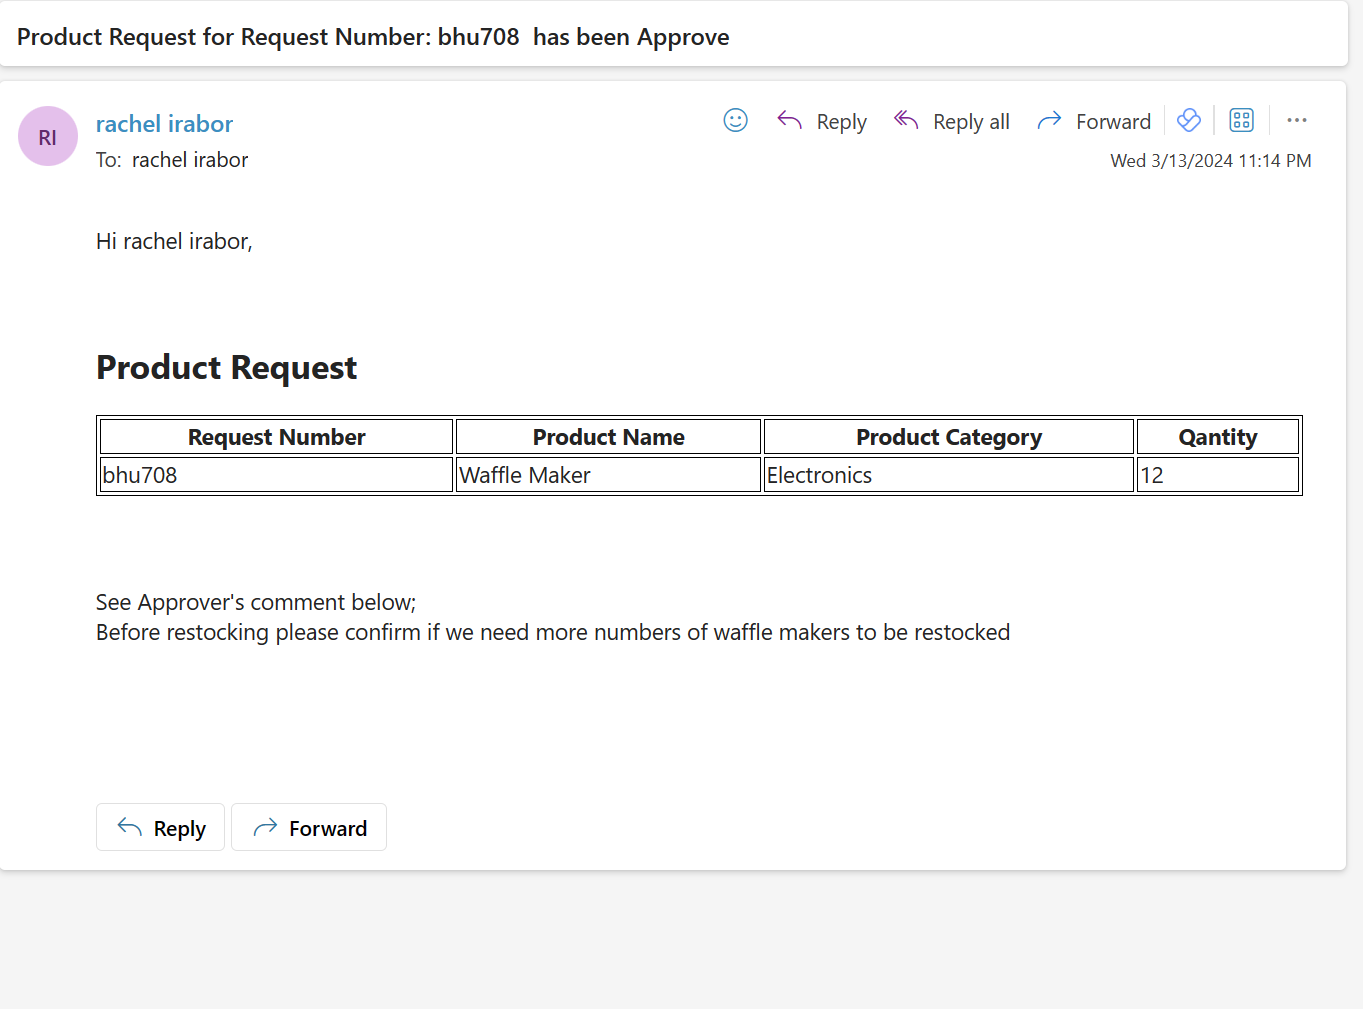
4. Copy and paste this text below in the Compose action. It should look like figure 60 when done. The text/code helps with the styling of the table and if you read the text, you will notice Product Request (this is the name of the table) and Request Number, Product Name, Product Category, and Quantity (these are the column names in the table) this is shown in the table in figure 63. So, you can easily make changes to the table and column names. Then go ahead and add the dynamic values of the column names as seen in figure 63.
<html>
<body>
  <style>
     table, th, td {
         border:1px solid black;
     }
  </style>
<body>
<h2>Product Request</h2>
<table style="width:100%">
  <tr>
    <th>Request Number</th>
    <th>Product Name</th>
    <th>Product Category</th>
    <th>Quantity</th>

  </tr>
  <tr>
    <td>@{triggerOutputs()?['body/RequestNumber']}</td>
    <td>@{triggerOutputs()?['body/ProductName']}</td>
    <td>@{triggerOutputs()?['body/ProductCategory/Value']}</td>
    <td>@{triggerOutputs()?['body/Quantity']}</td>
  </tr>
</table>
</body>

5. Next, add the output from the Compose action in the dynamic content named Table Style to the body of the Send an email V2 action (see figure 61).

Save your flow. It should look like figure 62.

When the flow runs through the cycle and request is approved (or denied), the table we added to the body of the email looks like figure 63.

Common Errors in the Flow and How They Were Fixed
There are a few issues I encountered while creating and testing the flow. They are listed below:
1. Line break in the table format of the approval email: While working on the table format of the contents in the approval email, I used the Start and wait for an approval action. I noticed a limitation if you use more than five column headers in the table, especially if you are expecting data in the row of that column to be big. Figure 64 shows the line break of certain column headers in the table.

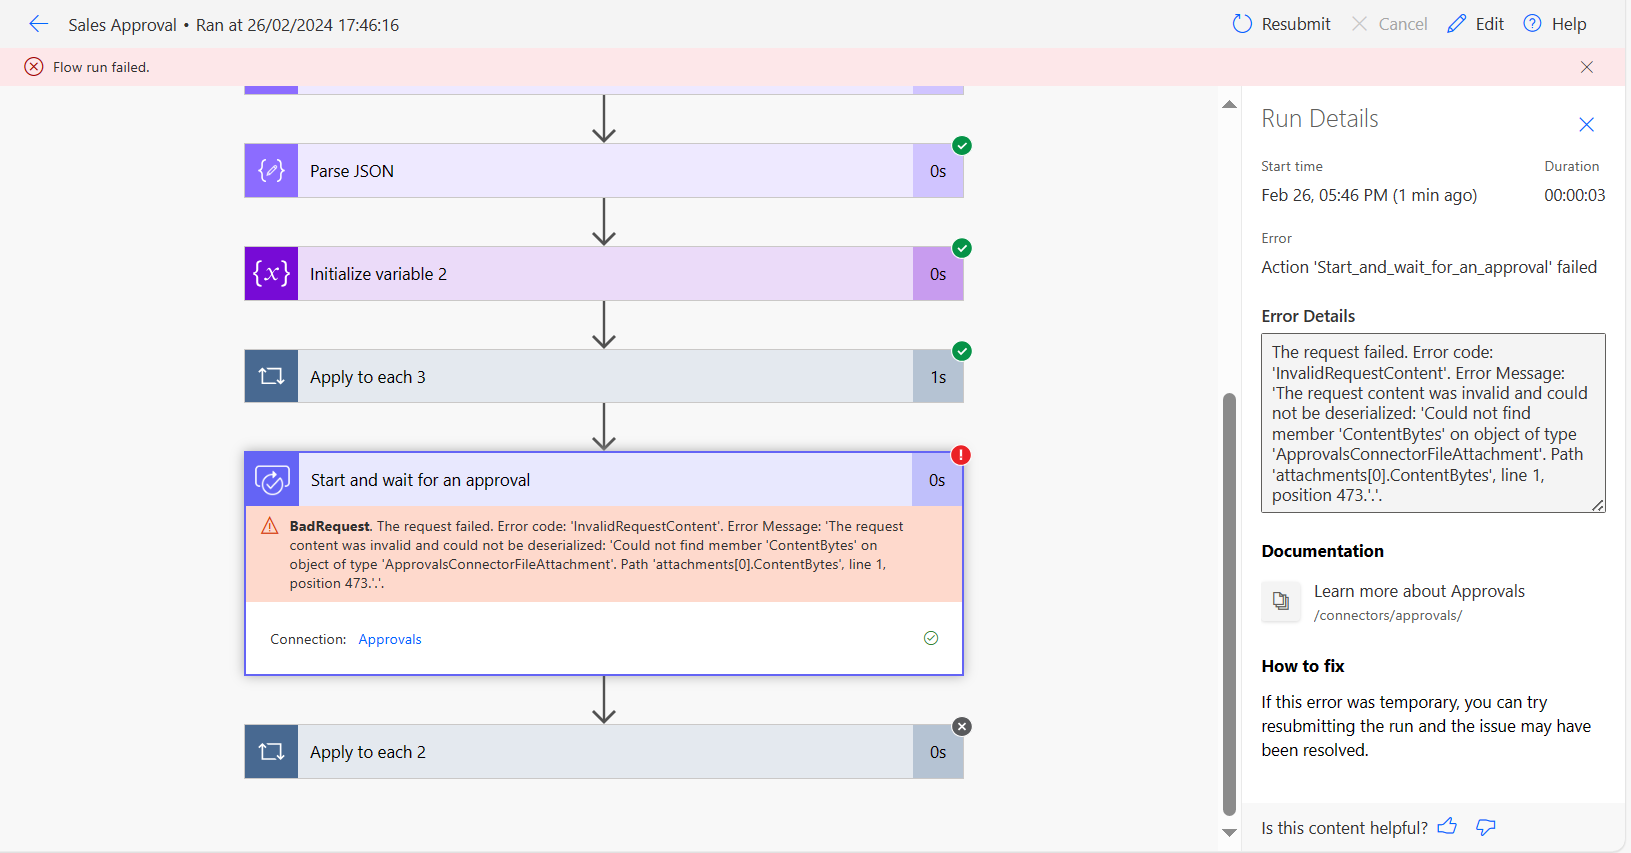
2. Error message in the Start and wait for an approval action: While working on the flow, I had an issue with the Start and wait for an approval action where after running the flow, it failed (see figure 65), and the error read:
“The request failed. Error code: ‘InvalidRequestContent’. Error Message: ‘The request content was invalid and could not be deserialized: ‘Could not find member ‘ContentBytes’ on object of type ‘ApprovalsConnectorFileAttachment’. Path ‘attachments[0].ContentBytes’, line 1, position 460.’.’.”
Read here on how it was resolved.

3. The issue with picking up a variable in an Append to string variable action (figure 66) in Power Automate. Read here on how it was resolved.

Conclusion
The approval process used to be difficult and stressful, but Power Automate approval actions have made it easier to complete, save the data, and the request is sent to the right approvers.
In conclusion, this article shows how businesses can streamline their approval processes using Power Automate actions, not just in an inventory approval process but in different areas where approval is needed. The approval email creation and invoice attachment retrieval from the SharePoint list helped increase productivity and efficiency, helped keep track of all the approval activities, and reduce errors and losses for all parties involved.
By following these steps in this article, you can learn and understand how to build an approval process, which will improve and increase the productivity of your business.
Resources
Get started with Power Automate Approvals
Automate an approval process in Power Automate
Create an approval process that requires everyone to approve
Use markdown in Power Automate approval
Send an email in a table format using HTML, and CSS, and Send an email V2 action in Power Automate.

Rachel Irabor
Rachel Irabor is a Microsoft MVP for Microsoft Business Application, Power Platform Advocate, and Dynamics 365 CRM Developer at a Microsoft Partner Company. She shares her experiences and insights through various mediums, including a Medium blog and newsletter where she writes about her passion for the Power Platform. Additionally, Rachel has contributed to the tech community by participating in a podcast series called A Girl in Love with Tech where she invites individuals in the community to discuss the capabilities of Microsoft technology and how to get started.
Rachel is the organizer of Dynamics 365 and Power Platform User Group Malta, and part of the leadership team in Power Platform User Group Nigeria.
Rachel is also recognized as a Gold Microsoft Learn Student Ambassador and has been a student at the University of Benin, Nigeria. Her work includes advocating for the opportunities of the Microsoft Power Platform, highlighting its potential to empower individuals and communities. Rachel's contributions extend to technical writing and sharing her knowledge with others who are interested in exploring the world of technology and development. She is passionate about community building, volunteering, and giving back to the community.