Power Platform Connector Fundamentals

Part one of this series introduced Power Platform Connectors and explored their capacity to integrate disparate systems, unify data repositories, and augment crucial business processes. It laid out some common use cases, along with the skills and prerequisites essential for connector creation, as well as preliminary tasks to initiate the process of building a custom connector.
Part two (this article) delves into a more comprehensive review of the elements that constitute a connector, introduces the connector creation wizard available in Power Platform, and discusses the basic infrastructure components essential for connector delivery, with a focus on high-level concepts pertinent to production deployment across any cloud stack. Various methodologies for testing and validating connector functionality will also be examined, both within the confines of the connector creation wizard and through the utilization of external tools or services.
For reference, the series outline is as follows:
- Introduction and Overview
- Connector Fundamentals (this article)
- Basic Building Blocks: Security, Actions, Requests, and Responses
- Advanced Capabilities: Triggers, References, and Policies
- Finishing Touches: Customization and Extensibility
- Staying In Control: Versioning and Change Management
- The Big Picture: Performance, Hosting, and Scalability
- Making It Official: Publishing, Certification, and Deployment
- Going All In: Commercialization and Monetization
- Lessons Learned: Tips, Tricks, and Advanced Techniques
Components
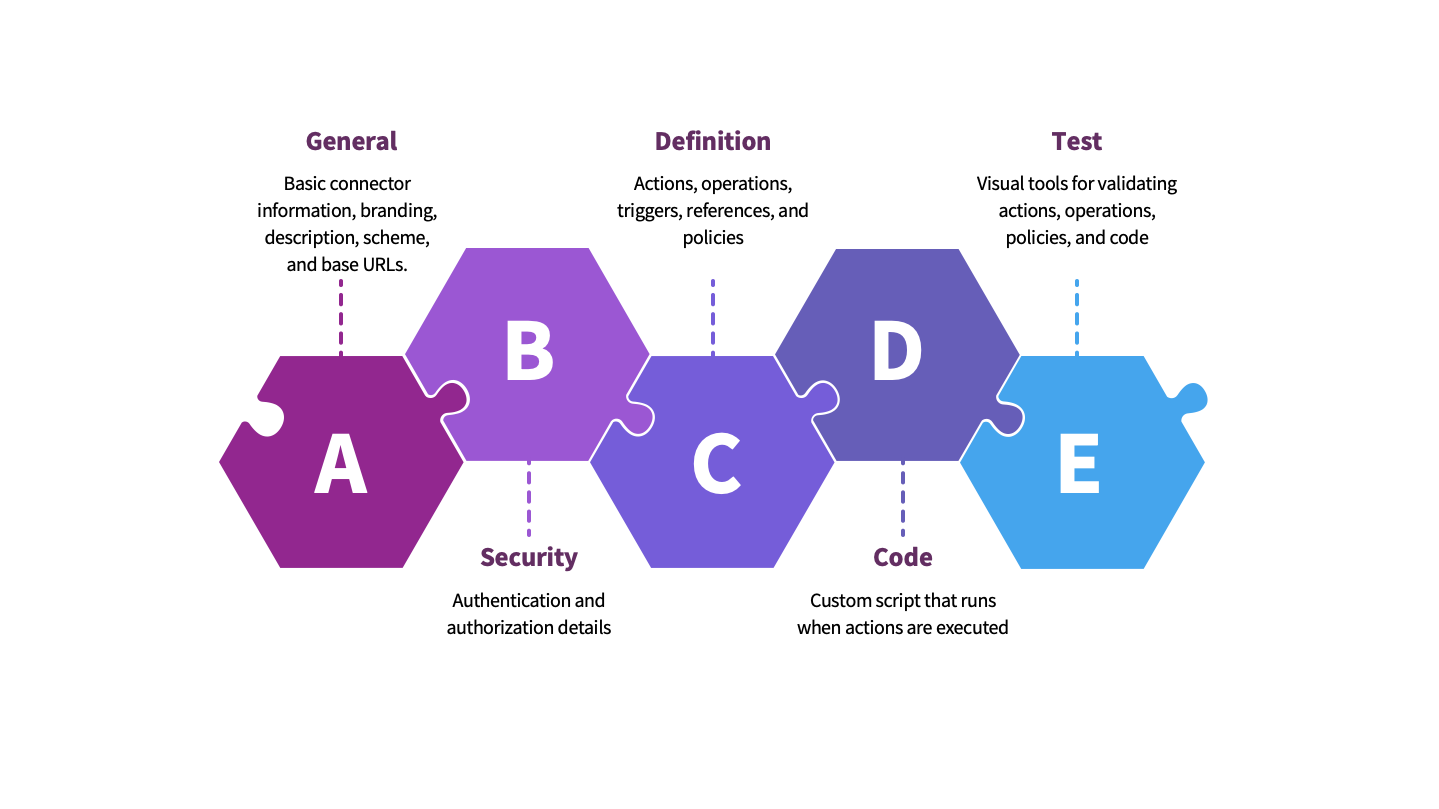
A Power Platform connector primarily consists of a connector definition file, associated policies, and executable code for when the connector is invoked. The definition file—also referred to as an Open API specification or Swagger file—adheres to a structured format that was briefly touched upon in the Introduction and Overview article. This file delineates the connector's functionality, operational mechanisms, and security configurations:
- Connector definition file: Describes what the connector does, how it does it, and how it is secured.
- Policies: Modify the behavior of the connector or its actions based upon a predefined set of rules.
- Executable code: Custom script logic that is invoked whenever a connector action is executed from within an app or flow.
The connector creation experience in Power Platform maps these components onto a visual editor that separates them into a series of steps, beginning with General, and progressing through Security, Actions, Code, and Testing. The following diagram illustrates which definition elements are associated with each step.
It is not necessary for the connector creator to own or operate the systems that the connector operations target. It is perfectly feasible to create a connector without knowing any details of how the target APIs function, so long as the creator and end-user have the necessary permissions to utilize those APIs in accordance with the provider’s specifications. The connector creator assumes responsibility for conforming to such specifications and interpreting the inputs provided by the customer so that they are appropriately passed onto the target endpoints. Doing so involves crafting a definition that exposes the necessary security and input requirements, instructs Power Platform on how to construct a request, and describes in detail the output for successful and unsuccessful responses.
Creating a Definition File
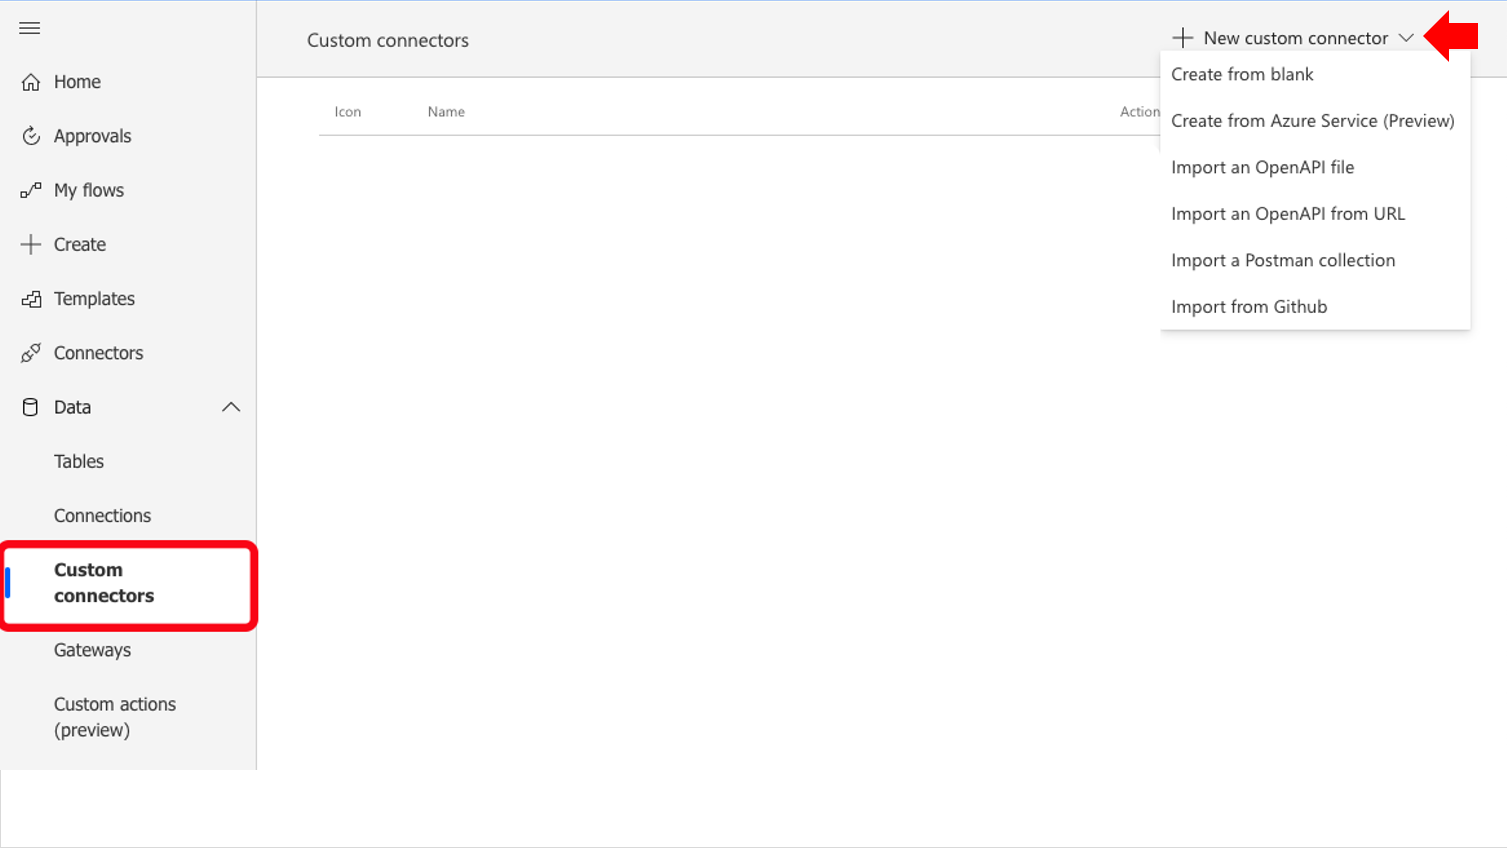
Creating a definition file from scratch in the native YAML or JSON format can be a daunting task for beginners. Power Platform greatly simplifies this process by providing a wizard that generates a definition based on user inputs. This is a simpler, faster, and less error-prone mechanism for generating a connector by walking the creator through each step of the process. To launch the wizard, open the Power Automate maker portal (https://make.powerautomate.com/) and locate the Data section in the left navigation. After selecting Custom connectors, click the down arrow next to + New custom connector and choose Create from blank or choose from one of the other options if an OpenAPI file has already been provided.
The wizard produces a basic definition file that lacks some of the native OpenAPI features like references and tags that will be covered later in this series. It also adds some capabilities beyond the OpenAPI specification that are specific to Power Platform, including code and policies. Additionally, it introduces optional elements and parameters only applicable to Microsoft (such as the x-ms-summary and x-ms-visibility properties). To overcome these limitations, manually edit the underlying definition from within the wizard by toggling the Swagger Editor switch. Before doing so, however, it is necessary to have at least good working knowledge of OpenAPI naming conventions and syntax.
General
All OpenAPI specifications begin with an info section that includes basic information such as title, description, and version of the connector, which the creation wizard exposes in the General step. Also part of the base configuration of a definition are the host, basePath, and schemes elements. It may seem a bit strange to break apart a URL into three separately defined values; however, by doing so, the specification allows for greater flexibility in substituting dynamic values, something Power Platform achieves via policies and code.
These values are then combined at runtime to produce the full target URL, including the endpoint path and parameters from the paths section. This allows for a great deal of flexibility in deployment, such as DEVELOPMENT => TEST => PRODUCTION scenarios in which the URL changes for each environment and each backend service requires different headers. This flexibility is a key feature of the OpenAPI specification format and has greatly contributed to its adoption as the de facto standard for describing RESTful API endpoints.
The following screen capture shows the first step in creating a new connector using the creation wizard:
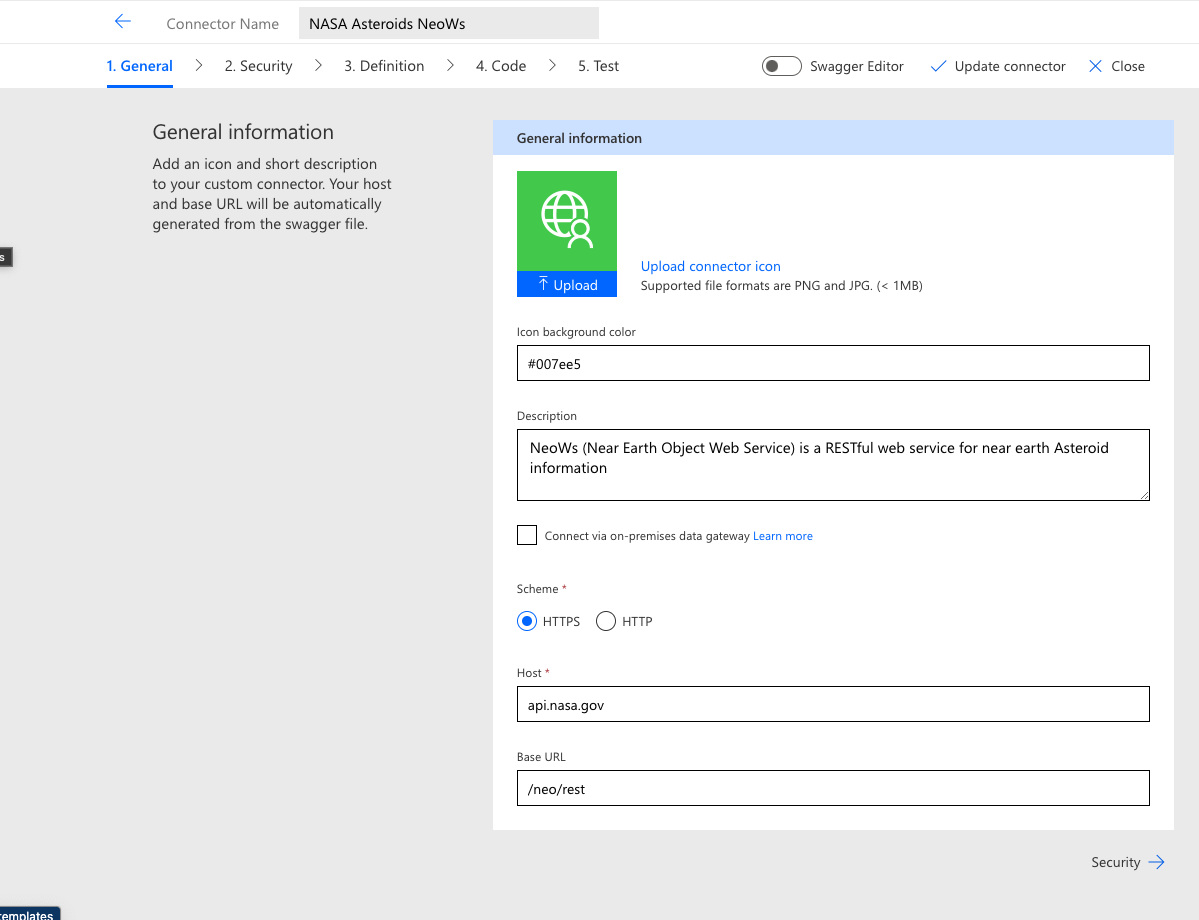
The following code snippet illustrates how data from the General information form is extrapolated into the proper sections of the definition file. The field titles differ slightly from the keys in the resulting JSON objects, but the file remains human-readable. It becomes less of a straightforward one-to-one mapping farther into the definition, but with a bit of experience these files can be easily read and understood without any type of graphical user interface.
{
"swagger": "2.0",
"info": {
"title": "NASA Asteroids NeoWs",
"description": "NeoWs (Near Earth Object Web Service) is a RESTful web service for near earth Asteroid information",
"version": "1.0"
},
"host": "api.nasa.gov",
"basePath": "/neo/rest",
"schemes": [
"https"
],
Some information on the form is missing from the definition, including the logo and on-premises data gateway setting (both of which will be covered in subsequent articles). The logo is optional and primarily exists to support the certified publishing process. It can be useful during creation and testing to visually distinguish each connector in the action gallery, especially if there are multiple connectors under development simultaneously.
There are currently two versions of the OpenAPI specification in use, which is why the previous code snippet specifies a version at the beginning. Version 2, also known as Swagger, was released into the public domain by Smartbear Software (https://smartbear.com) in 2016. The documentation for the original version is at https://swagger.io/specification/v2/. While it has since been superseded by version 3 (the latest documentation is available at https://spec.openapis.org/oas/latest.html), many systems still support only the original 2.x version, including Power Platform. The differences are mostly related to syntax, structure, and operational parameters. (In version 3.x, for example, references can be nested, whereas in version 2.x only a single level of reference callout was possible within a given object.)
It is not necessary to fully (or even partially) understand the release version differences in OpenAPI. It is important, however, to know that if an API publisher provides their documentation in version 3.x format, it will first need to be converted into version 2.x format before it can be imported into Power Platform to create a connector. (Smartbear provides an excellent conversion utility at https://editor.swagger.io.)
Security
The Security section allows the creator to specify what type of authentication to use when communicating with the target system. The API provider often dictates this. If the backend is an internal or partner system, however, then the developer can choose which authorization method to implement. There are four supported authentication types:
- No Authentication. This is the option to select if the target system is open and does not require any form of user authentication or authorization. There are many public and private APIs that are free to use and open to the public, requiring no authentication of any type, but be aware that they often implement request throttling and limits to prevent excessive utilization.
- Basic Authentication. This option is best suited for test scenarios when developing backend APIs. As it enables the sending of usernames and passwords in clear text that are easily captured and intercepted, avoid it for production scenarios. Be wary of any provider that uses this form of authentication to secure their API’s.
- API Key. The most commonly used form of API security, this option requires a private key exchange between the sender and receiver. As each key is unique to a single target system, and the user is typically in control of key generation, it reduces the potential for misuse. That does not mean the API consumer is immune from the key being hijacked and used without their knowledge, just that it is a better option than clear-text passwords. Many systems have a “copy once” policy for keys. This means that when a key is generated, there is a single opportunity to capture and store it. Once the key generation process exits, that key cannot be displayed again and a new one must be generated. Take this into account when deciding where and how to store API keys, and never share them except with highly trusted parties.
- OAuth 2.0. This the most secure option of the four choices, OAuth relies on a token exchange mechanism based on several different flow patterns. It is more difficult to configure than the other options but provides a higher degree of assurance that the connection between two parties can be trusted. If selecting this option, likely due to the requirements of the API provider, be prepared to supply information such as the Client ID, Client Secret, Authorization URL, Scope, and so on. The owner or developer of the target system should supply most of this information. The API consumer usually controls secrets, such as API keys, so there is typically a method provided to generate, store, and delete these values.
For an example of how to set up OAuth in a backend system and a connector, see the Power Automate Community blog post: https://powerusers.microsoft.com/t5/Power-Automate-Community-Blog/How-to-use-OAuth2-0-in-Power-Automate-Custom-Connector/ba-p/1260216.
Figure 4 shows the Security configuration step of the connector creation wizard and demonstrates using an API Key for authentication.

For each authentication method, the entered values once again map directly onto the underlying definition file. The Parameter label field is simply a reference pointer used within the definition and can be anything the creator desires whereas the Parameter name field is what the provider expects to receive in the request, followed by the designated value type. Many providers support both Query and header authentication parameters. In this case, which option to use is entirely up to the creator. If the documentation is unclear, a general rule of thumb is to use query parameters in GET requests and header parameters in all other request types (POST, PUT, PATCH, DELETE, etc.). The final Parameter location option determines how the specified security parameters are communicated to the target system, either as a query string argument (e.g. “?api_key=SOMEKEYVALUE”) or in the request headers.
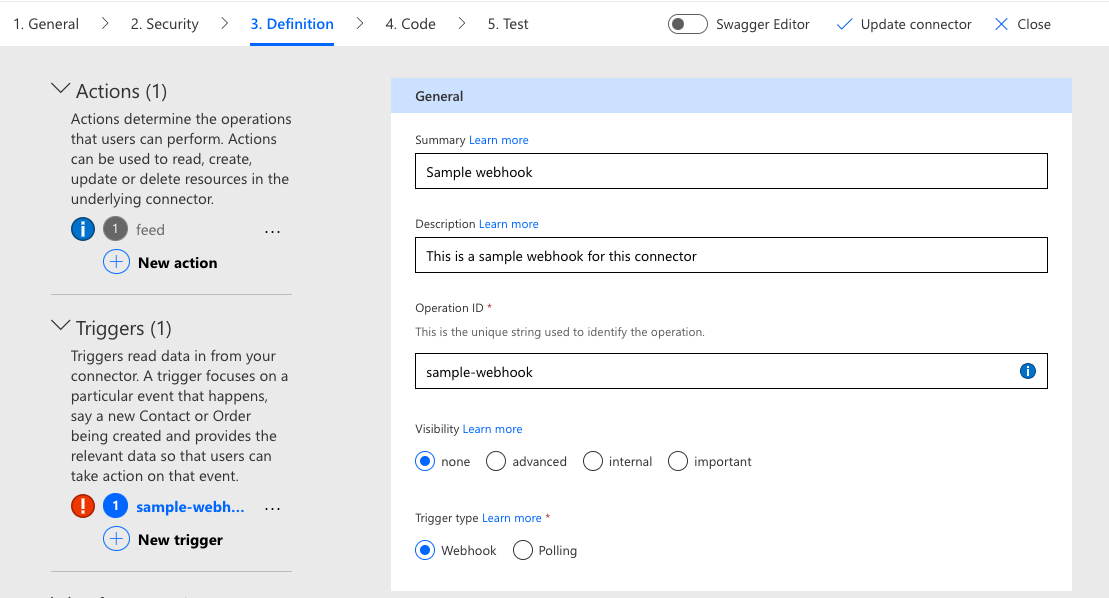
Definition
The Definition section of the wizard is where actions, triggers, and policies are defined. These constitute the actual operational elements of the connector–which endpoints are available, how they are presented to the user, how the requests and responses are formed, and how exceptions are handled. The wizard takes an example-based approach, wherein the creator provides a snippet of JSON from which the system creates a matching request object in the definition. This is sufficient for basic scenarios. The underlying assumptions, however, often lead to results that are incompatible with what the target system expects to receive. For example, a snippet that includes a number may result in a generic parameter type of number in the generated request schema, but the API requires a more specific format indicator that includes a type descriptor such as float or int64. Complex nested objects are also problematic as the wizard is not always able to create a schema that matches the example.
To address these issues, edit the underlying definition file directly to manually construct a request schema that aligns with the API specification. The example-based generator is a quick-start method best suited to simple scenarios and quick proofs of concept. As a connector becomes more complex, request and response configuration will be easier to perform by directly editing the definition file rather than using the visual elements in the wizard. This is especially true whenever advanced techniques like references are used, which reduce repetitive declarations when a definition contains multiple instances of the same object type (such as common errors and responses).
Although references are fully supported within custom connectors and will be displayed in the wizard if present in the definition, they cannot be created from the graphical user interface.

To produce the request object shown in the preceding screenshot, an example similar to the following is supplied in the Import from sample dialog:
{
“start_date” : “2023-01-01”,
“end_date” : “2023-01-02”
}
From this snippet, the wizard infers that there are two parameters named start_date and end_date and that both have a data type of string. It also provides switches for setting the required property and parameter location (path, query, header, or body). A real-time validator checks the syntax and structure of the generated snippet to ensure that they are properly constructed. The resulting request object in the definition is as follows:
“parameters”: [
{
“name”: “start_date”,
“in”: “query”,
“required”: false,
“type”: “string”
},
{
“name”: “end_date”,
“in”: “query”,
“required”: false,
“type”: “string”
}
]
The definition now contains sufficient information to make a request to the endpoint specified in the path. (Note that it combines the scheme, host, and basePath with the action path to produce a fully qualified URL.) This same approach is used to generate response parameters via provided examples. Assuming that the definition then matches what the API provider expects without any manual modifications, the connector could then move on to the Test phase; however, there are some additional options that merit further discussion before proceeding.
Triggers
Connector activities are primarily invoked as part of user-driven activities in flows and forms, but these are not the only mechanisms available to creators. There are also scenarios in which a process should commence when an event occurs in a remote system. Examples include a new record being added, a row removed from a database table, or a file being modified. Much like a flow is initiated via a trigger mechanism from an internal event within Microsoft 365, these external events can be registered as triggers.
There are two primary types of connector-driven triggers:
- Webhooks (push): An external event creates an inbound request to the flow APIs, which results in flow initiation.
- Polling (pull): Outbound requests are made from the flow subsystem to the external endpoint on a defined schedule.
The purpose of the Triggers section of the definition is to define the shape of these requests and what endpoints are associated with each action related to trigger execution. These are very similar to the action paths of the previous section in that they are API endpoints with request and response objects. However, they also include additional parameters that define how the connector framework processes them.
A webhook trigger definition, for example, must contain actions for registering, executing, and removing a hook. A polling trigger should include a method for retrieving specific data to determine if new information is available and a response that includes a retry interval establishing the polling schedule. A more in-depth exploration of triggers will be part of a subsequent article. At this stage, it is important to consider whether triggers will be part of the connector definition and, if so, which type is needed.
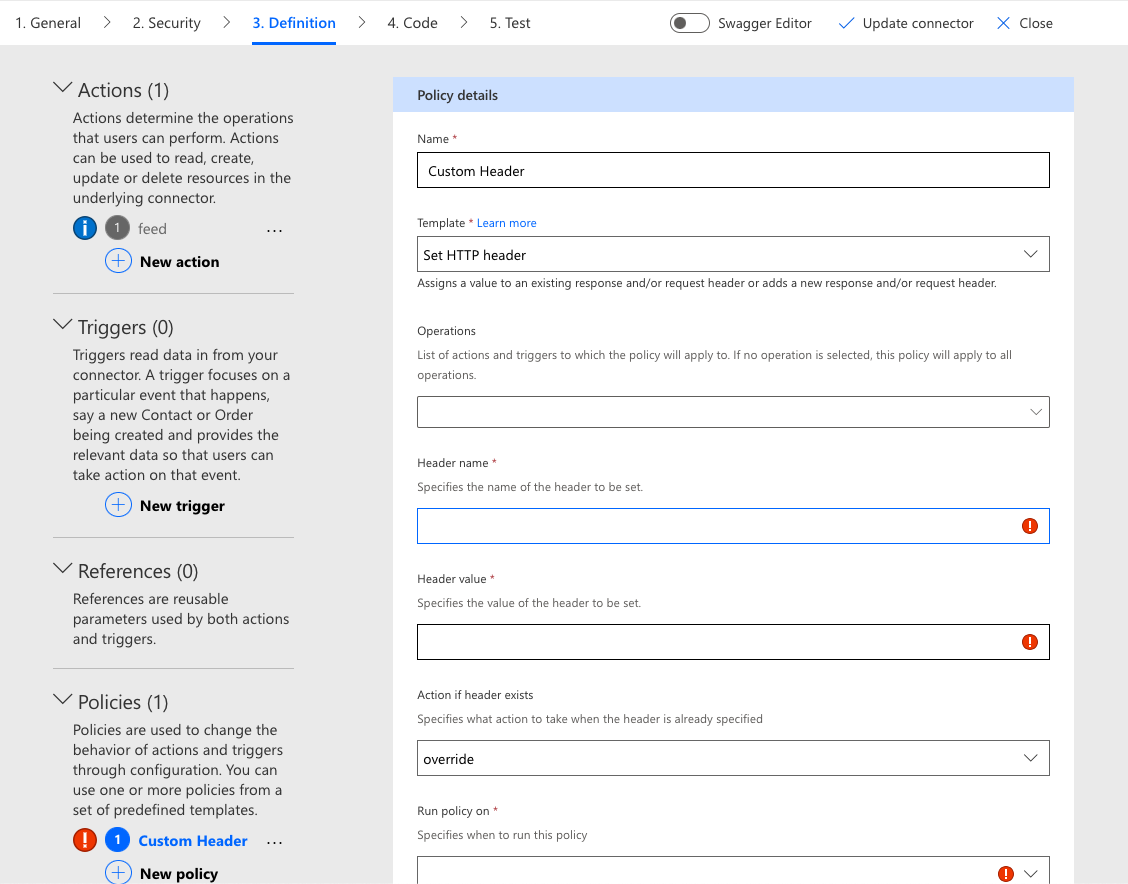
Policies
A policy is a pre- or post-processing activity that alters the connector behavior at runtime. Such activities include altering data objects, setting the base URL, changing an action path, setting a custom header, and more. They are intended to provide connector creators with additional flexibility in how a connector functions.
This can be helpful in situations where certain parts of the process are out of the creator’s control, such as an API provider changing the relative URL of an action path, a new header being introduced, or data objects being returned in a different format than what is needed. But they can also be used for other purposes, as in the example of altering the host setting to facilitate a DEVELOPMENT => TEST => PRODUCTION deployment pipeline.
The custom connector creation wizard provides a pre-defined set of templates for configuring each runtime activity. Depending upon what the policy template does, some of the configuration elements may need to process runtime information from the connection properties, such as the host URL or port number, data in the request body, like a specific parameter value, or even header key/value pairs. These are accessible via expressions that operate upon known variables or properties within a JSON object.
Some policies are global whereas others are specific to individual actions; exercise caution when performing operations with an action scope, such as data alteration. It is important to apply the policy only to those actions that match the defined activity. Otherwise, errors can be introduced that may prove difficult to troubleshoot.
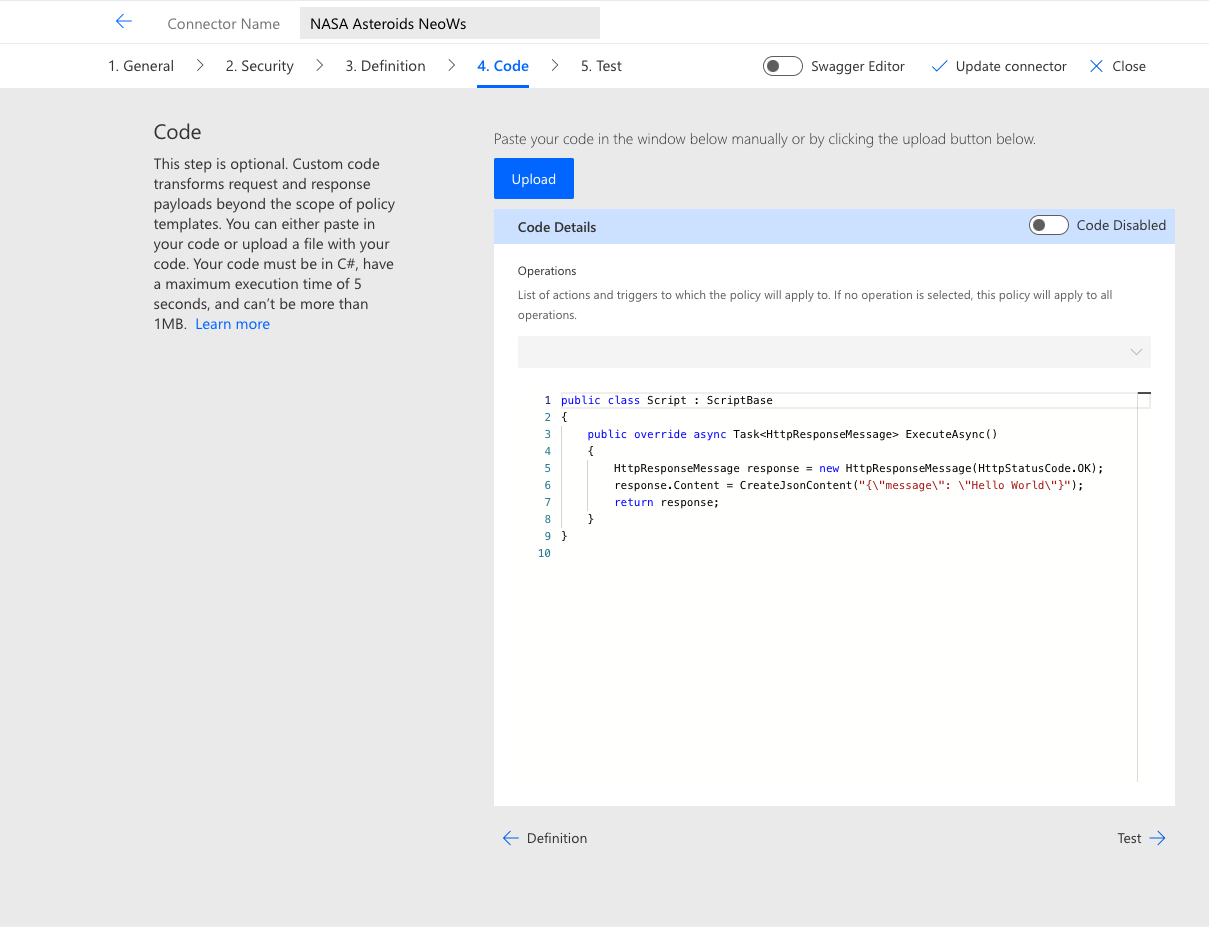
Code
Policy templates are certainly useful, but they limit creators to only what can be achieved within the defined parameters. Sometimes, a more robust solution is needed to achieve the desired results. This is where the Code step comes into play.
In this portion of the wizard, a pro code developer can create a script that executes custom functionality whenever a connector is invoked. The code is compiled and stored with the connector. Although it must conform to certain restrictions and limitations, there are many possibilities for enhancing connection functionality via this mechanism. A more detailed explanation of the Code step and what can be achieved with it will be provided in a subsequent article.
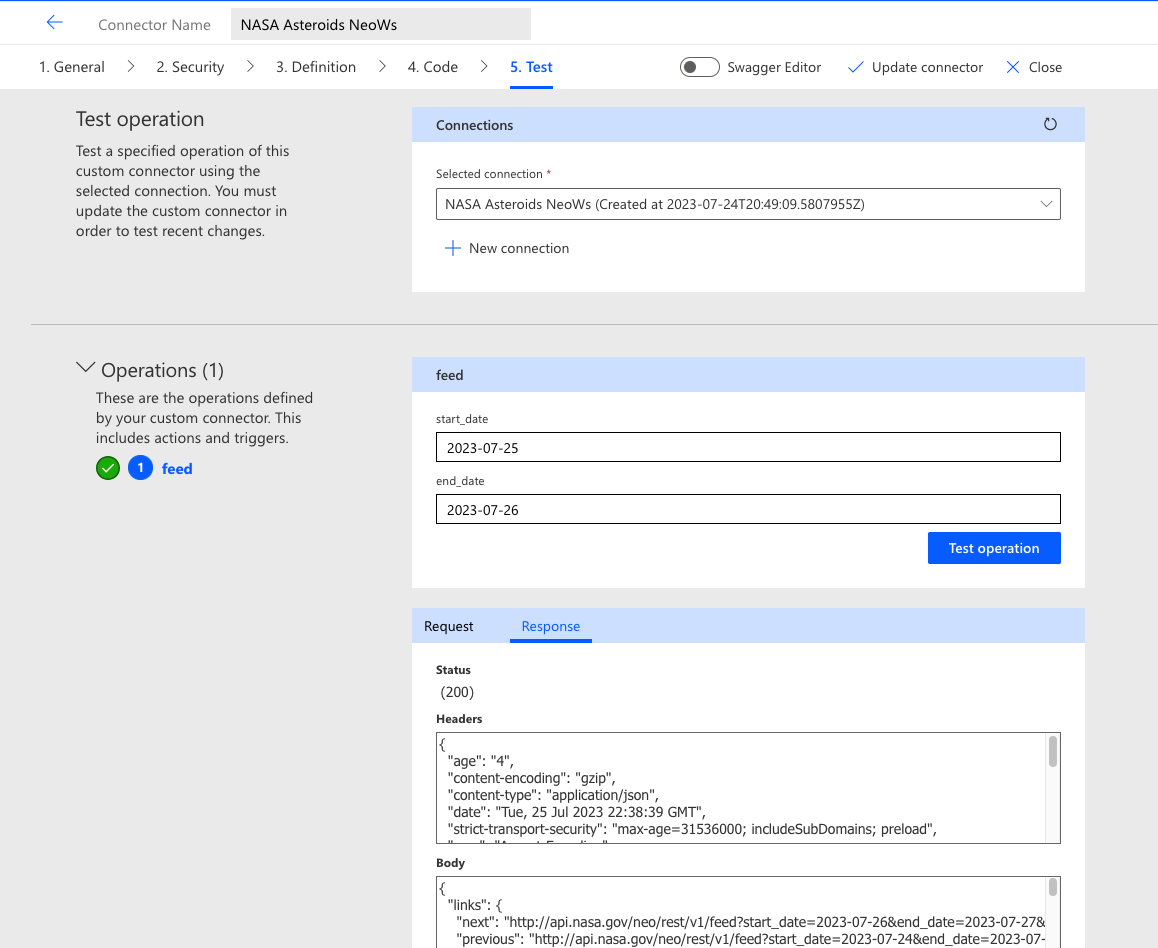
Test
Prior to deploying a connector, each operation should be thoroughly tested with a combination of valid and invalid inputs to ensure that it properly describes the remote system interaction and handles any exceptions. This is often an iterative process, with one or a small group of actions being tested in small batches before moving on to the next batch.
If the connector is sufficiently complex, basic operations should be implemented and tested first to verify that all supporting elements, including authorization, URLs and protocols, policies, and code function properly before moving on to more complicated actions. This makes it much easier to isolate fundamental problems so they can be corrected before getting deep into the minutiae of request and response troubleshooting.
The connector creation wizard contains a useful testing tool for validating operations. After creating a connection based upon the specified authentication settings, the connector creator can provide inputs for each action, execute the request, and examine the response. This utility is best suited to quick verification procedures using a small number of inputs.
It is strongly recommended to conduct robust validation using a proper test suite that contains a broader feature set to ensure that the connector is adequate for production deployment. The simple testing component in the wizard assumes that the target system has Cross-Origin Resource Sharing (CORS) enabled for handling requests from a JavaScript-based client. Systems without this feature enabled will return an error and cannot be tested from within the wizard.
Setting Up the Infrastructure
Although the preceding components technically comprise the entirety of a connector, they do not actually provide any of the functionality described by the connector actions. There must also be an API on the receiving end of the requests being made in a flow or app, which necessitates infrastructure—web servers, application servers, gateways, databases, firewalls, routers, and other elements—to deliver the expected response.
If the backend elements do not already exist and must be deployed to support a connector, then additional development resources may also be required, including source control repositories, CI/CD pipelines, analytics, logging, and other developer tooling. The connector creator might own and operate some, all, or none of these.
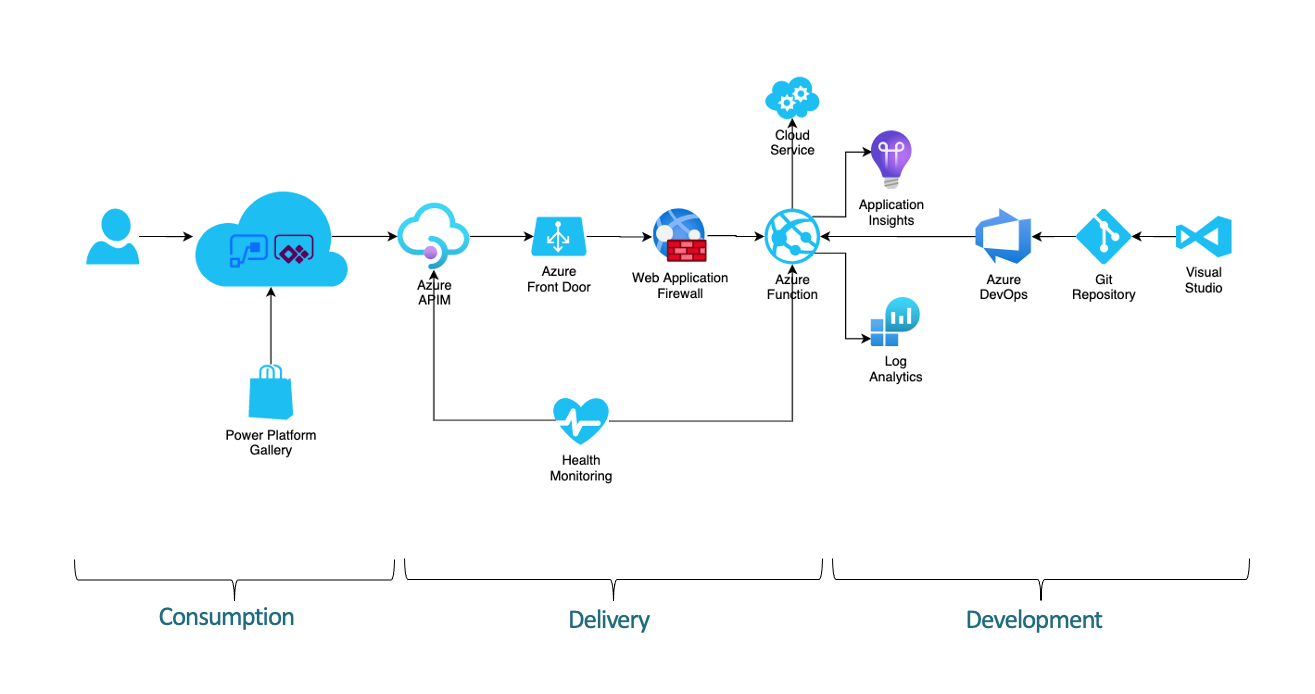
Many production API deployments use an API gateway to accept incoming requests, route them to backend resources, and deliver responses. An API gateway performs important functions, including request and response decomposition/modification/recomposition, rate limiting, throttling, authentication/authorization, caching, service orchestration, protocol translation, error handling, and more. They often include or connect to self-service portals that allow users to manage credentials, subscriptions, applications, and consumption.
Another common feature is the hosting of API documentation, test harnesses, and sandbox environments. Microsoft offers such a solution in the Azure API Management service. There is no requirement, however, that connector infrastructure run in Azure or any other Microsoft software or services. Although there are benefits to using a single-vendor solution, connector APIs can run anywhere, on any stack, provided by any vendor (or even be self-hosted).
Security is of paramount importance when exposing web-based services, so network and application firewalls are a vital part of the overall solution architecture. Most APIs function over standard HTTP ports like 80 and 443, so network firewall rules are often relatively straightforward. Application firewall rules can, and should be, much more complex, adhering (at a minimum) to the OWASP security standard. (For more information on OWASP and web application security practices, see https://owasp.org/www-project-application-security-verification-standard/.) When properly configured, these devices and services, such as Azure Front Door (which includes a web application firewall along with many other useful features), can be placed both in front of and behind API gateways for maximum flexibility and granular control over security policies.
At the core of the API infrastructure are the servers, services, databases, and other compute resources that accept incoming requests, process them, and return a response. This tier can be as simple or complex as necessary, from a single application service running serverless functions to distributed server farms with dozens of interrelated components.
They can also cross cloud platforms and geographic regions, be virtual or physical (or both), involve both modern and legacy systems, and run on any combination of programming languages and frameworks. There is no template for what a backend API services infrastructure should look like. Every implementation that meets the functional, security, performance, and operation parameters that the business sets forth is as valid as the next.
Conclusion
The Power Platform connector creation wizard provides a simple, step-by-step guide for generating a custom connector, with a graphical user interface that collects user input on general information, security, actions, triggers, policies, and code, to produce a structured definition file and related assets necessary for connector deployment. It covers most of the fundamental building blocks and even includes a testing utility for validating connector functionality.
Naturally, there are tradeoffs when using a graphical utility to produce a text-based definition and the wizard does have its limitations. Creators aren’t required to use the wizard. There are options to import directly from an already completed definition file. Also, for advanced scenarios beyond its capabilities, the wizard offers a direct text editing experience.
While advanced creators may find it too restrictive and prefer to generate definitions outside of the wizard, beginners will appreciate the ease of use and accelerated path to connector deployment, along with the built-in testing capabilities and inline validation.
In part three of this series—Power Platform Connector Building Blocks—we will explore the building blocks of an action in greater depth, construct request and response schemas, organize actions with tags, and create examples to support test cases. We will also discuss how OAuth authentication works, how it is configured, and what the ramifications are when using it for connector authentication.

Eric Shupps
Eric Shupps is the founder and CTO of Apptigent, a leading provider of cloud-based software solutions for Microsoft, Salesforce, and more. Eric has worked in the industry for more than 30 years, primarily focused on Microsoft software and services, as a consultant, administrator, architect, developer and trainer. He co-hosts the Community CloudCast, has authored numerous technology articles, and speaks at user group meetings and conferences around the world.