Power Platform Connector Advanced Capabilities

Part three of this series set aside the graphical user interface of the custom connector creation wizard in favor of a more technical approach to generating a definition. This included a comprehensive look at the various configuration elements within the definition file, complex security scenarios, and the inner workings of the various operations. This knowledge will prove useful for the more advanced topics in this article, including object references, triggers, and policies, much of which rely upon the creator’s ability to understand, construct, and troubleshoot connectors at the definition level and beyond.
For reference, the series outline is as follows:
- Introduction and Overview
- Connector Fundamentals
- Basic Building Blocks: Security, Actions, Requests, and Responses
- Advanced Capabilities: Triggers, References, and Policies (this article)
- Finishing Touches: Customization and Extensibility
- Staying In Control: Versioning and Change Management
- The Big Picture: Performance, Hosting, and Scalability
- Making It Official: Publishing, Certification, and Deployment
- Going All In: Commercialization and Monetization
- Lessons Learned: Tips, Tricks, and Advanced Techniques
References
Defining multiple request and response objects within a definition, whether using the creation wizard or directly editing the Swagger file, can quickly become a tedious task. Many such objects, especially common responses, may be identical and recur throughout the definition. Re-creating these objects, or even cutting and pasting them, is repetitive, monotonous, and difficult to maintain. A better approach would be to define an object only once, referring to it as necessary from anywhere in the definition.
This functionality is implemented in connector definitions through the Swagger $ref property. When specified, it is accompanied by a pointer to another location in the document, which describes the referenced object in detail. These pointers look and behave like same-page HTML links, starting with a hash (“#”) symbol and using forward slashes (“/”) that match the hierarchy of the definition document to indicate a specific element.
The following snippet references an error object that is declared within a definitions node of the document:
"schema": {
"$ref": "#/definitions/error"
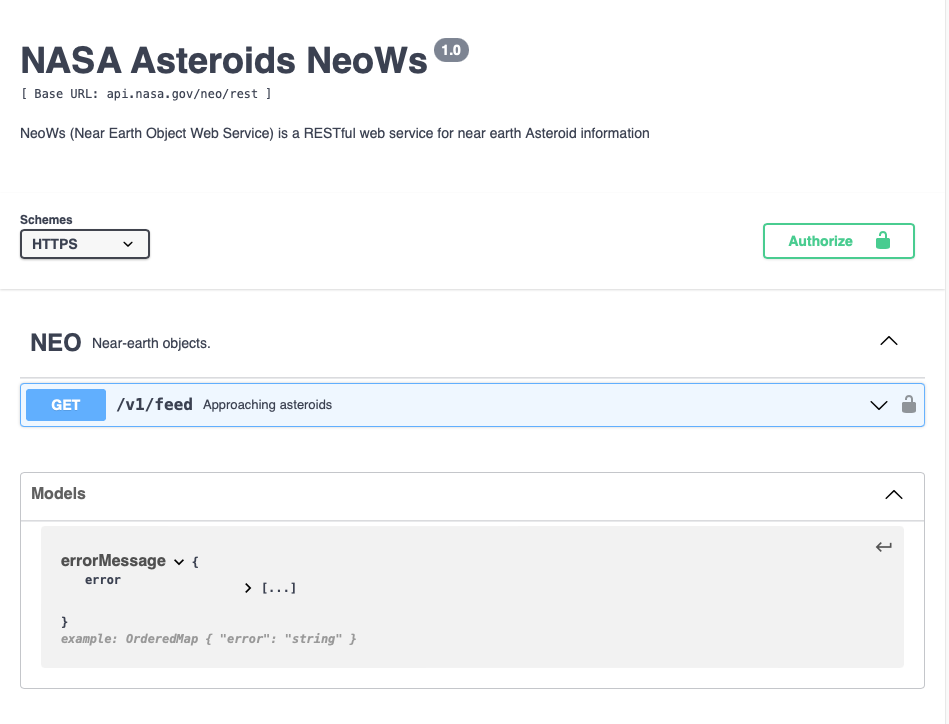
},In prior examples of the sample Asteroids connector, an error response object with a single error property was declared within the /v1/feed action and assigned to HTTP response code 400, as follows:
"400": {
   "description": "ERROR",
   "schema": {
     "type": "object",
     "properties": {
         "error": {
             "type": "string",
             "description": "Result",
             "x-ms-summary": "Result"
          }
      },
     "example": {
         "error": "string"
      }
    }
  }
It would be logical to assume that the preceding response object would be used elsewhere in the definition, possibly as the standard error output whenever a failure is encountered. Rather than re-creating the full object for each action, the definition creator could first declare an errorMessage object in a new root-level section entitled definitions:
"definitions": {
   "errorMessage": {
     "type": "object",
     "properties": {
         "error": {
             "type": "string",
             "description": "Result",
             "x-ms-summary": "Result"
          }
      },
     "example": {
         "error": "string"
      }
    }
  },
The new object could then be referenced from the /v1/feed action, and anywhere else in the document, as opposed to being re-created for the error output each time a new action is added to the definition. The errorMessage reference from the response object declaration of an action would then look like the following:
"400": {
   "description": "Error",
   "schema": {
       "$ref": "#/definitions/errorMessage"
    }
}
Making use of this capability, for both request and response objects, provides several benefits, including a reduction in manual errors, smaller definition size, greater reusability, easier maintenance, and greater portability. In fact, declaring all inputs and outputs as references is a good habit for creators to adopt, since it makes future expansion of the definition much easier. This is by no means a requirement or even a best practice, but it is a methodology many Swagger specifications have adopted, irrespective of size. It may look odd to separate all the request and response schemas in a small specification with only a handful of actions and operations, but it results in a much more maintainable implementation.
As mentioned previously, although the creation wizard supports references, it does not provide a method in the user interface for creating them, so it remains a manual task performed directly within the definition file. Once declared, reference objects appear within the Test display under the heading Models.
View Full Size
Triggers
It is sometimes necessary to start a flow based on an event that occurs outside of Power Automate, such as a record being updated in a database, an email being received, a document published, or any number of other scenarios. There are two ways in which Power Platform can “respond” to such events, either by monitoring a data source for changes (a polling trigger) or receiving a notification message about a new event directly from the remote system (a webhook).
Triggers are configured in the Definition step of the connector creation wizard. They are essentially the same as any other action, in that they are declared as a path with an operation verb, request and response objects, and an information block; however, they make extensive use of Microsoft-specific property extensions such as x-ms-trigger, x-ms-trigger-metadatda, and x-ms-trigger-hint to describe the action behavior.
A definition may contain multiple triggers targeting different endpoints and responding to different events. The connector creation wizard will automatically append the new triggers to the end of the paths section. This may not be ideal from an organization perspective if the definition is mostly managed outside of the wizard, especially if new actions are being added on a regular basis. It may be desirable to instead relocate all triggers at the end of the paths section manually; however, some creators may prefer to group triggers with related actions.
It would be helpful if there were a triggers section in the definition, much like the definitions section for references. However, such a root element would not strictly adhere to the Swagger specification structure, causing the definition to fail validation in most editors. Speaking of references, triggers are a prime example of how they can be used effectively to save time and reduce the possibility of errors. If the response format of a trigger matches that of a standard action, which is a common occurrence, using a reference in both places can make the definition easier to read and maintain. If the response format changes, then it only needs to be updated in one place without modifying the referencing actions and triggers.
It is important to bear in mind that not all web services can be used with connector triggers, even if they provide APIs that can otherwise be used as part of a connector definition. To support a polling trigger, the target service must have at least one endpoint that returns incremental data based on some fort of filter, such as a date range, starting and ending identifiers, or something similar. Likewise, not all API endpoints are suited to being used as webhooks, which require hook registration/deregistration, and callback functionality. If the API provider does not explicitly state their support for either of these mechanisms, then it is unlikely to be a good candidate for a trigger. If the documentation is vague or unclear, it may be necessary to contact the API provider for more information.
Polling
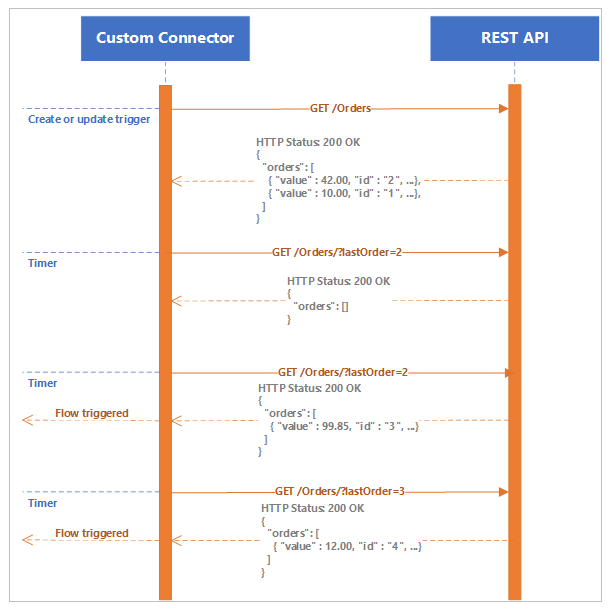
The simplest trigger type to define and implement is a polling trigger. It functions by periodically running a flow that makes a call to a remote endpoint on a schedule that the flow maker defines. Each time the trigger fires, it retrieves a new set of data, which is then available to all subsequent flow actions. Since it is quite possible that the request may result in an empty data set (there is no new data available since the previous request), flow makers should take this into account when designing their process.
Such a request will typically pass some kind of identifier or query as a parameter (or as multiple parameters) to the remote service, so it can retrieve the proper information This is dependent upon the creator specifying which field in the response object should act as the identifier. The system will then store the data from that field upon the completion of each request, using that value in the filter expression of the next request, and then repeat the process. If a response is empty, the last known good value is retained and reused until a response is provided that includes a new identifier value. (Note that the identifiers are often unique values, but they do not have to be so long as the process can handle a situation in which duplicate records may be returned in the polling response.)
At a high level, the polling trigger process resembles the following.

| https://learn.microsoft.com/en-us/training/modules/create-triggers-custom-connectors/5-polling-trigger
View Full Size
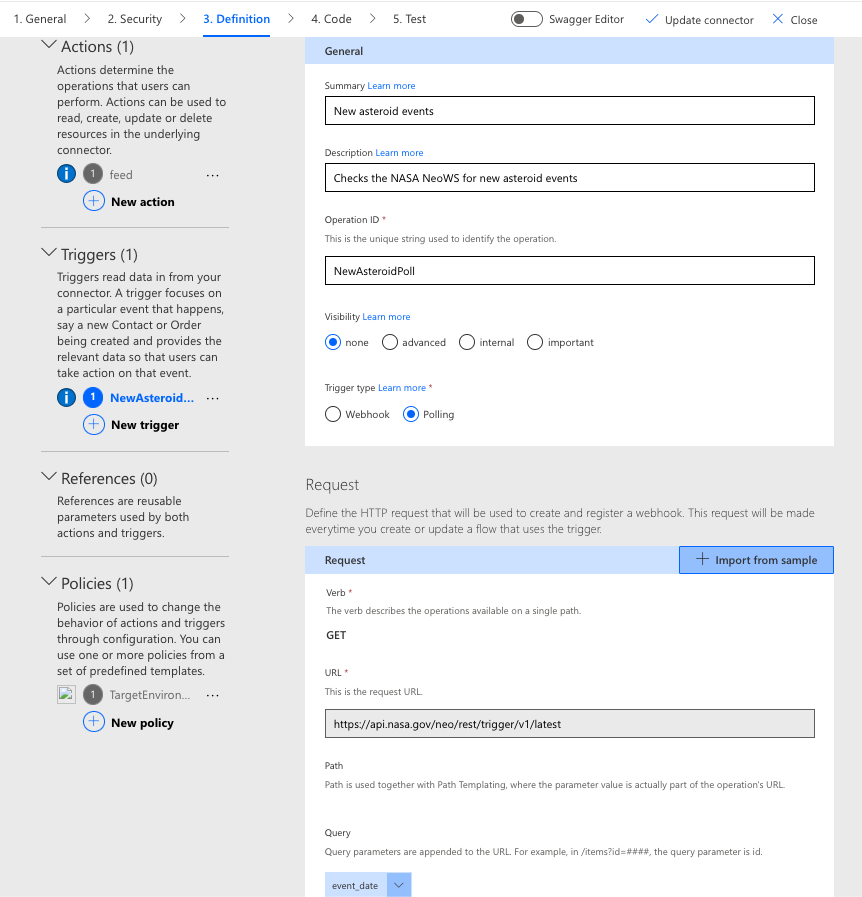
Basic triggers can be defined entirely in the connector creation wizard; however, as with any complex action, it may be necessary to enable Swagger view to edit the trigger configuration directly within the definition. The following example shows the request portion of a new polling trigger for the sample Asteroids NeoWS connector. Please note that the public API provided by NASA does not include any support for triggers – these are for sample purposes only and, unlike the live /v1/feed endpoint, will not return any data.
In this example, the response portion matches the original /v1/feed action get request, returning an array of objects with the same properties. The wizard will automatically detect an array in the response, adding it to the list of choices in the trigger data collection field. The expression in the Specify value to pass to selected query parameter field assumes that the responses are sorted in a descending manner by the specified field; if this is not the case, then a different expression may be required (the sample simply chooses the first item in the result array), the target system should specify another field to use, or additional filters may be required. This is part of the reason why not all endpoints are compatible with triggers, since they may not return data in the manner needed for the trigger to function.

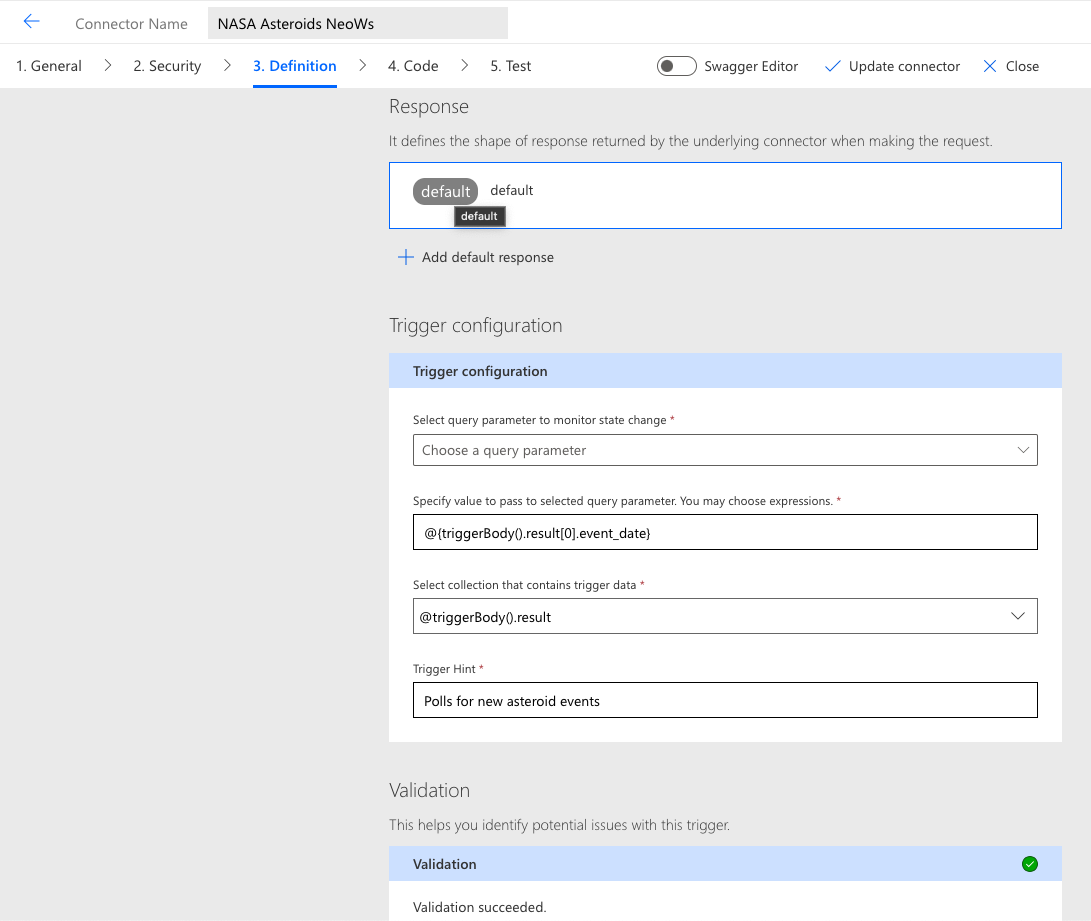
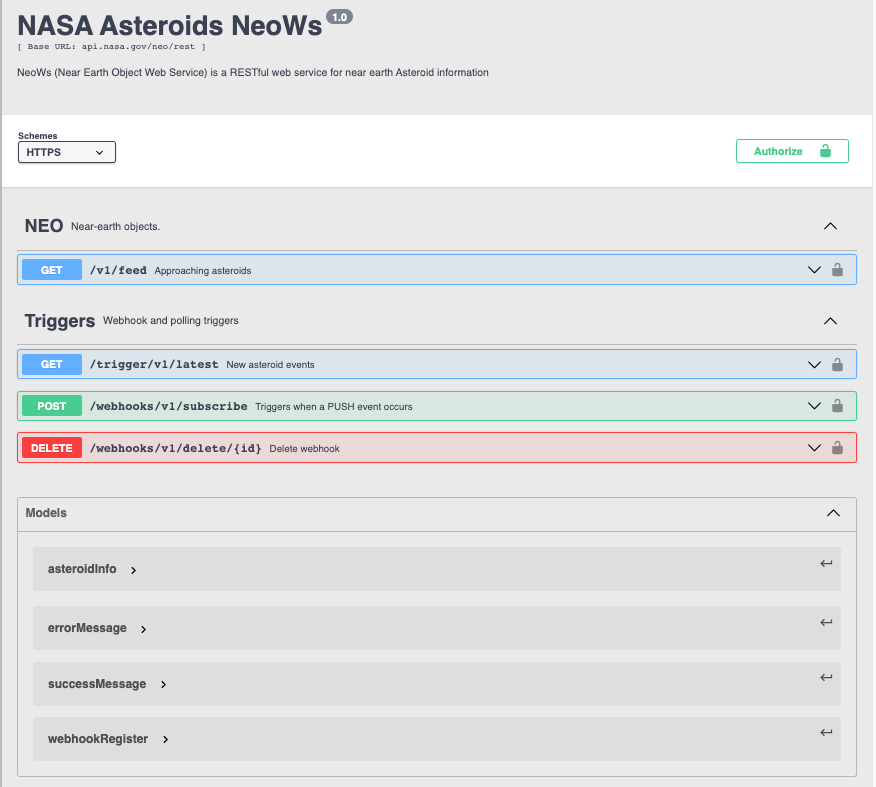
This trigger appears in the definition as a new action under the /trigger/v1/latest path (note the use of $ref in the schema node):
"/trigger/v1/latest": {
     "get": {
       "responses": {
         "default": {
           "description": "default",
           "schema": {
              "$ref": "#/definitions/asteroidInfo"
            }
          }
        },
       "x-ms-trigger": "batch",
       "x-ms-trigger-metadata": {
         "mode": "polling",
         "kind": "query"
        },
       "summary": "New asteroid events",
       "description": "Checks the NASA NeoWS for new asteroid events",
       "operationId": "NewAsteroidPoll",
       "parameters": [
          {
           "name": "event_date",
           "in": "query",
            "required": false,
           "type": "string",
           "description": "Event date",
           "x-ms-summary": "The asteroid event date"
          }
        ],
       "x-ms-trigger-hint": "Polls for new asteroid events"
      }
    }
The preceding code snippet demonstrates how the custom Microsoft extensions (x-ms-trigger, x-ms-trigger-metadata, and x-ms-trigger-hint) are used to store data from the wizard configuration fields that Power Automate/Azure Logic Apps needs to properly execute the trigger. This is a supported method for extending a Swagger document beyond the original specification, and various vendors and API providers employ it, all making use of their own x- property identifiers.
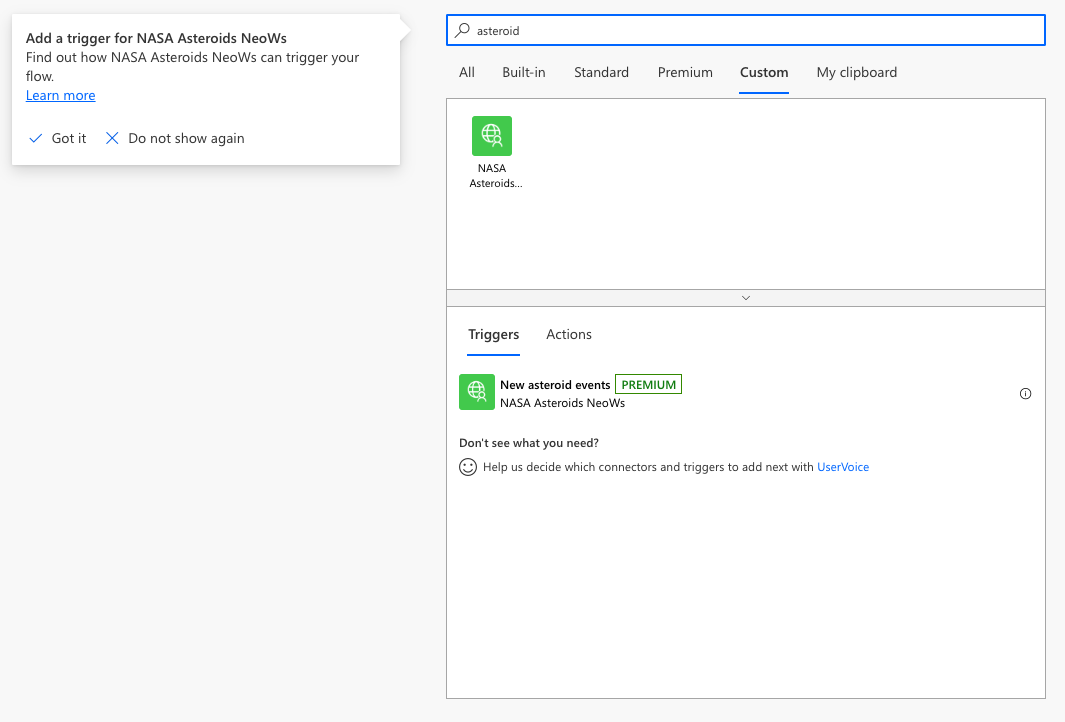
Once the trigger has been defined and the connector updated, it will appear in the Triggers tab when a creator adds a new flow start action in Power Automate.
Webhooks
Polling triggers offer a pull mechanism, in which a flow initiates the communication process, requesting data from a remote system. There is also a push mechanism, known as a webhook, in which an external system initiates communication, passing data into a flow. Webhooks are a common method that developers use for API-to-API communication, typically when small amounts of data are being transferred between two systems. They are ill-suited to large data transfers or long-running operations but ideal for signaling conversations. This is akin to one person calling another to say “Hey, your number is on my list to notify when I have new data, so here’s the information” and the recipient replying “OK, sounds good, I’ll go fetch it”.
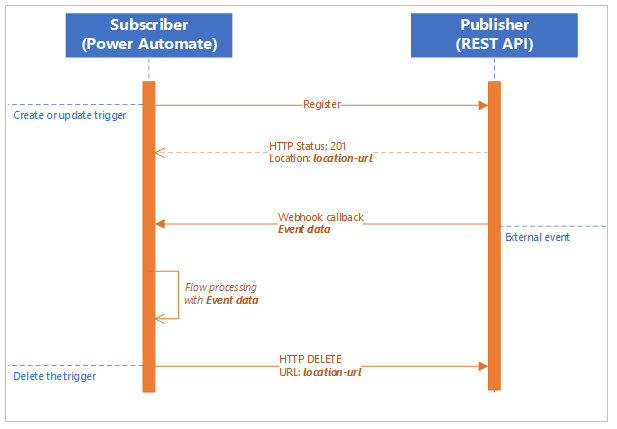
Webhooks follow a Publisher-Subscriber model. To set up a communication channel between them, the subscriber (the system that wants to be notified when new data is available) registers a new webhook instance with the publisher. When an event occurs that matches the webhook parameters, the publisher notifies all subscribers, either sending the actual data or providing information that the subscriber can use to query for it. This process continues until a webhook registration reaches a predefined end date or the subscriber submits a request to delete the webhook.
The following diagram illustrates how the Subscribe-Notify-Unsubscribe process works at a high level.

| https://learn.microsoft.com/en-us/training/modules/create-triggers-custom-connectors/2-webhook-trigger
View Full Size
The process of notifying the subscriber that new information is available is known as a callback. When the subscriber registers a new webhook instance, the registration data contains a URL that the publisher sends a request to, when the webhook is triggered. Extending the previous analogy of a telephone conversation, the subscriber calls the producer, leaves their number, and the publisher calls them back on that number with new information, hence the term “callback.”
What type of data is transferred on the callback is up to the publisher. If the data is guaranteed to be limited in scope and small in size, then it may just send the entire payload at once to avoid a subsequent return call from the subscriber. In many, if not most, cases, it could prove difficult for the publisher to ensure that the payload meets these limitations. It is far more likely that the publisher will send a small message in the callback informing the subscriber what changed, leaving it up to each message recipient to retrieve the new data or not. Although this involves at least one extra request from the subscriber (and possibly more depending on how much data is involved), it is actually a more efficient method of handling callbacks. Not all subscribers will react to the callback, so sending them all the same data could be wasteful. More importantly, however, each subscriber receives data at different rates and processes it at different speeds. If even a moderately large amount of data is involved, the subscribing system might time out or return an error. Publishers are generally not responsible for maintaining transactional integrity in callbacks, so if the call fails due to an issue on the subscriber side, then that data may be lost. A more resilient approach is to allow each subscriber to request and process the new data at their own pace.
To construct a webhook trigger, the following information must be collected from the API provider (or created if the target is an internal system that does not yet have webhook functionality):
- Authentication requirements (webhooks may require a different form of authentication than other API endpoints)
- The registration URL
- The expected structure of the registration request (verb, headers, body, query parameters, etc.)
- The structure of the registration response
- The structure of the notification request sent from the provider to Power Automate when the webhook event fires
- The deletion URL
- The expected structure of the deletion request
- The structure of the deletion response
Registration
Creating a new webhook subscription requires defining two distinct operations: the subscription request and the notification response. The former is structured like a standard operation, with the same elements that would normally be used to make a post request to a remote system; there is one notable exception: the x-ms-trigger property, which should be set to single as opposed to the batch value used in a polling trigger. This is because a subscription registration request only occurs once each time the trigger is added and returns a single response object, whereas a polling trigger occurs repeatedly and may contain multiple objects in the response.
What differs most about a subscription request is the mandatory x-ms-notification-content section. This describes the structure of the notification that will be received when the remote system calls back into the flow. The shape of this data needs to be defined so that subsequent flow actions can reference it correctly. The configuration is simple, requiring only a description for display purposes and a schema for the object structure. The publisher determines how this object should be declared and should provide sufficient documentation, likely in Swagger or OpenAPI 3.0 format, to construct the requisite schema.
The combined operations for the subscription request appear in the definition file as follows:
"/webhooks/v1/subscribe": {
     "x-ms-notification-content": {
       "description": "Details for Webhook",
       "schema": {
           "$ref": "#/definitions/asteroidInfo"
        }
      },
     "post": {
       "description": "Creates a sample webhook",
       "summary": "Triggers when a PUSH event occurs",
       "operationId": "WebhookSubscribe",
       "x-ms-trigger": "single",
       "tags" : ["Triggers"],
       "parameters": [
          {
            "name": "webhookRegister",
           "in": "body",
           "schema": {
               "$ref": "#/definitions/webhookRegister"
            },
           "description": "Register a new webhook"
          }
        ],
       "responses": {
          "201": {
           "description": "Created",
           "schema": {
               "$ref": "#/definitions/successMessage"
            }
          },
         "400": {
           "description": "Failed",
           "schema": {
                "$ref": "#/definitions/errorMessage"
            }
          }
        }
      }
    }
The definition for the body element of the subscription operation must include a field for the callback URL, which is specified by setting the x-ms-notification-url value to true. The actual value for this field will be set at runtime by Power Automate/Logic Apps when the trigger is added to a flow. It must also be a required field and the x-ms-visibility property should be set to internal (meaning that it will be hidden from the maker in the trigger configuration form), as seen in the following code snippet:
"webhookRegister": {
      "type": "object",
     "required": [
       "url"
      ],
     "properties": {
         "event": {
             "type": "string",
             "description": "Event name",
             "x-ms-summary": "Event"
          },
         "url": {
            "type": "string",
           "description": "Callback URL",
           "x-ms-visibility": "internal",
           "x-ms-summary": "Callback URL",
           "x-ms-notification-url":true
        }
      },
     "example": {
         "result": "string"
      }
    }
Strictly speaking, it is not necessary for the registration operation to include a responses section; however, adding one can prove useful for troubleshooting purposes. The biggest challenge when creating webhooks is testing to ensure they are working correctly and that both the registration response and the notification data match the expected HTTP codes and format. This can be tricky in Power Platform because the callback points to a URL that is obfuscated from the user ; there is no way to capture the output other than to run the flow and examine the raw information in the trigger action results.
A common approach that API developers and experienced connector creators take is to use a standalone tool like Postman (https://www.postman.com) for constructing sample requests and reviewing responses. Such utilities simplify the testing and validation process, making it much easier to provide test inputs, analyze errors, and ensure that a functional definition is constructed, one which includes properly documented response objects. However, API testing tools are designed for professional developers and can be frustrating for first-time users who lack a strong programming background. New creators may find it easier to start with web-based utilities like https://editor.swagger.io, which uses the same open-source API test interface as the connector creation wizard (and accepts definition files copied and pasted directly from the wizard). Once comfortable with the troubleshooting process, they can then graduate to more advanced tools like Postman.
Deletion
Every webhook must have an action to unsubscribe or delete the hook in the target system. Whenever a trigger is updated, or a flow is deleted, Power Automate or Logic Apps will call the deletion action to unregister the webhook. Be aware of this when modifying triggers, since it may result in unexpected hook removals in the provider system. Such actions often make use of the delete operation, but they can also use the more generic post operation.
The payload, in the path, query string, or body, should identify the hook to be deleted. Power Platform relies upon the producer to provide such an identifier, in the form of a URL, that is transmitted to the consumer in the Location header of the registration response (which must also return an HTTP 201 code). If either of these conditions is not met—the Location header is missing, or the provider responds with an HTTP code other than 201—then the trigger will fail.
Any variable values within the Location URL must have matching parameters declared in the delete operation. For example, if the provider sends back a Location value of https://www.example.com/webhooks/v1/delete/123456, with 123456 representing the webhook id, then the parameter path should be configured as /webhooks/v1/delete/{id} and have a matching object definition, as seen in the following snippet:
"/webhooks/v1/delete/{id}": {
     "delete": {
       "description": "Deletes a sample webhook",
       "summary": "Delete webhook",
       "operationId": "WebhookDelete",
       "tags" : ["Triggers"],
       "parameters": [
          {
           "name": "id",
           "in": "path",
           "required": true,
           "type": "string"
          }
        ],
       "responses": {
         "200": {
           "description": "",
           "schema": {
             "$ref": "#/definitions/successMessage"
            }
          },
         "400": {
           "description": "Failed",
           "schema": {
               "$ref": "#/definitions/errorMessage"
            }
          }
        }
      }
    }
With both the registration and deletion webhook operations in place, grouped together under a new Triggers tag along with the previous polling operation, the definition appears in the wizard like the following.

Policies
Policies invoke a system-level activity that takes place when a connector action is executed. They comprise a portion of the overall connector package but are not part of the underlying definition file. Instead, they are declared and stored in a separate apiProperties.json file under the section heading policyTemplateInstances. Each policy within this section is comprised of a title, templateId, and one or more parameters. Parameters follow a predefined naming convention that begins with the string x-ms-apimTemplate. (The “apim” portion of the identifier refers to the Azure API Management service, which, incidentally, can also be used to host the middleware infrastructure components of any custom connector.) Parameter values can be made up of a fixed string, an environment variable, or an expression (which may even combine the other two value types).
The connector creation wizard provides an easy-to-use graphical interface for defining policies, obfuscating the underlying declarative code in the apiProperties file. Typically, only connector publishers need to be concerned with this file, since it must be included in the open-source documentation for each certified connector. We will refer back to this file later when we explore the connector publishing process. At this stage, however, it shouldn’t be necessary to edit it directly except in a few specific use cases, since the wizard provides nearly all of the necessary configuration options for each template. Anyone wishing to view an example of how this file is constructed may peruse the Power Platform certified connectors repository on GitHub at https://github.com/microsoft/PowerPlatformConnectors.
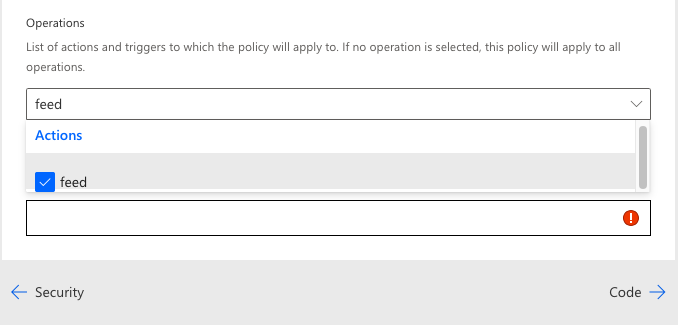
A connector may contain multiple policies and each policy can be scoped at the global or action level. The wizard provides a drop-down control that permits selection of one or more defined actions. No selections within this control indicate that the policy is applied globally to all actions. If a policy is applied at the action level, then a new action is added to the definition; the policy will need to be edited and the new action selected for inclusion.
Each action has a different configuration screen based on the number and type of required parameters. If it is unclear where the policy should be applied based solely on the type of policy template selected, a Run policy on field will be included that offers a choice of Request or Response. Each parameter setting has different input requirements, and it often is not clear what should be entered into the corresponding field of the user interface. Microsoft provides thorough documentation, including usage examples, for each template type at https://learn.microsoft.com/en-us/connectors/custom-connectors/policy-templates.
By way of example, consider a common scenario in which the host value of the definition should be replaced at runtime with a parameter indicating the type of environment the connector is targeting—development, testing, or production. The first step is determining how to pass an environment value to the policy. This could be achieved with a custom header, a connection parameter, a query string parameter, or an environment variable within a solution. Assuming the use of a connection parameter (which allows the flow maker to provide the relevant information by setting a value in the connection properties dialog box), the Url Template field would then be configured with an expression like @connectionParameters(‘TargetEnvironmentUrl’), as seen in the following example.
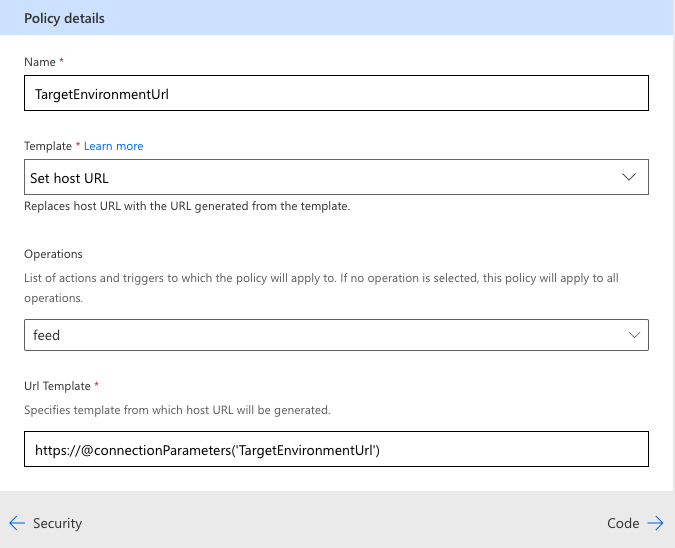
View Full Size
This configuration would result in the target URL for connection operations being overwritten by the TargetEnvironmentUrl field from the connection properties. In the apiProperties.json file, the policy implementation would look similar to the following:
"policyTemplateInstances": [
  {
   "parameters": {
     "x-ms-apimTemplate-operationName": [
       "feed"
      ],
     "x-ms-apimTemplateParameter.urlTemplate":
"@connectionParameters('TargetEnvironmentUrl')"
    },
   "templateId": "dynamicHostUrl",
   "title": "TargetEnvironmentUrl"
  }
]
Unfortunately, there is no method for adding a connection parameter within the wizard. In fact, it is not accessible in any portion of the Power Automate or Logic Apps user interface. The only way to modify connection parameters is with the paconn command-line utility. For information about downloading, installing, and using this tool, see https://learn.microsoft.com/en-us/connectors/custom-connectors/paconn-cli. Installing the supporting Python libraries is a developer-oriented task that requires an elevated level of permissions on the user’s machine; assistance from IT might be required to complete the prerequisite steps.
Once installed and authenticated to the Power Platform environment that contains the custom connector, the package files can be downloaded by running the following command from any terminal application or a PowerShell prompt:
paconn download
A choice of environments will be displayed, followed by a list of custom connectors within the selected environment. Selecting a connector will download the package files, consisting of apiDefinition.swagger.json, apiProperties.json, settings.json, and an icon image if one was specified in the creation wizard. Open the apiProperties.json file in any editor and locate the connectionParameters section. To add a connection parameter for the TargetEnvironmentUrl from the preceding example, a new JSON object would be inserted after the existing security definition objects as follows:
"connectionParameters": {
 "api_key": {
   "type": "securestring",
   "uiDefinition": {
     "constraints": {
       "required": "true"
      },
     "displayName": "API Key"
    }
  },
  "TargetEnvironmentUrl": {
   "type": "string",
   "uiDefinition": {
     "constraints": {
       "required": "false"
      },
     "description": "Target environment URL (Example: https://api.nasa.gov)",
     "displayName": "Target Environment URL",
     "tooltip": "Provide a base environment URL"
    }
  }
}
Once the file has been updated and saved, it can be updated by running the following command:
paconn update --api-prop [Path to apiProperties.json] --api-def [Path to apiDefinition.swagger.json]
Note: If the connection to Power Platform times out between operations, run the paconn login command again to re-authenticate, and then retry the update operation.
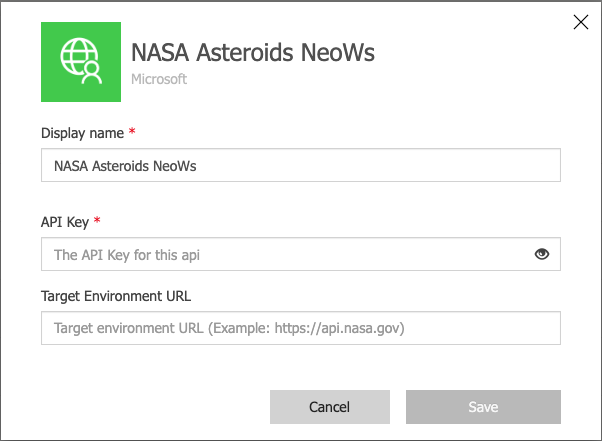
Once the connector has been updated, the connection parameter will appear when creating a new connection or editing an existing one.
View Full Size
Obviously, this method veers hard off the low code/no code path and firmly into professional developer territory. Other options for supplying configurable parameters to use in policy template expressions come with their own list of pros and cons. Query parameters can be referenced in expressions but require an additional field to be filled in for each action. Custom headers can only be set by policy or code. Environment variables require the use of solutions that will be covered in a subsequent article that introduces additional configuration, permissions, and maintenance overhead.
While much can be done within the confines of the user interface, the current tool set dictates that the more advanced techniques require deeper technical skills and know-how. Of course, these are completely optional, and it is possible to build connectors that contain a great deal of functionality without needing such skills. However, by understanding what the advanced capabilities entail, creators can better estimate the level of effort, skills, and cost involved with producing a custom connector that meets user requirements.
Conclusion
References provide a mechanism for abstracting repetitive object declarations into reusable blocks, making connector definition files easier to create and maintain. Triggers introduce a method for automatic flow initiation based either on events that occur in a remote system or the scheduled retrieval of new data. Policies provide a layer of extensibility on top of the defined actions in a connector, facilitating data manipulation, request routing, variable configuration properties, and other useful functions at runtime. Combined, these represent a comprehensive set of advanced capabilities that creators can take advantage of to enrich the functionality of their connectors and provide a more robust user experience.
Part five of this series will introduce additional customization and extensibility features, such as the ability to connect to internal data sources with the on-premises data gateway, generate object definitions on the fly using dynamic schemas, and run custom code for even greater pre- and post-processing flexibility.

Eric Shupps
Eric Shupps is the founder and CTO of Apptigent, a leading provider of cloud-based software solutions for Microsoft, Salesforce, and more. Eric has worked in the industry for more than 30 years, primarily focused on Microsoft software and services, as a consultant, administrator, architect, developer and trainer. He co-hosts the Community CloudCast, has authored numerous technology articles, and speaks at user group meetings and conferences around the world.