Don’t Miss This to Implement a Successful Governance Plan in SharePoint Online

In the ever-evolving landscape of digital workplaces, governance in Microsoft 365 stands as a cornerstone for ensuring a secure, compliant, and efficient environment. This article is for developers and administrators tasked with the critical role of implementing and managing governance within their organizations. We'll delve into how to create a comprehensive governance plan and utilize PowerShell for automation and customization. This guide aims to equip you with the knowledge and tools to effectively navigate the complexities of governance in Microsoft 365.

Understanding Governance in Microsoft 365
Definition and Importance of Governance in Microsoft 365
Governance in Microsoft 365 refers to the set of policies, roles, responsibilities, and processes that control how an organization's business divisions and IT teams work together to achieve business objectives and comply with regulatory requirements. Effective governance ensures that IT assets are used responsibly, risks are managed properly, and services are aligned with business needs.
Key Components of Governance in Microsoft 365
- Data management: Involves data retention, archiving, and disposal policies.
- User access: Managing who has access to what within the Microsoft 365 environment.
- Security: Protecting data from unauthorized access and ensuring data integrity.
- Compliance: Ensuring that the organization meets legal and regulatory requirements.
- Reporting: Monitoring usage and activities for auditing and operational purposes.
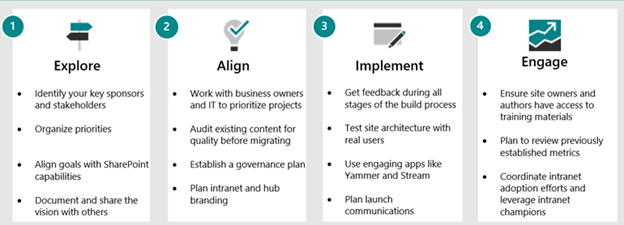
Creating a Governance Plan for Your Organization
Assessment and Planning
Start by conducting a thorough assessment of your organization's needs, considering factors like business objectives, legal requirements, and the roles of different user groups. This assessment forms the foundation for your governance plan.
Policy Development
Develop clear policies for how Microsoft 365 will be used within your organization. These policies should cover aspects such as data retention, access control, acceptable use, and security measures.
Implementation Strategy
Implementing a governance plan involves more than just setting rules; it requires buy-in from stakeholders, training for users, and a process for monitoring and enforcement. A phased approach often works best, starting with the most critical elements and gradually expanding the scope.
Tools Available to Help You Govern Your Tenant
SharePoint Online (SPO) PowerShell, PnP PowerShell, and Office 365 CLI are three powerful tools used for automating tasks in SharePoint and Microsoft 365 environments. Each tool has its unique features and use cases, making them suitable for different scenarios. Here’s a detailed comparison:
SharePoint Online PowerShell
- Purpose: Primarily used for administrative tasks in SharePoint Online.
- Installation: Install-Module -Name Microsoft.Online.SharePoint.PowerShell
- Features: Offers a wide range of cmdlets for administrative tasks like creating a site collection, user management, and tenant-level configuration.
- Limitations: Less flexibility for complex tasks and fewer cmdlets compared to PnP PowerShell.
Pattern and Practices (PnP) PowerShell
- Purpose: Extends SharePoint Online PowerShell capabilities focusing on ease of use and complex site provisioning tasks.
- Installation: Install-Module PnP.PowerShell
- Features: Provides a huge set of cmdlets that are more focused on-site provisioning, branding, and content management. It’s community-driven and regularly updated.
- Limitations: Community-driven nature of PnP PowerShell means it can be less stable than the official SPO PowerShell.
CLI for Microsoft 365
- Purpose: Designed to be cross-platform (Windows, macOS, Linux) and offer a consistent experience across different Microsoft 365 services.
- Installation: npm install -g @pnp/cli-microsoft365
- Features: Great for cross-platform scenarios and automating tasks across the entire Office 365 suite, not just SharePoint. It's useful in scenarios where PowerShell is not available or ideal.
- Limitations: Being CLI-based, it might not be as familiar to users accustomed to PowerShell.
Key Differences Between PnP PowerShell and SharePoint Online (SPO) PowerShell
- Platform availability: CLI for Microsoft 365 is cross-platform, while SPO and PnP PowerShell are primarily for Windows.
- Command style: CLI for Microsoft 365 commands are more uniform across services, whereas PowerShell cmdlets can vary significantly.
- Scope of use: SPO PowerShell is more for administrative tasks, PnP for complex SharePoint tasks, and Office 365 CLI for a broader range of Microsoft 365 services.
In summary, the choice between SPO PowerShell, PnP PowerShell, and CLI for Microsoft 365 depends on the specific requirements of the task at hand, the platform being used, and the user's familiarity with each tool. SPO PowerShell is ideal for basic administrative tasks, PnP PowerShell for advanced SharePoint operations, and CLI for Microsoft 365 for cross-platform compatibility and a broader scope of Microsoft 365 automation.
Implementing a Governance Plan for SharePoint Online
Managing and governing SharePoint Online is crucial for any organization. SharePoint administrators play a pivotal role in shaping the governance plan that guides how SharePoint Online is used within the organization. As this article continues, I’ll explore some practical PowerShell, PnP PowerShell, and CLI for Microsoft 365 snippets to automate and enforce governance policies.
How to List Site Ownership of Microsoft 365
Tracking site ownership in SharePoint Online is crucial for effective site management and governance. Here are key strategies to ensure clear and responsible site ownership:
- Assign primary and secondary owners: Always have at least two owners for each site – a primary and a backup. This ensures continuity in management even if one owner leaves the organization or is unavailable.
- Regularly update ownership information: Implement a process to regularly review and update site ownership details. This can be part of a broader site review strategy.
- Ownership documentation: Maintain clear documentation of site ownership, including contact information and roles. This documentation should be easily accessible and regularly updated.
- Automated alerts for ownership changes: Set up alerts or workflows in SharePoint to notify administrators of any changes in site ownership.
- Ownership training: Provide training for site owners on their responsibilities, including content management, user access, and compliance with organizational policies.
- Reporting tools: Use SharePoint’s reporting tools to regularly audit and report on site ownership, ensuring that all sites have active and responsible owners.

Creating reports in PowerShell can significantly assist in managing and tracking site ownership in SharePoint Online. Here are some top report types that can be scripted in PowerShell to aid in this task:
1. Site Ownership Report
Description: Lists all site collections along with their primary site owner.
Get-SPOSite | Select Url, Owner | Export-Csv -Path "SiteOwnershipReport.csv" -NoTypeInformation
2. Orphaned Sites Report
Description: Identifies sites without an active primary owner or with owners who have left the organization.
Get-SPOSite | Where-Object { -not (IsActiveUser($_.Owner)) } | Select Url, Owner |
Export-Csv -Path "OrphanedSitesReport.csv" -NoTypeInformation
3. Sites with External Sharing Report
Description: Lists sites that have external sharing enabled, along with their owners.
Get-SPOSite | Where-Object { $_.SharingCapability -ne "Disabled" } |
Select Url, Owner, SharingCapability | Export-Csv -Path "ExternalSharingReport.csv" -NoTypeInformation
4. Site Collection Administrators Report
Description: Details all site collections along with their respective administrators.
Get-SPOSite | ForEach-Object {
    $site = $_
    Get-SPOUser -Site $_.Url | Where-Object { $_.IsSiteAdmin } |
    Select @{Name="Url";Expression={$site.Url}}, LoginName
}
 | Export-Csv -Path "SiteCollectionAdminsReport.csv" -NoTypeInformation
5. Inactive Sites Report
Description: Identifies sites that have not been active for a specified period.
Get-SPOSite | Where-Object { IsSiteInactive($_.Url) } | Select Url, Owner, LastContentModifiedDate |
Export-Csv -Path "InactiveSitesReport.csv" -NoTypeInformation
These strategies provide a structured approach to managing site ownership in SharePoint Online, ensuring accountability, continuity, and alignment with organizational governance policies.
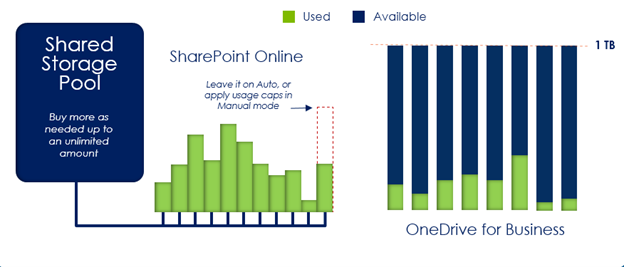
Keep Control of Storage in Microsoft 365
Storage management is fundamental in SharePoint governance. It involves not just managing the amount of data stored but also understanding how it's used and archived.
When it comes to managing SharePoint Online, a key decision is between setting storage quotas and opting for unlimited storage. Here’s a brief overview:
Setting Storage Quota Per Site
- Controlled usage: Storage quotas allow for better control of storage usage, preventing unchecked growth and potential misuse.
- Predictability in storage management: Quotas make it easier for administrators to predict and manage storage needs.
- Encourages efficient use: Imposing limits encourages users to be more mindful and efficient in their use of storage.
No Restriction of Storage Quota Per Site
- Flexibility: Unlimited storage offers flexibility, removing the need to monitor and adjust quotas regularly.
- User convenience: Users don’t need to worry about hitting storage limits, allowing them to work without interruption.
- Potential for misuse: Without limits, there’s a higher risk of storage misuse, such as retaining unnecessary or redundant files.
Balancing the benefits of controlled storage management with the flexibility of unlimited storage is crucial. The right choice depends on the organization's size, data management policies, and overall strategy for SharePoint Online usage.
How to Use PnP PowerShell Snippets to Manage Storage Limits in SharePoint Online or Microsoft 365
Here are some of the top reports you can generate using PnP PowerShell to assist in site storage control:
1. Overall Storage Usage Report
Description: This report provides an overview of total storage usage across all SharePoint sites.
Get-SPOSite | Select Url, StorageUsageCurrent | Export-Csv -Path "StorageUsageReport.csv" -NoTypeInformation
2. Site Collection Storage Quota Report
Description: Generates a report detailing the storage quota set for each site collection, which is crucial for understanding how storage limits are allocated.
Get-SPOSite | Select Url, StorageQuota, StorageQuotaWarningLevel |
Export-Csv -Path "SiteQuotaReport.csv" -NoTypeInformation
3. Large Files Report
Description: Identifies large files within SharePoint sites that might be consuming a significant portion of the storage quota.
Get-SPOSite -Limit All | Get-SPOList | Get-SPOListItem |
Where-Object {$_.FieldValues.File_x0020_Size -gt 100MB} |
Select-Object @{Name="Url";Expression={$_.FieldValues.FileRef}},
@{Name="Size (MB)";Expression={$_.FieldValues.File_x0020_Size / 1MB}},
@{Name="Version Count";Expression={$_.FieldValues._UIVersionString}} |
Export-Csv -Path "LargeFilesWithVersioningReport.csv" -NoTypeInformation
4. Unused Sites Report
Description: Finds sites that have not been used or updated for a long period, which can be candidates for archiving or deletion to free up storage.
Get-SPOSite | Where-Object {$_.LastContentModifiedDate -lt (Get-Date).AddMonths(-6)} |
Select Url, LastContentModifiedDate | Export-Csv -Path "UnusedSitesReport.csv" -NoTypeInformation
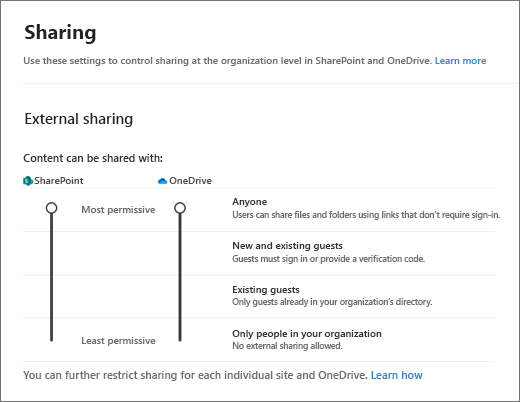
How to Enable and Disable External Sharing in Microsoft 365
Deciding between enabling external sharing for all cases versus specific cases involves balancing ease of collaboration with security and compliance.
Enable External Sharing in All the Microsoft 365 Sites / Teams
- Universal collaboration: Allows seamless sharing across all SharePoint sites, fostering an open and collaborative environment.
- Ease of use: Reduces administrative overhead in managing sharing permissions.
- Risk of data leakage: Increases the risk of sensitive information being shared inadvertently.
- Broad access control: Requires robust overarching policies to prevent unauthorized access.
Enable It for Specific Cases
- Controlled sharing: Limits external sharing to certain sites or documents, enhancing data security.
- Targeted collaboration: Focuses on specific business needs or projects where external collaboration is essential.
- Increased administration: Requires more active management of permissions and access.
- Reduced risk: Minimizes the chance of unintentional data exposure by controlling who can share externally.
Choosing the right approach depends on your organization's collaboration needs, data sensitivity, and compliance requirements.
Here's a list of top reports you can generate using SharePoint Online PowerShell for external sharing control:
1. Report of All Externally Shared Files and Folders
Description: Generates a detailed list of all files and folders shared with external users.
Get-SPOExternalSharingReport | Export-Csv -Path "ExternalSharingReport.csv"
2. List of External Users with Access to SharePoint Sites
Description: Identifies all external users who have access to any site within the SharePoint environment.
Get-SPOSite | Get-SPOExternalUser | Select DisplayName, Email | Export-Csv -Path "ExternalUsersList.csv"
3. Report on External Sharing Settings for Each Site
Description: Provides an overview of the external sharing settings configured for each site collection.
Get-SPOSite | Select Url, SharingCapability | Export-Csv -Path "SiteSharingSettings.csv"
4. Audit Log Report for External Sharing Activities
Description: Retrieves entries from the SharePoint audit log related to external sharing.
Search-UnifiedAuditLog -Operations SharingInvitationCreated, SharingSet -StartDate (Get-Date).AddDays(-30) |
Export-Csv -Path "AuditLogSharing.csv"
5. Report of Recently Shared Documents with External Users
Description: Lists documents that were recently shared with external parties.
Get-SPOUserActivityReport -Detail | Where-Object { $_.SharedWith -like '*@*' } |
Export-Csv -Path "RecentExternalShares.csv"
Using these PowerShell scripts, SharePoint administrators can effectively monitor and control external sharing, ensuring that organizational data is shared securely and in compliance with policies.
How to Provision Sites and Apply Templates in Microsoft 365
Provisioning processes and templates ensure consistency in how sites are created and configured.
SharePoint Online site provisioning and templates are pivotal in managing the creation of new sites within an organization. They ensure that new sites adhere to a uniform structure, compliance, and aesthetic, reflecting the organization's policies and branding. Site templates can include predefined lists, libraries, configurations, and design elements, providing a consistent starting point for new sites
Provisioning methods vary, and choosing the right approach depends on the organization's needs and governance policies:
Submit a Ticket or Form to IT Department
- Centralized control over site creation.
- Ensures compliance with organizational standards.
- Can be slower due to process layers.
Use a Self-Service via Custom Application
- Empowers users to create sites as needed.
- Custom applications can enforce governance policies.
- Faster creation but requires robust governance in the application.
Creation Is Open to Everyone Without Restriction
- Allows any user to create a site without restrictions.
- Promotes flexibility and quick collaboration.
- Risks include unmanaged sprawl and inconsistent governance.
Balancing control and flexibility are key in SharePoint Online site provisioning. Whether it's tightly controlled by IT, facilitated through a custom application, or open to all users, the approach must align with the organization's governance strategy and operational needs.
How to Use Templates in Microsoft 365
SharePoint Online offers several ways to create and manage site templates, each with its own advantages and considerations. The three primary methods are out-of-the-box templates, custom templates using Site Design and Site Scripts, and PnP (Patterns and Practices) templates.
Out-of-the-Box Templates
- Pros: Easy to use, require no coding, and are supported by Microsoft. For example, see SharePoint Look Book
- Cons: Limited customization options and may not meet all specific business requirements.
Custom Templates Using Site Design and Site Scripts
- Pros: More flexible than out-of-the-box templates, allowing for some degree of customization. They integrate well with the SharePoint Online modern experience.
- Cons: Require knowledge of JSON scripting, and the customization scope is still limited compared to PnP.
PnP Templates
- Pros: Offer the highest level of customization. PnP templates can be complex, incorporating detailed site configurations, custom content types, and more.
- Cons: Require a good understanding of SharePoint framework and PnP PowerShell. They are community-supported, which might be a concern for some organizations in terms of long-term viability and support.
In summary, out-of-the-box templates are best for quick, standard site setups, Site Design and Site Scripts offer a balance of customization with modern SharePoint integration, while PnP templates provide the most flexibility and control for complex and highly tailored site requirements.
PnP PowerShell Scripts
Description: Create a new site collection using an OOTB template
New-SPOSite -Url https://yourtenant.sharepoint.com/sites/YourNewSite -
Owner user@yourdomain.com -Title "Your Site Title" -Template "STS#0" -StorageQuota 1024
Description: Apply a site design to an existing site
Invoke-SPOSiteDesign -Identity https://yourtenant.sharepoint.com/sites/YourSite -SiteDesignId [SiteDesignId]
Description: Apply a PnP Provisioning Template
Apply-PnPProvisioningTemplate -Path "path/to/your/template.xml"
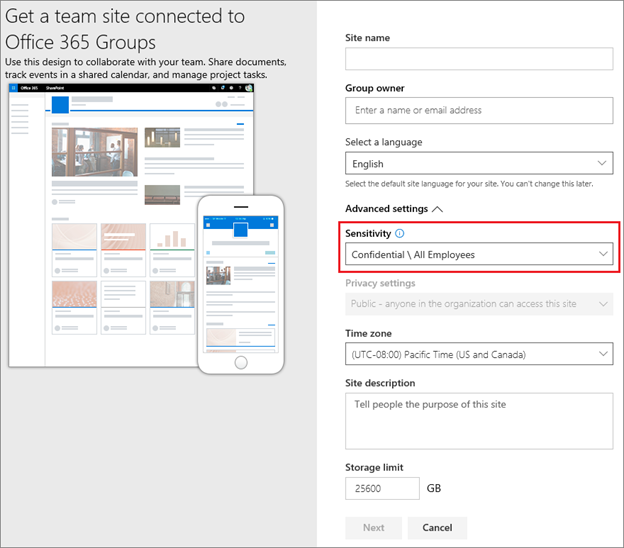
How to Apply Sensitive Labels in Microsoft 365
Sensitive labels in SharePoint Online help in classifying and protecting your organization’s data. They are a crucial feature for managing and protecting sensitive content. Here's a brief overview, including the pros and cons:
Using Sensitive Labels in SharePoint Online
Pros:
- Enhanced security: Labels provide an extra layer of security by classifying and protecting sensitive content.
- Compliance: Helps in adhering to regulatory and legal requirements by ensuring data is handled appropriately.
- Automated protection: Can automatically apply encryption and access restrictions, reducing the risk of human error.
- Content management: Makes it easier to track and manage sensitive information across the organization.
Cons:
- Complexity in implementation: Setting up and managing labels can be complex, especially in large organizations.
- User training: Requires educating users on how to correctly apply and manage labels.
- Potential overhead: Mislabeling or over labeling can lead to unnecessary restrictions, hindering workflow efficiency.
In conclusion, while sensitive labels in SharePoint Online offer significant benefits in terms of security and compliance, they require careful planning and user training to be effectively implemented and managed.
PnP PowerShell Scripts
1. Report on Sensitive Label Usage Across SharePoint Sites
Description: This report identifies which SharePoint sites have content marked with specific sensitive labels.
Get-PnPSite -Includes SensitivityLabel | Select Url, SensitivityLabel |
Export-Csv -Path "SiteSensitivityLabels.csv" -NoTypeInformation
2. List All Documents with a Specific Sensitive Label
Description: Generates a list of all documents in SharePoint that have been tagged with a particular sensitive label.
Get-PnPListItem -List "Documents" | Where {$_["SensitivityLabel"] -eq "[LabelName]" } |
Select Title, SensitivityLabel | Export-Csv -Path "DocumentsWithLabel.csv" -NoTypeInformation
3. Audit Report for Sensitive Label Changes
Description: Creates an audit report to track when and by whom sensitive labels were applied or changed.
Note: Running this script assumes that Audit Log Search has been previously set up
Search-UnifiedAuditLog -Operations LabelApplied, LabelChanged -StartDate [StartDate] -EndDate [EndDate] |
Export-Csv -Path "LabelAuditReport.csv" -NoTypeInformation
Conclusion
Governance in Microsoft 365 is an essential element for any organization looking to leverage the full potential of its digital workspace while maintaining security and compliance. This guide provides a foundation, but the journey of governance is ongoing and dynamic. Continuous learning, adaptation, and a proactive approach are key to effective governance in Microsoft 365.
References

Rubén Toribio
Rubén Toribio is a software developer with over 13 years of experience in the field, specializing in web development using Microsoft technologies such as SharePoint, .NET, and Azure. He is also Microsoft Certified: Azure Developer Associate and Microsoft Certified: SharePoint Developer, demonstrating his expertise in these areas.
Rubén has a deep understanding of SharePoint development and extensibility, building custom solutions. Throughout his career, Rubén has been involved in numerous complex projects. He is highly motivated, constantly seeking out new opportunities to learn and stay up-to-date with.
Rubén is passionate about sharing his knowledge and helping others succeed. He is an active member of the tech community, regularly participating in speaking engagements, training sessions and workshops.